Tired of ads? Me too. This page is moving to http://babywearing.dictumsapienti.com/diy/scrunchyMT.html, update your bookmarks or whatever. :)
I made this narrow adjustable-width Mei Tai for a 12 week old who does not like her legs "in". If you just want a regular MT then go check out sleepingbaby.net ;) (you should probably read those directions first, regardless.)
Disclaimer: I am not responsible for anything that may result from attempting to follow these diagrams. :)
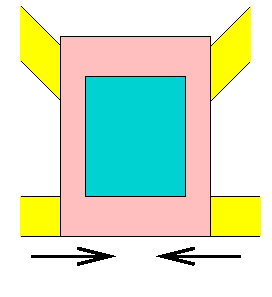
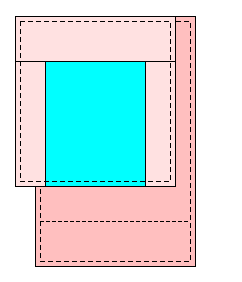
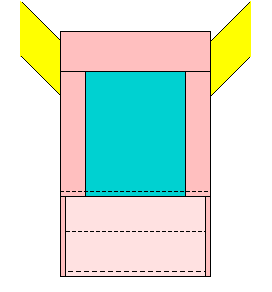
This is what the end result will look like. It is 15" wide,
20" high. The bottom strap is a single piece running through a
"sleeve" (or casing) in the body of the MT. You can make it narrower
by scrunching the sleeve fabric together.
Straps:
You will need to make 3 straps of body fabric. Cut ~8" by at least 60" for the waist strap, sew it wrong-sides together the long way, and turn it right side out, and press flat. Cut two shoulder straps ~8" by 60", do the same.
Stuff some padding into them if you like; in the shoulder straps I used 6" by 12"(?) or so of polar fleece, fold it the long way, stitch one end closed and stick a yardstick into it, then stuff the yardstick as far into the strap as you want, remove yardstick and sew the padding in place. (To figure out how far in the padding should go, pin the straps in place on the body and try it on, then mark the place you want it with a pin or whatever.)
Body pieces:
These are cut-size measurements, assuming a 1/4 inch seam allowance, and copied over from the back of the envelope that I scrawled them on. (Caveat emptor.)
One piece of fancy fabric, 10.5" wide by 12.5" high.
One large rectangle for the "inside" of the body. 15.5" wide x 25" high.
Two short rectangles for the sides of the "outside", 3" wide x 12.5" high,
and one for the top of the "outside". 15.5" wide x 4.5" high.
You could put a pocket on, if you want, but you will have to figure out an ideal placement on your own (remember there will be straps tied across the MT body and possibly getting in the way.)
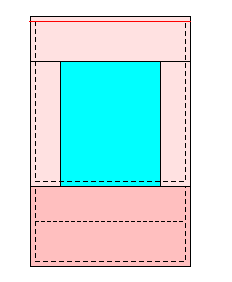
Assembly is shown in the following diagrams. The fancy fabric is shown in blue and the body fabric in pink.
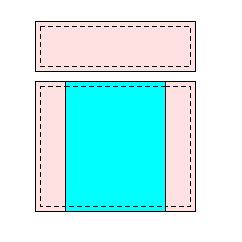
| First start by piecing together the top layer. Here are three rectangles of body fabric and one rectancle of fancy fabric, with a seam allowance all the way around. (Seam allowance is shown as dashed lines.) |

|
| Sew the middle and the two sides together. Press the seams flat. |
|
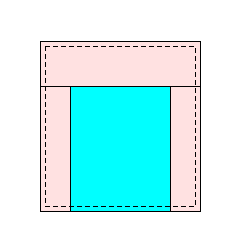
| Sew the top rectangle. Press the seams flat. |
|
| Now you will add the bottom layer. Line it up with the top layer, wrong sides together. (Shown here not lined up yet.) |
|
| Sew along the top ONLY (red line). |
|
| Turn it "right side out" for a minute to work on the strap placement. Place the straps between the layers at your preferred angle (diagram gives x-ray view of left strap, make sure you have 3" inside the MT in order to sew the reinforcement stitching later on.) Pin them to one of the layers. |
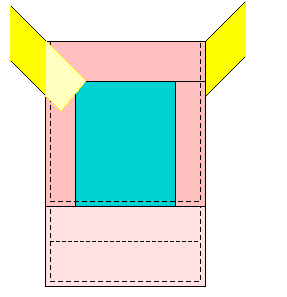
|
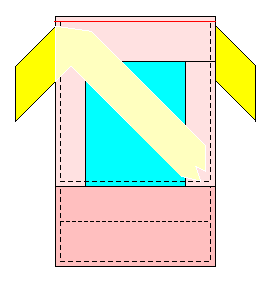
| Turn it back "inside out", stuff the long parts of the straps inside, and the short 3" ends are sticking out. (x-ray view of left strap shown.) |
|
| Sew along only the two sides of the body (through the bottom layer, the straps, and the top layer). Stop at the lower edge of the top layer. Be very careful not to sew through any extra random parts of the straps that are currently stuffed inside. |

|
|
Turn it right side out. (You now have something like a pillowcase that
has straps at two corners and some extra length at the open end.)
I have forgotten to show it, but at this point you would topstitch along the edge of the side seams and top seam; if you want some padding in the side or top edges, you can put folded strips of polar fleece inside the body before topstitching, and anchor it with the topstitching. Continue the topstitching on the sides so that you hem the edges of the bottom layer. If you are padding the sides, you probably want to pad up to half of this strap-casing area as well, but I did not so I can't render advice on the matter (except that it would have been a good idea.) |
|
|
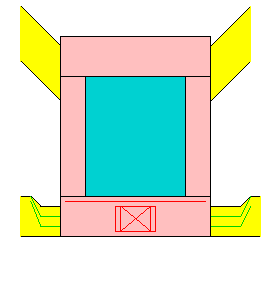
Reinforce the straps, by sewing an X in a box (shown in red)
or by sewing three rows of stitching parallel to the sides, or whatever
floats your boat, just make sure those suckers are sewn on with great
redundancy.
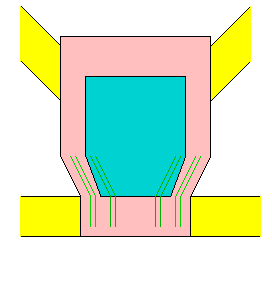
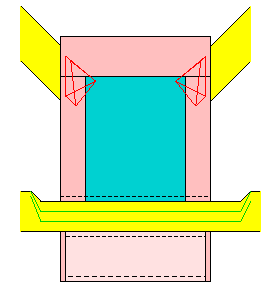
Then lay the bottom strap on the lower body as shown. Scrunch it a bit narrower to make sure you won't be sewing through it in the next step (scrunching shown as green lines.) |
|
|
Fold up 1/4" of the bottom layer (for a hem) and then fold up 4" over
the strap. Sew along your 1/4" fold, and sew again 1/4" farther down
(so your cut edge will be between these seams and not randomly
shedding threads into the strap casing.) Be careful not to sew through
the strap at this point - you are only sewing the bottom layer and
the top layer of the body.
Now you will sew the strap. Make sure the strap is centered in its casing. Sew a 4" wide X-box (shown in red) in the middle. |
|
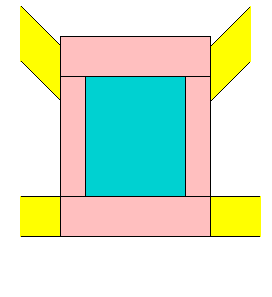
| There, all done. |
|
| Several inches of the bottom strap are not sewn to the body, so you can scrunch the body smaller like this: |
|
|
Yay. Tie it on apron-style and put someone in it, etc.
Caveat: The waist straps are straight but have a tendency to want to angle (did you ever wonder why MTs often have angled waist straps? apparently they like to be that way) and because they are not sewn to the body at the edges of the body, they can do so, up to a point... that is, the waist straps will tend to bunch themselves narrower towards what is, in these pictures, the lower end of the body. This is why having edge padding that stops right at the seam of the casing was not such a hot idea (oh well); you want the padding to continue over the seam because the child's legs may be resting on the seam area unless you're very careful with the tying and the scrunching. Padding the part of the waist strap that is in the casing but is not sewn to it, to stiffen it up more, might also help; haven't tried it. |
|