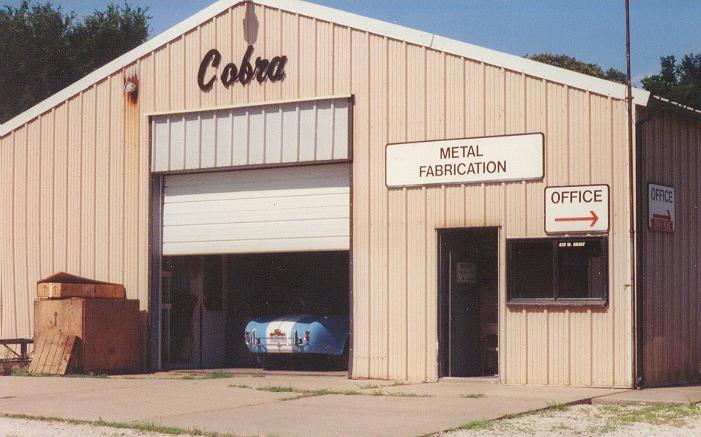
My Cobra Replica was manufactured by Midstates Classic Cars and Parts in Hooper, Nebraska. A small operation, Midstates has thrived mostly by word of mouth advertising. After visiting their place in 1996, I can see why. The quality of their car is fantastic and the service is probably one of the best in the business. Bob Kallio, the former owner and now General Manager, took the time to answer MANY of my questions before I ever became a customer. This speaks volumes as to the type of business Midstates runs. After all, I wasn't a customer (yet) and he could have just as easily spent that time with someone who had already purchased a car.
Around the same time, I was looking at other manufacturers besides Midstates. Antiques and Collectables, Classic Roadster, Unique, and Johnex were all on the list, but I think one of the deciding factors for me was that I just liked Bob. All of the others had great cars, and by all accounts, great service, but they just didn't have that family feel that I found so appealing about Midstates. I suppose the only other company that came close was Unique, who is also known for their one of the family feel.
The deal clincher was not something Bob said to me but something he did for me. In 1993 I had the misfortune of buying, or should I say, sending my money to Classic Motor Carriages (CMC) in Miami, Florida. They promptly took my money, sent me a frame, and then went out of business. I was left with a frame, misc. parts, and a hard learned lesson. I told Bob about the problems I'd had with CMC and he assured me nothing like that was going to happen if I bought from him. As a show of good faith, he took my CMC frame and used it as a credit toward one of his frames. I realize that some of you may think that's not a big deal, but when you have a frame sitting in your yard and you know that you have to BUY another frame it becomes a great incentive. Bobs frame would now cost me a mere $1000 or so, instead of the full amount he would have normally charged. The deal was made and the wheels were now in motion.
As a side note, I think Bob still has that CMC frame (sorry Bob). He was going to try and adapt one of his Cobra bodies to fit it and perhaps drum up some business by selling bodies to CMC customers who were out in the cold. I don't think it worked out though. The body just needed too much modification to fit correctly (again, sorry Bob). But, on the positive side, he did earn my business along with my respect; he's a true gentleman.
I took delivery of the car the third week of April 1997. My new girlfriend, now my wife, and I sat patiently in our Motel room until opening time. Midstates opens at 8am, but I can assure you I was up much earlier than that. I couldn't wait to see my new car. Finally it was time to go. My wife and I, along with my Dad, Mom, and Brother, piled into our van and headed the five miles to Hooper. The rest of the family came along because, well, honestly it was THEIR van and trailer, not mine. Besides, they were just as excited as I was.
Upon arriving we were greeted by a smiling Bob Kallio. Coffee in one hand and the other in his pocket, he asked if we wanted to see the new car. Of course he already new the answer to that question and I suppose that's why he was smiling.
Imagine yourself walking into a car dealership and ordering a new car. Then a few weeks later you go back to the dealership and pick it up. The salesman greets you with a smile and walks you over to your freshly polished and prepped car just gleaming in the sun. Well, this was nothing like that. Yes, it was a NEW car by definition, and yes I did spend a lot of money for it, but it certainly wasn't gleaming in the sun. Not even close. The body was a semi-shiny grey color and the frame, along with some other misc. parts, were dull, unpainted steel. Not your typical new car, but you couldn't wipe the smile off my face with all the Windex in the world. Bob, Lauri, Dad, Myron (my brother), and I all talked for a while while Mike and Chuck loaded the frame and body onto the trailer. We took pictures and toured the shop a little then said our goodbyes; it was going to be a long ride home.
The Chassis
Once home I wasted little time getting started. The first order of business was to paint the frame. I chose to use POR15 per the recommendation of a friend. It's supposed to be tougher than paint and prevent rust. My experience however is one of mixed emotion. I sprayed it on, which is okay, but I believe brushing it on would have worked better. Also, I chose the silver instead of the black. The silver does fade with sunlight as the instructions state, which makes color matching difficult. In hind site I think I would have bought black and brushed it on. This is what my friend did on his Jeep frame and his results were much more positive than mine.
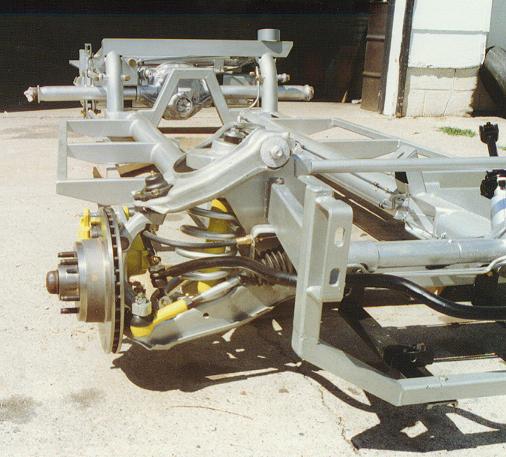
Moving along, my next goal was to get a rolling chassis together. I bought a complete Mustang II front end for $150 at a local junkyard. I sandblasted it, painted it with the POR15, and reassembled it with Poly bushings. I knew ahead of time that I was going to paint the car yellow, so I special ordered the bushings in that color. I had a hard time getting them, as yellow is not one of the more popular colors like red or blue. But, I did eventually get them. The front brakes are from ECI. They are 11" Granada Rotors with a late model GM caliper; not the top of the line like Baer brakes, but much nicer than the teeny stock 9" Mustang units. I re-used the springs, which needed to be cut down about 1 ½"to achieve the proper ride height. I actually cut them 2 ½" and later had to add back in a 1" spacer because the ride height was now to low. Future improvements include the addition of tubular control arms and coil-over shocks. The rack is the stock Mustang II unit with ¾" removed from the tie-rod arm on the driver side. One thing I didn't do that I probably should have was replace the inner tie-rod ends. They're worn but I didn't realize it until the car was already done. I may end up replacing the whole rack with a Flaming River unit or something equivalent. I kept the stock ¾" sway bar but it needed to be narrowed slightly to fit since the lower control arms aren't the same distance apart as the Mustang II. It wasn't hard, just heat it up at the bends and put a large pipe clamp on it overnight until it cools completely.
The rear suspension is a 4-link assembly, supplied by Midstates, with a Mustang GT 8.8 differential. I had the housing shortened 1 ½" on each side to accommodate the tire and wheel assemblies. Moser did that work along with supplying me the 31-spline axles. Summit Racing Equipment supplied the Auburn Posi-traction, while the 3.08:1 gears were retained. My thinking was that the torque from a big block engine should be able to turn those gears pretty good and I would still get decent gas mileage. I had a local shop set-up the differential since I wasn't really sure how. They did an excellent job. I suppose if I were to do it again I'd swap out the 3.08's for maybe a 3.27 or 3.55. The 3.08s do a good job but I think I'd like just a little more off the line acceleration. Who knows, that may be another future project.
The fuel tank is from a 1969 Camaro but has the filler neck moved from the rear to the right side for use on a Cobra. I like this setup because I can replace the sending unit by going to any local parts store. No need for any special parts here.
All of the fuel and brake lines were run over the course of about a week. This was a semi-difficult process. I needed to think ahead about what was going to be in the way and how I could replace these parts if I needed too once the body was on. Planning was probably more important than actually routing the tubing. Later, after I had the car running, I found that the 3/8" tubing I'd originally run for the fuel line was inadequate. I needed to remove it and replace it with ½" tubing. I'm glad I thought ahead, it made replacing that tubing a lot easier.
Lastly, I bought a set of Aldan Coil-over shocks from Midstates to complete the rear suspension. They're really nice units and come with your choice of spring rate. I chose a 300lb rate.
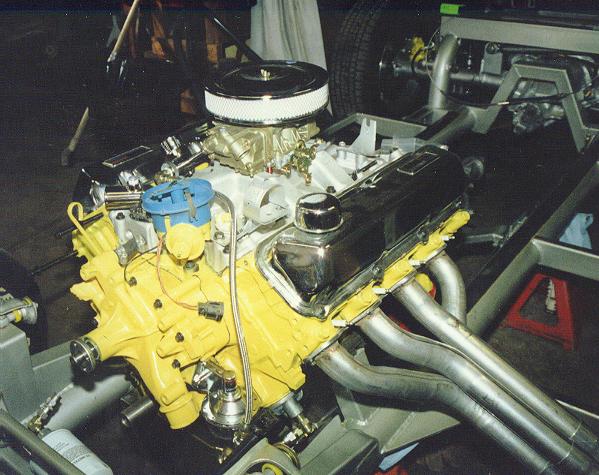
The engine is a 460 that I bought from a local junkyard for $300. It ran fine as it was, but I figured it could use some "freshening up", so to speak. I began by tearing down the engine and sending it out for a good cleaning and bore job. Upon return, it displaced 466 cubic inches and was ready for it's rebuild. I went to Summit for almost all of the engine parts but Jegs and PAW did supply some. The stock, dished pistons were replaced with Keith Black flat top pistons to bump the compression up to 9.8:1. This was a good compromise since I wanted higher performance but I didn't want to run racing fuel; premium works just fine. The camshaft, valve springs, timing chain, carburetor, oil pan, intake manifold, and water pump were all replaced with new parts. Essentially, every part that could be replaced was. The only exception to that would be the heads, crank, and rods. I retained the stock heads but had them cleaned up and a three-angle valve job done.
Since completing the engine there's only a couple major changes I'd like to make. The first thing I'd like is a better manifold. The Edelbrock Performer is a good manifold but it stops working around 4,800 rpm's, slightly lower than the 6,000-rpm limit I'd prefer. A better choice, I think, would be the Weiand Stealth or Edelbrock Performer RPM. The Summit cam I bought would actually work better with one of these other intakes anyway. The second thing is, I'd like to replace the stock heads with aluminum heads from Edelbrock, Ford MotorSport., or BlueThunder. Besides the weight advantage, I'm sure there would be a notable power increase.
The headers and sidepipes were made by Midstates and coated by Jet Hot coatings. They're both really well made and the coating is extremely durable.
Heres an interesting thing I did with the valve covers. I bought a cheap set of chrome covers from PAW and also a set of 460 Powered by Ford side emblems from Finishline. I then cut the studs of the emblems and glued them to the valve covers with a high temperature adhesive. They're not quite pentroof valve covers but not nearly as expensive either.
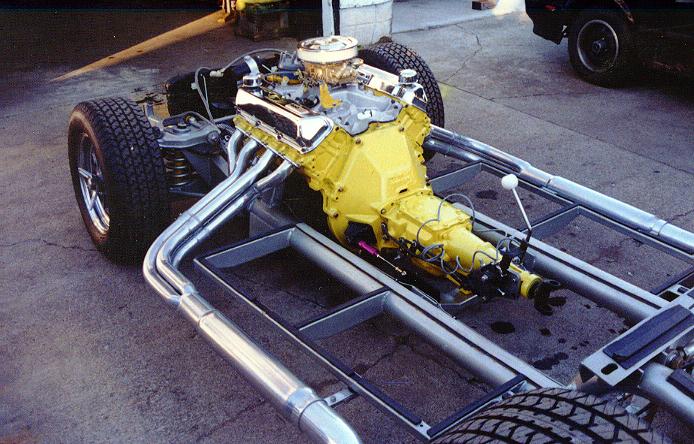
The transmission is a Ford Toploader 4-speed. Again, I went to the local junkyard to find this item. They can be a little hard to come by so as you can imagine the shop owner wasn't going to give it away. It cost me $350 with bell housing. I bought a Hurst Competition Plus shifter for the transmission as well as a slave cylinder from Shell Valley. The transmission was in excellent shape and needed little to be ready for duty. All of the gears where in perfect shape so I simply replaced the seals, put in the clutch, and put it behind the engine.
I started out with the stock Ford ignition system but quickly realized that it was inadequate for the job. It was later replaced by a Holley Annihilator system supplied by my brother-in-law who works for Holley. The new system works head-n-shoulders above the Ford unit. I would highly recommend the Holley system. In my opinion it's better than the MSD products for reliability as well as functionality. I'll give you an example: The rev limiter on the Holley is controlled by to Potentiometer switches allowing for finer tuning of the rev limit. The MSD ignition requires you to replace a chip with preprogrammed rev limit on it. Do you see the disadvantage here? Yes, they're easy to replace, but you have to BUY a new chip whenever you want to change the limit. Okay, yes, that's trivial and I'm bias since my brother-in-law works for Holley, but hey, it's my web page, I can be that way. But really, the Holley is a nice product and you won't be disappointed if you buy it.
Finishing off the rolling chassis are the wheels and tires. The tires are 295-50-15 rear and 235-60-15 front. They're mounted on Dynamic Motorsport Halibrand knock-off replica wheels. These wheels are unique in the fact that they come in either aluminum or steel (mine are steel) and the center is a fiberglass cap that covers the lug nuts. The spinner holds the center cap tight against the wheel. The beauty of these wheels is that you can order separate center caps and have them painted different colors. The center caps on mine are painted yellow to match the body. The cost was $850 for a set of four. That's a bargain compared to other replica wheels that are anywhere from $1500 to $3500. Sadly, I don't think they make these wheels anymore. Dynamic was having problems with suppliers and were unable to continue production. It really is a shame because they look great, and cost peanuts. I told Bob Kallio about them and he bought a set for one of his Cobras. As far as I know he was quite happy with them.
Here's a picture of the completed frame just before the body went on.
The Body
Getting the body on the frame is where it starts to be a little more fun. That's in no small part due to the fact that it starts to actually look more like a car. It seems like getting to the point of working on the body wouldn't take long, but be assured, it's a long process getting the rolling chassis together. It actually took longer to do that than it did the body. If you build a Cobra, take your time on the chassis; you'll have fewer headaches in the future. There are always bugs to work out, but you want them to be as minor as possible. So, take your time and do it right. Okay, off my soapbox.
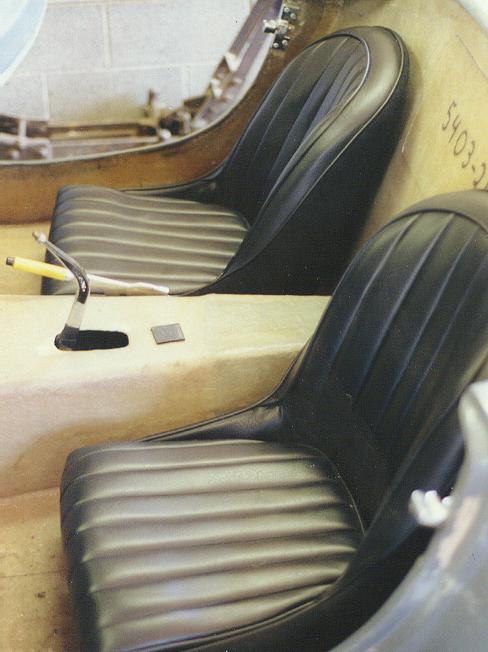
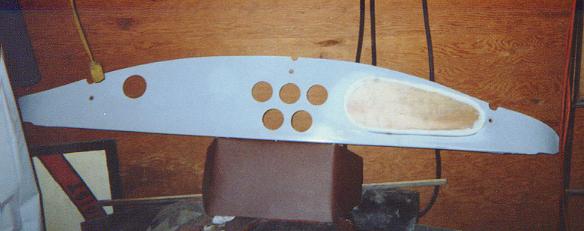
I began by upholstering the dashboard supplied by Midstates. Bob sent me some vinyl, but leather was also available. Since my seats were vinyl, the choice here was obvious. The first thing I did was cut all of the holes for the gauges, steering column, switches, and indicator lights. I also filled in the glove box recess with a piece of ¾" plywood since I wasn't going to use it. A thin layer of padding was applied to the dash first, and then the vinyl covered that. The VDO Series I gauges, supplied by ShellValley, were then installed; so were the indicator lights and a shifter boot that I modified to go around the steering column. Th e dash was now ready to go in the car. After I installed the dash I found a problem that I didn't see before. The defroster vents that Bob sold me were designed in such a way that the hose exited the bottom of the vent. This caused interference between the hoses and my gauges. I returned the vents to Bob and began to think of a different solution. What I came up with is a bit unusual but it seems to be working. I took a vacuum crevis tool and plugged the end with high temp. RTV. I then cut slots and holes in the thin edges that would mate up to the chrome bezels on the outside of the body. With this solution, the hoses now exit from the sides of the vents leaving more room under the dash for other things. It may seem strange, but it works.
Installation of most of the major body parts was relatively easy. The window, gas cap, lights, mirror, and bumper uprights were all installed in one day. The roll bar took longer because Bob only cuts a rough opening for the bar to fit in. It's up to the customer to adjust these holes to get a perfect fit. I had to work slowly and trial fit several times so as not to over cut the holes. Remember this rule, measure twice, and cut once? Well, that's important here otherwise the rubber grommets won't fit right.
The emergency brake handle is from a John Deere combine. I chose it because it was small, only cost $5.00, and was very adjustable. It's not going to win any prizes for authenticity, but I don't really care, it serves its purpose and didn't break the bank. (No pun intended). A friend of mine, the same friend who suggested the POR15, was the guy who told me about using a combine brake. It seems he used one in his Jeep with good results and so did his brother. I figured for $5.00 why not give it a try. It even came with the rubber boot, which I used on the shifter instead. Since the e-brake handle was mounted on the side of the transmission tunnel, my wife simply fashioned a cover out of the left over dashboard material.
Some other notable items are the horn, which can be purchased cheaply at any local auto parts store, the windshield washer solvent "bag", which I purchased from JCWhitney Co., and the washer spray nozzles, which came from a bread delivery van. The spray nozzles work great and I'd recommend them to anyone. Not only are they chrome, so as to look good, but also adjustable from side-to-side as well as up-and-down. And, for the measly sum of $1.00 each (your price may vary), how could I complain about the cost.
Friends and co-workers made several parts on my Cobra for me. Sometimes you need a special part made and having this type of access is very handy. I work in a manufacturing plant so things like steel, rubber, and fasteners are readily available to me at a very low cost. If you're considering buying a Cobra Replica, don't forget about the small things. Parts like nuts and bolts add up quickly. And if you need a custom part made, it can be expensive, unless you have someone that can do it for you. Some of the parts I had made, or bought from work, include: stainless steel shifter handle, stainless steel radiator shroud, stainless steel braided hose and hose ends, bolts, nuts, clamps, electrical fasteners, heat shrink, rubber, raw steel, and various other things. They all add up and I can say with all honesty that I'm glad I had a lot of these things available to me. I can't imagine how much this stuff would cost to buy from other sources.
The wiring harness I bought was from Centech. It's a good overall wiring kit with the wires well-labeled, and crimped ends covered in heat shrink. The instructions were actually pretty good; I think I might have called them just two or three times for some help. I had a switch go bad, whether or not it was my fault we couldn't determine, so they told me to simply return it and they'd send me a new one. So, I'd give them an A for customer support.
Wiring is a long and tedious process. I'd say I spent the better part of two weeks completely wiring the car. I took great care to loom all the wires and route them in such a way as to protect them as well as make them accessible. Again, this is where planning comes in. You need a clear plan of attack in your head before you begin. Make sure you have enough wire to route it the way you want it. There's nothing worse than coming up two inches too short somewhere and having to splice in a piece of wire to make a connection. So if you're wiring, plan carefully.
As for my wiring, I was pleasantly surprised to find very few problems when I was finished. I attribute that to just taking my time and thinking things through. I'll be honest, the part I was dreading the most was the wiring. I'm sure I'm not alone here, but if you follow the schematics, and take your time you'll do just fine.
Firing it up
Probably the single most exciting day of my life, outside of my wedding and my children's birth, is the day I first heard my Cobra come to life. For nearly two years that 460 sat idle in the frame. I didn't even know if it would run or not. Occasionally I'd roll the engine over just to make sure everything was still freed up, but nothing could control my excitement on that first day.
I remember it well. My Dad, Brother-in-law, and myself were in the garage making sure everything was wired and plumbed correctly. We poured a little fuel down the carburetor and pumped it a few times just to make sure we had the float bowls full. We checked for spark and roughly set the timing. Everything looked okay so we began to crank, and we cranked, and we cranked. Finally, a POP, then another. We tweaked the timing a little more. POP, POP, POP a few more times, tweak the timing a little more. Then, with a glorious roar, it came to life; belching smoke from the sidepipes like an old factory. It rumbled roughly and started to stall, but with a few quick jabs of the throttle, it cleared out and began to sing sweetly. It sounded so good that words here cannot describe. I spent many nights in that garage and busted open many knuckles. I broke tools and even threw a few. But none of that mattered at that very moment. Everything I'd worked for, for so long, was now a reality. I had a complete running Cobra Replica. Sure, there was still plenty to do, but for me, that day in the garage was the pinnacle of the build. When I started out many Cobra owners told me to enjoy the build because it was one of the best parts of owning the car. I didn't believe them; I considered the build as a means to an end. But they were right; it is one of the most gratifying things you could ever do.
First Drive
My first drive was during the second week of January 1999. It was cold, and snowy but I didn't care much. Just one week prior I'd heard that engine come to life and I wanted to drive it so badly I didn't care if it was only 10 degrees outside.
I hit a whopping top speed of 10mph as I drove around the cul-de-sac; I didn't want to get slush and snow all over my new car you know. It was loud, rumbley, and I loved every second of it. I'm pretty sure the neighbors didn't care for it but at the time I really didn't care what they thought. I was in seventh heaven and nobody was gonna bring me down.
My drive lasted maybe all of five minutes, just enough to drive it around the block a couple times. It was really cold out and in spite of how much I wanted to go around a few more times, my wife, who was along for the ride, wanted nothing more to do with it. Yeh, it was fun and all, but she was too cold to stay out any longer. She's such a wimp, I should have known better than to take her. (Just kidding honey). But seriously, it was a great feeling to be able to finally drive the car I'd been working on for nearly two years.
Paint and Body
A long time ago I decided that my Cobra was going to be yellow. After all, every cool car I'd ever owned was yellow. There were only two cars really, a 1966 Fairlane and a 1977 Cutlass Supreme, but they were both cool and both yellow. So, in keeping with tradition, the Cobra had to be some shade of yellow. The problem was WHAT shade. Well, as fate would have it, it just kind of presented itself. My wife and I were at the Ford Dealership looking at an Escort, when this Mustang on the corner of the lot caught my eye. As I approached it, I knew right away that THAT was the color yellow I wanted on my Cobra. It was Mustang Chrome Yellow and it was awesome. I'd looked through pages of paint chip books and dozens of magazines, but nothing really hit me as "that's it, that's the color", until I seen that Mustang. The color was really bright and rich and I knew if it looked that good on that Mustang it'd surely look better on a Cobra!
After I picked the color it was time to decide on a body shop. Now I'll admit right here that I didn't take the time to talk with different shop owners or examine their work. I broke a cardinal rule about buying any product, one I certainly should have remembered from my dealings with CMC, I didn't shop around. I went to a friend of the family who had his own shop, and had done work for my parents before. He quoted me a price that sounded reasonable, $2500. Well, I learned a valuable lesson (again), SHOP AROUND. I can't say that enough. The family friend, Kevin, had done a pretty good job, but good is all I can give him credit for. He promised fantastic, but didn't deliver that. Don't get me wrong, the paint job is better than on most factory cars, but this car is much more noticeable than most factory cars. People like to get up close and check out every detail, that's where Kevin let me down.
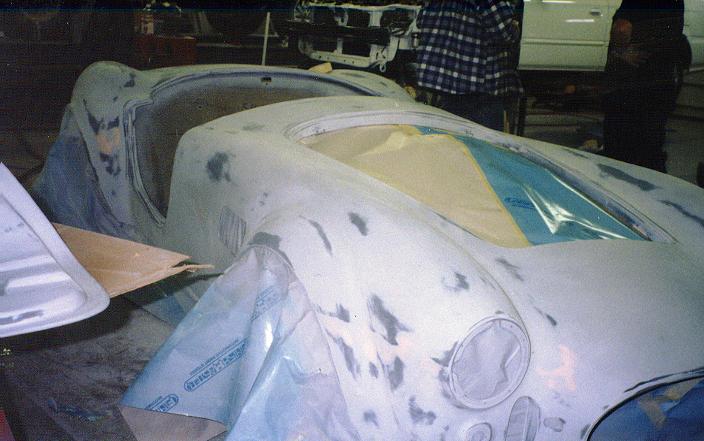
Here's a picture of the body work in progress.
Upon close inspection I found two small dots of black paint in the yellow. They obviously came from the stripes somehow. He mixed up all of the hinges, and although he claims to have gotten them back in order, I know he didn't. I know, because the deck lid doesn't sit flush with the body in one corner; it did before it was painted. Also, there are a few spots were the paint is thin. In the right light, you can almost see through it. There are several other things wrong and I don't want this to be a page about bashing someone else, so I'll just stop here. The problems I had with my paint job are just as much my fault as his. I didn't do my homework, and I paid the price. Again, SHOP AROUND.
My car has won several trophies at local car shows so I don't want you to think the paint is really sucky, it's not; it just didn't meet my expectations. I gladly would have paid more to have my expectations met, that's all.
Here's a picture of it after it's second car show.
Final Thoughts
Okay, I realize that was a pretty long story, but a lot of stuff happens in two years. I tried to keep it as short as possible, so if you're reading this you must not have fallen asleep.
My Cobra build was fun, and although there were some rough times, the reward in the end was well worth it. A project like this never seems to really be done. Even now there are things I need to fix or change. It's all just part of the fun of owning a Cobra.
As a final note, I forgot to mention earlier that after nearly four years, the company that took over the now defunct CMC, Street Beasts, sent me the rest of the Cobra kit CMC owed me. I applaud them for taking care of the past customers before taking on new ones.
I ended up selling that Cobra body to a fella in Flint. He built it up and enjoyed it for several months before it burnt to the ground. It was the unfortunate victim of an electrical fire. Sure glad I got a fire extinguisher!
Thanks for reading.
Dave
![]()