Color Darkroom
by Jerry Sparrow
I have noticed there is a lack of information in print with regard to color darkroom work.
Having been a professional for over twenty years I was not entirely surprised. In this article I am going to try and deal with some of the reasons these materials are so
uncommon. I will also describe some of the basic color darkroom theory, techniques and equipment.
The lack of information
Most people are reluctant to begin working with color in their darkrooms. Some of this has merit and some of it doesn't.
Personally I feel to start into color requires a great commitment on the part of the photographer, both in terms of time and cash.
Color darkroom work is quite expensive. Not only in the materials involved but also in the equipment required to produce
quality work. Few people have the resources to create a truly top notch black and white darkroom, let alone a color one.
Even if they do have the money color photography is a multi-faceted discipline that requires a great amount of attention to detail.
While I believe their are many talented individuals out there that can do color in their own darkrooms I think that many pro photogs
try to hold these secrets close to the vest, and that is a shame. Also much of the information for color work is available from
Kodak and other manufacturers web sites, and prior to the advent of the world wide web they were always just a phone call away.
Therefore many professionals felt it unnecesary to re-invent the wheel as it were since most of the technical data was already available.
For instance at the link below You will find a vast array of technical information on color darkroom
practices and techniques under the "Technical Publications" heading:
Kodak Technical Data
I also recommend going to this next site to get the most information on Kodak C-41,
the chemistry used for color negative film::
Kodak C-41
If you scroll down the page you will see many processing guides including the ever famous Kodak Z manuals used in labs all over the world to
monitor and control their processes. Unfortunately this un-willingness by pros has made it dificult for amateurs to learn the techniques
very effectively on their own. I am one pro who hopes to make up for that, starting with this article and also with the book I have been working on for
some time called "The Fifteen Minute Photographic School" in which I take photography and break it down in short sections with lab exercizes and
experiments.
Basic color theory
Color is not a magical process that is achieved by waving a magic wand over the film or incanting long lost and forgotten spells,
but it is different. Color film instead of having one layer of emulsion has three, all of which are basically black and white film emulsion with one key difference. Each of these layers are made sensitive to different
wavelengths of light by the introduction of carbo-cyanine dyes in the formulation of the emulsion; different dyes deliver different spectral absorption
characterisitcs. The first layer is the blue sensitive layer. This layer is first because all film is inherently sensitive to blue light,
and the blue emulsion requires the least amount of filtration. On top of the blue layer is an Ultra-violet filter. Next we find the green sensitive layer,
this layer has a yellow filter layer above it and lastly we have the red sensitive layer under a red filter.
Unlike black and white film, which has the silver in the emulsion reduced to metallic silver in the development process, color film actually
has the silver halides that were exposed to light replaced with color dyes that correspond to the color layer. For example, when the film is processed
the red layer has all of it's silver halides that were exposed to red light replaced with red dyes. The intensity of the dyes introduced are directly
propotional to the amount of exposure the layer received. Once the film is processed the varying intensities in the three layers sandwiched on top of one
another give all the different hues present in the original scene. Once developed the film is then placed in a bleaching bath which removes ALL of the silver in the film.
leaving only the dyes.
There are two basic color systems in use today, these are the additive and the subtractive color systems. In the additive color system we work with Red Green and Blue.
In the subtractive system we work with the colors Yellow Magenta and Cyan. the two systems derive their names by the manner in which they combine the colors.
The additive system can be described as the combination of the three basic colors to achieve any color required. If for instance we add Red and Blue together in
equal amounts we will get Magenta a sort of purple color. By varying the amounts of red and blue we get all the colors that reside in the spectrum between
red and blue. The same is true with regards to the combination of blue and green and green and red. The interesting thing about the additive system is that
if we combine all three colors we get white. This is because white is the presence of all colors.

The subtractive system on the other hand works by the act of cancellation of different light (or subtraction if you Will). If we place three lights, each with a different filter in front of them, one with a magenta filter one with a cyan filter
and one with a yellow filter, so they can shine on a wall in a manner in which all three lights will intersect with each other we will see the following.
In the area where yellow and magenta combine we will see red at the intersection, likewise we will see green at the point where cyan and yellow combine and finally we will see
blue at the point where cyan and magenta combine. Just as there was a unique quality in the additive process there is an even more bizarre quality in the
subtractive. If we combine all of the colors of the subtractive process together we will achieve black at the point where all the colors intersect. This is
due to the fact that the three colors cancel each other out, as it were, and yied the absence of all color, or black.
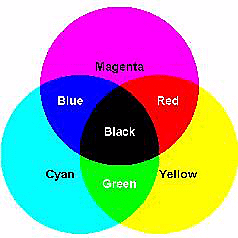
This brings up the point of complimentary colors. Complimentary colors refers to the manner in which the two systems interact with one another. For example if I were to
print a negative and I found that the whites in the print are too red I can "cancel out" this effect by adding cyan. If you look at the above diagram you will see that
Cyan is directly opposite of red and that the two colors point of commonality is black. This is how the cyan is able to cancel out the red. Consequently Yellow and blue are complimentary
as are magenta and green. There is an old saying to help you remember. "there is a General Motors Red Car in my Back Yard" GM, RC, BY. Or Green Magenta, Red Cyan, Blue Yellow.
I know this sounds trite but it helps me to say this little ditty, ever since I learned it I have never fogotten the complimentary colors.
Equipping the color darkroom
Ok I am sure you are sick of hearing me ramble on about theory. We will now discuss the equipment required for the color darkroom, and which we would probably never see in a black and
white darkroom. The most important thing about processing color is temperature control. If you cannot keep your chemistry within 1/4 of a degree of 100 degrees then don't bother.
I know this sounds rediculous, but there is a reason. Color materials unlike black and white can have the color balance shift by even a tiny change in the developer temperature.
This is because the spectral dyes in the emulsions absorb the transfer or replacement dyes from the chemistry correctly at only one temperature. In the case of C-41 that temperature
is 100 degrees. If this tolerance isn't met then an object that was scarlet in the scene may come out pink in the final print. This means we need a way to control that temperature accurately and consistently. There are a couple of ways to do this and both are rather expensive. One is a
water regulator valve. the water regulator valve is a device that accepts both the hot and cold water from your supply and has a large round dial by which to control the mixing of the two.
The assembly also has a large round dial thermometer to monitor the temperature with. These valves are quite accurate and as such are quite expensive. They usually run around $250.00.
The second way, and by far the most accurate, is to use a heated recirculator pump designed specifically for photographic purposes. These units take the water from the sink, regulate
the temperature, and return it to the sink. These units cost about $500.00. In both systems the photographer places his developing tanks in a water bath in the sink and thus is able to maintain
a constant 100 degree temp.
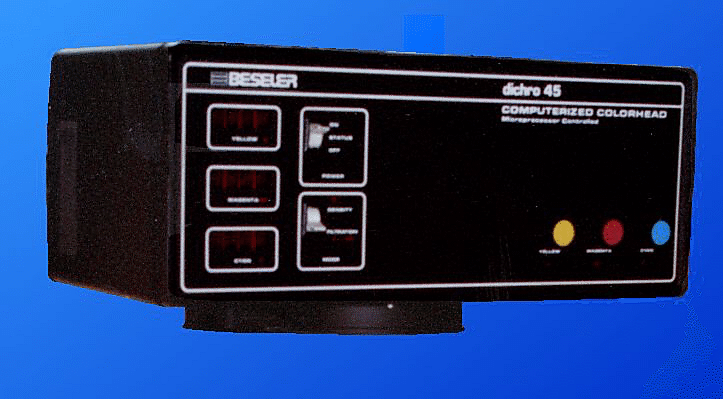
The color enlarger is quite a bit different than the black and white enlarger. On a color enlarger you have a color head above the negative carrier. This color head has three filters in it.
Usually these filters are of the subtractive variety, but in rare cases you will see one with additive filters. these filters are referred to as dichroic filters. These filters are also usually
graduated from dark to light in each of the respective colors. Thumbwheels or dials are usually used to "dial in" the filter pack thus changing the amount of gradation used in the printing process.
The graduations for this technique are usually in divisions of 5 ranging from 10 to 90. These numbers represent the number of an individual filter. For example if I were to use individual
filters I would have a Magenta filter of 25 (CP25M) and a cyan filter of 10 (CP10C) and a yellow filter of 15 (CP15Y). This would be my filter pack for a specific negative on a given type of paper. The thumbwheels
on the color head of the enlarger make it possible to just dial in the setting and avoid the hassle of finding color filters and sandwiching them together then placing them in the path
of the negative. From this discussion one thing may appear obvious. It is not entirely necessary to have a color head on your enlarger. One could purchase an inexpensive or even used set of
color printing filters and use them with a good black and white enlarger. While this would be quite a bit more difficult and time consuming (not to mention giving you several more items to clean in the
print path) than using a color head it works just as well and costs a lot less.
The last thing that would be noticibly different in the color darkroom are the tanks for color processing. Instead of using one daylight tank you would want to use 6 seperate open tanks in complete darkness
with a good quality film washer and timer.
Doing the work
Well we are finally here, the point where the work actually begins to take place. We will start with the actual processing of the film.
To process C-41 or color negative films in Kodaks C-41 Flexicolor chemicals the following are the steps to employ.
1. Establish your sink line. Place the tanks in the sinkline in the order of use,(Developer, Bleach, wash, Fix, wash, Stabilizer) and bring the water bath to 100°F.
2. Turn out all room lights! And load the film on the reels. Place the reels on a spindle rod so you can agitate the film by raising and lowering it with the spindle.
3. Set your timer for 3:15 and place the film in the first tank or developer. Then agitate for 5 seconds at each 30 second mark.
4. Set your timer for 6:30 and place the film in the second tank or bleach. Agitate every thirty seconds for 5 seconds.
5. Set your timer for 3:15 and place the film in the third tank or first wash tank. let it wash for the prescribed time with sufficient agitation.
6. Set your timer for 6:30 and place the film in the fourth tank or Fixer. Agitate every thirty seconds for 5 seconds.
7. Set your timer for 3:15 and place the film in the fifth tank or second wash tank. let it wash for the prescribed time with sufficient agitation.
8. Set your timer for 1:30 and place the film in the sixth tank or stabilizer. Agitate every thirty seconds for 5 seconds.
9. dry the film for the amount of time needed from 75 - 110°F.
That is the process in a nutshell. It is not complicated but if you do not have good temperature control it can be frustrating. This is not to say it cannot be done in a daylight tank
it just isn't recommended.
Once your film is dry we will want to print it. To print the film place it in the negative carrier and then put it in the enlarger. On your color paper data sheet there will be a
basic filter pack setting. For example for Kodak Supra III paper it is recommended that you start with a filter pack of 45M and 45Y. Dial in these settings or place the filter pack
in the print path and make a test exposure. The best way to make a test exposure is to place a piece of cardstock over all but a small section of the paper. Set the enlarger timer to
3 seconds and make an exposure. Now move the cardstock a couple of inches over to reveal more paper and make a second three second exposure. Repeat this process until the entire paper has been exposed.
By doing this you will make a series of exposures from 3 seconds progressing by three second intervals. In other words 3 seconds 6 seconds 9 seconds etc. This will help you to determine
the best exposure timewise for the final print.
Now we will want to processs the test print. I highly encourage you to invest in one of the small tabletop rotary drum paper procesors from Jobo or Doran. With the drum and motor
base you can be in business for around $160.00.
Again I recommend going to Kodak professional site and getting the processing information for Kodak RA-4 Ektacolor chemicals for the processing recommendations for their chemistry and paper in the rotary tube
machine.The link is:
Scroll down the page to find all the information you need for rotary tube, tray and manual tube processing.
Once you have the print in your hands examine it. Determine which of the time swatches gives you the best exposure. Set your enlarger timer to that setting. Next we will color correct the
print. The main thing to remember when color correcting is this, go for the whites. Try to get the whites as white as possible, without destroying the proper color of the rest of the scene.
Kodak offers a set of color print viewing filters to help you determine the amount of color correction needed, however, with time you will be able to judge this on your own very accurately.
If the scene looks overall to be too blue then you would simply dial in a little more yellow to cancel out the blue. Or if it is a little too red dial in some cyan. This is done and the neg is printed again
but without the preceding technique of multiple exposure as we already have our time determined. Process the new print and again examine it. Check again for exposure and color balance, making
adjustments as needed. This process is repeated as many times as is necessary to achieve the final print. Odd colors such as Aqua may be tough to correct at first, you need to think about the colors
that make up these odd colors, and this is the one place that the color print viewing filters can really help. It takes time to master the use of these filters but if you view the white areas and
correct for them you should have good results. Obviously this technique is very subjective and is dependant upon ones personal taste, as is most of photography.
Other Processes
While this discussion has focused on C-41 primarily, there are other processes the home darkroom enthusiast can do as well. Such as E-6 for Ektachrome slide films. Again simply follow the above links
to the Kodak professional site and download the manuals you need. Also Fuji, Agfa, Ilford and others have processes that you may want to explore. One word of caution though, don't get over-ambitious
and decide to try Kodachrome or K-14 at home. K-14 is a very specialized process that only the largest commercial labs with the best trained people can tackle. In fact I would say some seventy percent
of all labs in the country send their K-14 to Kodak for processing. Kodachrome uses an automatic processor that actually exposes the film to various wavelengths of light during the process. Keeping a K-14 processor
within quality control guidelines is probably one of the most dificult challenges any photo lab could attempt to do. In fact while I was on board the USS Nimitz during my time as a Navy photographer
I never saw the Kodachrome machine ever fired up, or for that matter filled with chemistry, even though we had Kodak trained people on ship who could operate the machine.
Final Thoughts
Color chemistry is very caustic, Plastic or meticullously kept stainless steel are the only materials to use around any color chemistry. Also if you do not have a good ventilation system do not work with color.
The fumes can be very harmful. Almost all color work must be done in total darkness as color materials are sensitive to almost all wavelengths of light. The cost of color materials are prohibitively expensive. For instance a 1 gallon kit
for C-41 is around $70.00. The printing paper seems to be the one thing that is not so expensive B&H photo sells 100 sheet boxes of SupraIII 8x10 paper for around $28.00.
Don't get discouraged if your first attempts at color don't come out all that well. Color technique, especially printing, takes time to learn and master. By all means
if you have the inclination (and the budget) go for it.
This is but a very brief introduction into color darkroom work, but should be sufficient to get you started.
I hope this little introduction has helped, now go have fun!!!
copyright Ó 2001 Jerry Sparrow
picsbyjerry@yahoo.com