Build a Brew-center
|

|
Having a well-organized place to store your supplies and to brew and bottle your beer can be a real time saver. I built this brewing center out of one piece of chip-board and a few 2x4s . |
Features:
 The top platform supports your bottling bucket, allowing you to bottle on the waist-high work surface. I use a 4-foot piece of tubing to connect the bottling wand to the bucket, and fill 24 bottles at a time.
The pegboard back gives you a place to hang all your brewing equipment
The bottom shelf allows for storage of 10 beer cases (or other supplies), safely up off the floor.
The worktop can be covered with a scrap of linoleum, or with 6 to 10 squares of stick-on flooring. This makes wiping up spills a lot easier!
Add a "back-splash" of thin wood to the back of the work surface to keep things from rolling off the back. (I got tired of retrieving my bottling wand from the floor behind the brew center).
|
Click on these plans to see them full sized. Print them out and head for the lumber store!
A friendly store will be willing to "rip" the chip- board to size for you, so you won't even need a truck to get the material home. |

|
Basic Instructions:
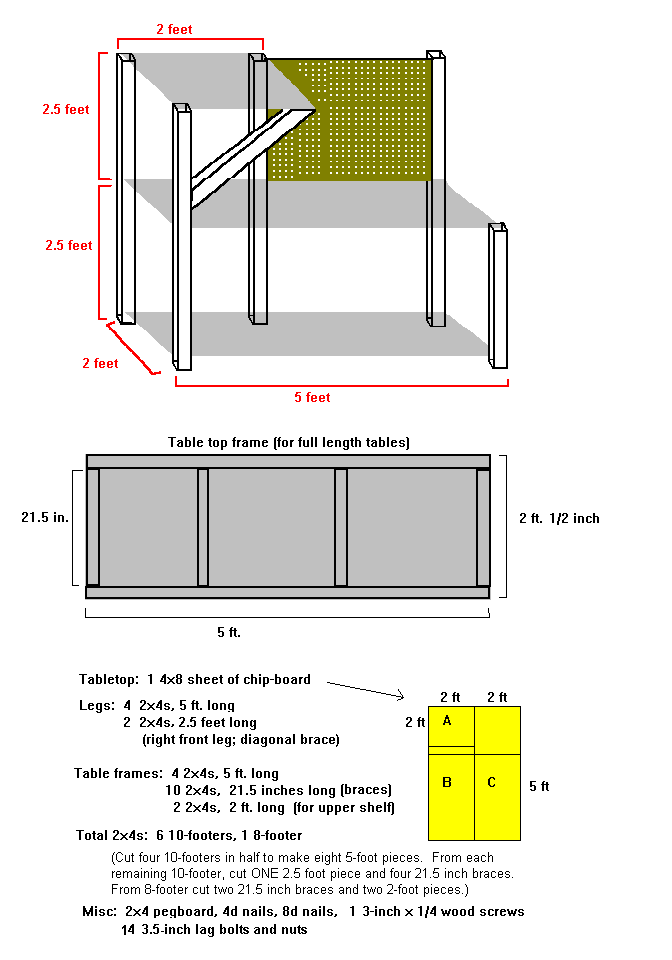
Cut 2x4s as described. Use 8d nails (or use 3" drywall screws and a power driver) to construct two full-sized table-top frames. Note that frames are 1/2 inch wider than the chipboard. This is to make sure that the chipboard doesn't hang over the edges of the frame, making it hard to fasten the frames to the upright posts.
Build the top shelf frame out of two 2-foot boards and two 21.5-inch boards. All full-sized frames should be constructed with the 2x4s "on edge". Top shelf can be built with one piece not on edge (see photo below).
Square up the frames and use the 4d nails to fasten the chip-board to the frames.
Beginning with the bottom "storage" shelf, fasten the shelves to the posts. The bottom shelf should be fastened with an inch or two of clearance from the floor, so that the brew-center sits on the posts, not on the bottom frame. This will make the unit sturdier, especially on an uneven floor.
All three back posts and one front corner post should be 5-foot posts. Two of the back posts will support the top shelf, the other will be used for the pegboard.
The posts should be fastened to the platforms with 3 1/2-inch lag bolts, with the nuts on the inside.
The top shelf is supported by posts on 3 sides, and with a 45-degree brace on the inside front corner. The brace can be held with a 3-inch wood screw on the top and a lag bolt at the bottom. See photo below.

This should produce a very sturdy shelf. Don't skip the brace--remember you are going to set 5 gallons of beer on this shelf.
Fasten the pegboard to the back upright posts. If this does not add enough rigidity to the structure, you can attach an extra piece of chip-board or plywood behind the bottom storage shelf to make the unit more rigid.