| Home │ System Restore Pt 1 │ | ||
Disable Guest account access to folders or drives[1] Understanding NTFS permissions [3] Windows XP Professional edition
1. Understanding NTFS permissionsThe issue of folder sharing and permission is a little complicated as it depends on several factors and whether you use Windows XP Home or Professional edition. The same principle applies to shared folders or disc volumes (drives) in Windows XP except for one important difference: Simple File Sharing cannot be disabled in Windows XP Home edition. To set security permissions the disc volume needs to use NTFS and you must logon as Administrator or an administrator account (a user account with administrative privileges). These accounts should have passwords in any case (although it is not a strict requirement for a user administrator account or the Administrator account in Windows XP Home edition). An administrator account without password or set to autologon (bypassing the logon screen) poses a security just as a Guest account. Since permission is inherited by default everything inside the drive or folder you set permission inherits the same permission unless you modify it. If you're inexperienced in modifying the folder's access control list (ACL), create a test folder and do a practice run first. If anything goes wrong, at least you won't lose any valuable data. In general, you should set permissions and sharing for folders and not individual files, and for user groups rather than individual users.
2. The Guest accountThe Guest account is in Everyone group (a built-in group in Windows XP) so it has access to drives and folders which are not password protected. If you go to Control Panel, User Accounts and click the Guest account icon, you'll see this message "Password-protected files, folders, or settings are not accessible to guest users." The methods to prevent Guest from accessing folders and drives are different depending on the Windows XP version and whether it is on a network. The method in Windows XP Home edition would also work in Windows XP Professional edition in normal mode but the method in Windows XP Professional edition is more robust. It is also easier to manage security and sharing in Windows XP Professional edition in general.
3. Windows XP Professional editionFirst disable Simple Files Sharing (which makes the Security tab available in folder properties; read this) and ensure the server service is running in System Services (which makes the Sharing tab available). Then enable password-protected shared folder or drive by clicking Share this folder on the Sharing tab. Change permissions as necessary by clicking the Permissions button (this only applies if on a network; you cannot change permissions otherwise). The shared folder name is denoted by D$ as seen by users who can share it (Fig. 1)
Fig. 1. Click the share this folder in the Sharing tab of the folder or drive.
In both Windows XP Home and Professional editions there is a shared folder snap-in (Start, Run, fsmgmt.msc) to manage shared folders.
4. Windows XP Home editionIn Windows XP Home edition, boot into Safe Mode, right click the folder or drive to access the security tab. In Windows XP Professional edition, this is accessible in normal mode after you have disabled Simple File Sharing.
Fig. 2. Add Authenticated Users.
Highlight and remove Everyone from the Group or user names list (Fig. 3). Do not delete Everyone group until AFTER you've added the Authenticated Users group, otherwise you may lose all permissions and have to retake ownership.
Fig. 3. Remove Everyone from the group.
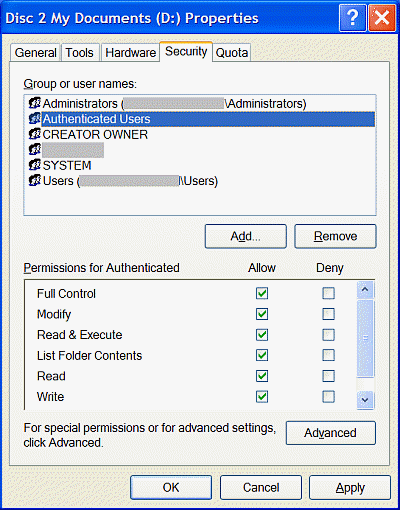
Back in the Security tab, highlight the Authenticated Users group and tick Allow Full Control in the Permissions for Authenticated box. Ticking the Full Control box includes all the other controls. Click Apply and OK to finish (Fig. 4). This group does not include the Guest account.
Fig. 4. Allow Full Control for Authenticated Users group.
Afterwards, check that you still have access to the folder and the Guest user doesn't.
ReferencesKB 308418 How to set, view, change, or remove file and folder permissions in Windows XP KB 308419 How to set, view, change, or remove special permissions for files and folders in Windows XP KB 307874 How to disable simplified sharing and set permissions on a shared folder in Windows XP
Copyright © 2003-2005 by Kilian. All my articles including graphics are provided "as is" without warranties of any kind. I hereby disclaim all warranties with regard to the information provided. In no event shall I be liable for any damage of any kind whatsoever resulting from the information. The articles are provided in good faith and after some degree of verification but they may contain technical or typographical errors. Links to other web resources may be changed at any time and are beyond the control of the author. Articles may be added, removed, edited or improved at any time. No support is provided by the author. This is not an official support page for any products mentioned. All the products mentioned are trademarks of their companies. Edit the Windows settings at your own risk and back up first. Created 2003; Last updated 27 Feb 2005 |
||