

2 Big Broncos Rocky Mountain Site

Straight Axle Conversion
This site has a new home!! It has been moved to http://www.stubig4x4.com
Please update your bookmarks
The links to the left contain more information I put together while rebuilding the axle.

The Bronc was born with a Twin Traction Beam (TTB) front suspension. While this suspension is very smooth on highway, and very forgiving off road, it has many problems with wander, complexity, alignment, and strength. There are virtually NO heavy duty parts for this front end, forcing the owner to tiptoe lightly for fear of breaking one of the special axles.
The axles in the TTB are pretty beefy, all things considered. The right side is actually quite large from the slip joint to the knuckle u-joint. However, from the slip joint into the differential, all that beef disappears. The shaft necks down severely where it passes through the seal and bearing in the differential. The left side shaft is about an inch in diameter for most of its length which is substantially smaller than heavy duty axles for the D44 beam axle used on earlier Broncos and F-trucks.
The solution? A Dana 44 from a 1978 Bronco now resides under the front of the Bronc. It retains the Lock Right locker and 4.56 gears in the Bronc differential. I got a helluva deal on this new differential. The previous owner had installed new ORD heavy duty alloy axles with full-circle u-joint clips not long before deciding to do a full upgrade to one-ton running gear. WooHoo! (Thanks, Rob!)
The installation was a grueling 16 hour marathon involving three people. Many thanks to Kent Stewart, engineer and fabricator, and Dan Ruegsegger, experienced wrench and mechanical experimenter, for holding on and finishing the project in one day. Many thanks also to Brian Solderblom. His Dana 44 site provided invaluable guidance while Brian himself answered a steady stream of questions. I was not able to take many pictures during the actual install. Brian's Install page has many detailed pictures.
The story:
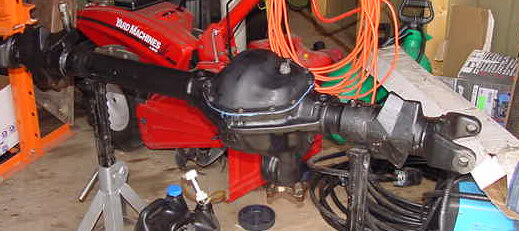
The swap actually started several months ago with a total teardown and rebuild of the new axle. After a few years of romping through the dirt, mud, and rocks of Texas and Colorado, the housing was pretty dirty. The pinion seal had blown and the last trip the axle took included some water. The fluid was heavily contaminated, but no damage had occurred yet. Two spindle studs were damaged and one retaining nut was missing. One ball joint was locked up. The brake calipers were very worn and needed overhaul. At some point one had stuck and damaged the brake rotor. Both axle u-joints had seized at one time and damaged the trunions. None of this wear and tear was unexpected, and it was all fixed in short order.


Straight off the truck (my pickup, that is.) This is cool stuff. Rather minor by extreme truck standards, but enough to keep me busy for a while!
A master overhaul kit from Randy's Ring and Pinion was ordered to install and setup the gears and locker from the TTB front end. A major lesson learned: Make sure you check pinion bearing pre-load at the final torque! On the day of the installation I did the final torquing of the flange nut and found out that the pre-load was way too high. Another .002" shim needed to be added to make it right. AutoZone supplied new ball joints and axle joints. I decided to reuse the calipers and rotors from the Bronc. The straight axle and TTB calipers are different. The only difference I've found so far is the size of the banjo bolt holding on the brake line. The '78 uses a 7/16 fitting, the TTB uses a 3/8 fitting.
 All painted and ready to be reassembled.


The knuckles. New ball joints and a coat of paint and they'll be good as new.
The spindle and caliper bracket. The dust shield will most likely be removed.
The spindles and knuckles from the '78 front end are totally different from the TTB parts, so these parts cannot be reused off the TTB. The machined parts of the spindles are identical, however, as well as the caliper mounting points, so the hubs, rotors, and brake calipers from the TTB will swap. The brake calipers are different from the straight axle to the TTB, but the difference is in the hose attachment, not the caliper body. They are interchangeable as long as you use the correct hoses.
With the axle rebuilt and ready to install, I needed to figure out how to mount it. The obvious choice was to use all stock parts, and it worked great. The axle came with two sets of radius arms and brackets. I scrounged up spring cups and spring towers at the local bone yard. Jeff's Bronco Graveyard supplied new Superlift 6" lift springs, tie rod ends, drag link, track bar, track bar bushings, c-bushings, and radius arm bracket bushings. I couldn't use the drag link and had to return it. The taper on the Pitman arm end was too big for the '81 Pitman arm. I ended up fabbing a new drag link out of one of the old Superrunner steering links. Removing the stock spring towers also meant losing the stock brake line mounts. I modified the stock '78 brackets to do the job instead.


Although the install was extremely time consuming, it actually proceeded very smoothly and orderly. The first order of business was to remove the entire TTB suspension. Non of it is reused. Kent and Dan fired up the plasma cutter and had the whole thing laying on the floor in about an hour. While this was going on, I finished assembling the axle. Due to weight, I had left the spindles, knuckles, and hubs off for the trip to Kent's house. The most tedious part of the disassembly seemed to be the stock spring towers. They are held on with five rivets at opposing angles. Once the heads were cut off, the towers still needed to be persuaded over the rivet shafts. With some hammering and prying, they gave up the battle and came off the frame. With the TTB components gone, some quick grinder work was performed and a shot of black Rustoleum laid over the bare metal.
Next, the axle assembly was laid on the floor and the radius arms and spring cups installed. It's amazing how far the c-bushings are crushed. They collapse about an inch and a half by the time the radius arm caps are torqued. Another tip: Don't mix up the radius arm caps! They are matched. In my case, if they were mixed up, the bolt holes in one spring cup wouldn't line up with the radius arm holes. With the radius arms installed, the axle was slid under the truck to get a feel for where all the brackets needed to go. The first decision was where to mount the spring towers. After all clearances were considered, they ended up centered about 1/2 inch forward of the center of the TTB spring location. The towers were securely clamped to the frame and new 1/2 inch holes drilled for mounting bolts. I used all the stock holes in the new spring towers except the top front on the drivers side. The crossmember is reinforced here for the steering box and has no access from the backside. I just left this bolt out and will keep an eye on the bracket for movement.


The next order of business was the radius arm brackets. The '78 radius arms are about 10 inches longer than the TTB arms. With everything lined up, the brackets want to mount almost entirely under the transmission crossmember. It's not close enough to share bolts with, however. Also, the angle of the frame combined with the angle of the radius arms from the 6 inch lift caused severe binding in the radius arm bushings. The cure here was to lay back the front face of the radius arm bracket 21 degrees to correct the angle. This also caused the mounting point of the brackets to move forward just enough to eliminate interference with the crossmember.


With the spring towers and radius arm brackets installed, it was time to hang the axle. It went in just like a factory install. The next thing to take care of was the track bar bracket. Since there isn't a lot of room along the frame for an additional bracket, and a bracket in the stock location would cause the track bar to hit the engine crossmember, the new track bar bracket mounts under the spring tower. To make the bracket strong, it needs to extend from the frame to the engine crossmember. The bracket itself is very simple, a piece of three inch angle iron with a plate welded on to sandwich the bushing. At this time, the bracket is held on the frame end with a single bolt. I may end up securing it to both lower spring tower bolts in the future if the need arises.


With the exception of making up a drag link and ordering shocks, the install was complete. A quick test drive proved that this swap is worth all the time and money that went into it. The truck is stable at speed, bump steer is gone, the rear Detroit doesn't throw the vehicle all over the road any more, pavement grooves don't throw the truck around any more. The ride is marginally harsher than with the TTB. The TTB was definitely a soft suspension on the highway. Initial ramp testing shows that the straight axle flexes a bit more than the TTB, even with new bushings. A wristed radius arm is in the works which will increase the flex way beyond what the TTB was capable of.


Would I do it again? You bet! I recommend this swap to anyone that wants to run a tall lift with a TTB Ford. There just isn't any comparison.


Before and after. What a difference.