And Here it Doesn't (Work)
I.e., Leading from a K. See previous example.
|
|
 A 2 A 2 |
|
 J 7 6 5 2 J 7 6 5 2 |
|
 K 9 6 K 9 6 |
|
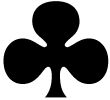 A 10 4 A 10 4 |
|
|
 Q 7 6 4 Q 7 6 4 |
|
 10 9 8 5 10 9 8 5 |
|
 K 9 4 K 9 4 | |
 10 10 |
 10 10 | |
 Q 8 5 4 3 2 Q 8 5 4 3 2 |
 K 9 8 7 2 K 9 8 7 2 | |
 J 6 J 6 |
|
|
|
|  K J 3 K J 3 |
|
 A Q 8 3 A Q 8 3 |
|
 A J 7 A J 7 |
| |
|
 Q 5 3 Q 5 3 |
| |
This is my kind of slam hand for the purposes of discussion. Touch and go. Roughly half making it, half not. Very roughly, perhaps, but not just an isolated declarer capitalizing on an outrageous blunder. It looks like a tough hand for slam -- and was. Yet four made it. I didn't print out those who went down, since it looks to me as though it'll always go down on good defense. You've got a heart to lose; now how do you avoid a club loser? Well, there were ways, primarily on a lead from that king of clubs -- a very low lead --(after getting in with the king of hearts). But a couple of declarers pulled off a rather unexpected squeeze and deserve credit for that.
Anyway, lemme start with the two most mundane ways of making the hand: Opening lead, the diamond ten into a finesse that was always on anyway. Spade to the ace, heart to the queen and king, the deuce of clubs to the 4, jack and queen. Six tricks later, declarer led to the A 10 of clubs and finesssed the 10. East could hardly have guessed that his 6 of clubs would do as good a job as the jack in drawing the queen. But West certainly should have led the top of his inside sequence, the 9, if he must lead the suit. Then East will know not to play the J unless the 10 is played. With one trick in the bank against a slam, it's probably not a good time to lead from the king in the first place, especially when West had an easy exit in a trump. Still, it's not the worst of leads. Declarer can always hold club losers to one, and if West led the 9, there would be the same result. But if your partner has the jack, it is a time to tell him not to play it unless the 10 is played.
On the next play-through, the situation is virtually the same. Only this time it's at trick 5 that West leads from his king of clubs (again the deuce), and declarer finessed the 10 at trick 6. No club losers on A 10 4 opposite Q 5 3? Incredible.
The next play-through was a lot more exciting and complex, even though this declarer got the same deuce of clubs lead as his confreres above! Opening lead the same, spade to the ace, heart finesse into the queen and king, deuce of clubs ! ! ! to the jack and queen, run two more hearts, king of spades, another heart, diamond to the king, and the last heart was cashed. The hand then looked like this:
|
|
 ------- ------- |
|
 6 6 |
|
 9 9 |
|
 A 10 A 10 |
|
|
 Q 7 Q 7 |
|
 10 9 10 9 |
|
 ------ ------ | |
 ------ ------ |
 ------ ------ | |
 Q Q |
 K 9 K 9 | |
 6 6 |
|
|
|
|  J J |
|
 ------ ------ |
|
 A A |
| |
|
 5 3 5 3 |
| |
On the lead of the 6 of hearts, declarer sluffs a low club, East the queen of diamonds and West the 7 of spades. Now on the lead of a diamond to the ace at trick 11, West is squeezed. If he discards his last spade, the jack of spades will be good, and if he discards a club, the king will fall to the ace making the 10 good. Yes, he did sluff a club, and it was a trick declarer could have finessed for as his two confreres above did. Still, it was a much more dramatic line of play.
And here is the other squeeze: A spade lead to the jack. Not a common lead. Declarer could now sluff a club on the long spade, but would still seem to have a loser, and indeed, he chose to sluff a diamond. Here is how the hand proceeded: A heart to the jack, cash the ace of spades, heart to the ace, king of spades, sluffing a diamond, a diamond to the king, a heart to the queen and king, spade queen, ruffed by declarer in the closed hand as he sluffed the 4 of clubs.
Now came the queen of clubs, covered, won by the ace. This constituted a transference of the threat, for it is now East who holds the key club. At trick 10, declarer led the 7 of hearts, sluffing a low club, and then the 5 of hearts, sluffing his last club. The hand then looked like this:
|
|
 ------- ------- |
|
 5 5 |
|
 9 9 |
|
 10 10 |
|
|
 ------ ------ |
|
 ------ ------ |
|
 ------ ------ | |
 ------ ------ |
 ------ ------ | |
 Q 8 Q 8 |
 9 8 2 9 8 2 | |
 J J |
|
|
|
|  ------ ------ |
|
 ------ ------ |
|
 A J A J |
| |
|
 5 5 |
| |
On the lead of the 5 of hearts, East can't throw the jack of clubs, since the 10 is sitting in dummy, and so throws a diamond. Declarer throws the five of clubs and takes the last two tricks with the A J of diamonds. How'd he do it. Actually, West gave up two tricks with first a lead from the queen of spades, and then the lead of the queen of spades when it constituted a sluff and ruff. True, declarer sluffed a diamond on the long spade, but that creates a differential in diamonds, on which a club is sluffed. When another is sluffed on the sluff & ruff, that takes care of the club suit. The end position is same finesse all other declarers took with 3 diamonds opposite 3, more or less masquerading as a squeeze. It only remained for declarer to take the diamond hook, but he chose to play it more like a squeeze. Transferring the club danger to East wasn't really a key play here.