Two Ways
|
| 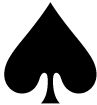 K Q 2 K Q 2 |
|
|
 A J 10 6 5 3 A J 10 6 5 3 |
|
|
 ------ ------ |
|
|
 J 8 7 4 J 8 7 4 |
|
| 8 |
|
J 7 3 |
| 9 7 4 |
|
K Q 8 |
| 8 5 3 |
|
K 9 7 6 4 2 |
| K Q 10 9 5 3 |
|
6 |
|
A 10 9 6 5 4 |
|
|
2 |
|
|
A Q J 10 |
|
|
A 2 |
|
There would seem to be two ways of making this six spades contract, that is, from declarer's viewpoint when dummy comes down. You can either try a ruffing finesse against the king of diamonds, or you can look to exploit that lovely heart suit. We can see that only the latter line works, but the former is certainly favored by the odds. A 3-3 split in hearts is about a 35% chance, while the diamonds are a little under 50%. A little under? Not a 50-50 chance? No, it's not up to 50-50 because West, if he has the guarded king, doesn't have to cover on the first round or any round till the last. If East has only a couple of diamonds, West could inhibit a ruffing out of his king by refusing to cover.
Declarer could then test the hearts without a club opening lead, though that's a very natural lead that everyone was getting, and the king is offsides anyway. Now you don't want to cash the ace of diamonds first. That's a totally unnecessary play. "But I might drop a stiff king!" Oh, please! You've got a lot more potential for mischief in the diamond distribution than you do of missing a stiff king with 9 cards out against you. If you cash the ace of diamonds and do find the king of diamonds onsides, you're going to need to find East with at least four diamonds, whereas if you get to it with the lead of the queen, first round, you can survive a 6-3 split. Since the odds of a worse than 6-3 split are about 10%, your odds of the ruffing finesse working are about 45%.
That's a significant difference from the favorable heart split and I certainly wouldn't fault any declarer who took the club lead and led the queen of diamonds immediately. No one likes to go down by trick 3, but you do like to give yourself the best chance of not going down at all. Anyway, one thing is certain: you've got to do one or the other. You've got to bank on a favorable lie in the diamonds or in the hearts. Of the six declarers who went down one trick, not one did so from taking a losing diamond hook. They went down because they screwed up their play of the hearts, being careless about entries. I had to go to someone who went down 2 to find a declarer who pushed the queen of diamonds through at trick 2.
How many entries to dummy do you need, and how many do you have? Well, one thing that should be pretty obvious is that you don't have a whole lot of entries there. You cannot count a ruff of a diamond an entry, not for the purpose of developing hearts, because that cuts you down to two trump there and if spades are 3-1, the favored split, then you can't use the hearts even if you develop 'em. So you have exactly three entries to dummy. Since you can get two heart leads out of the deuce to the ace, you can clear hearts using only two of those entries, and then use the third, on the third round of trump to use them.
What did these declarers do? A common mistake, made by four of those who went down, was to cash one of dummy's spades before touching hearts. Now you can't make it. You cash the ace of hearts, ruff a heart, back with the queen of spades, ruff a heart, the suit is clear -- but you have no access to it. Another mistake, made by a couple, was to ruff a diamond immediately. Now you can't set up the hearts, or rather, you can't use them. Sheer carelessness was exhibited by the declarer who ruffed three diamonds, establishing the hearts as he did so -- without a round of trump! He's using the honors he needs to draw trump to ruff out a suit that just might have been chock full of winners. He now led the fourth round of hearts and was overuffed with the 8 on his left. A club was cashed, and the last trick was East's with the jack of spades. Down two.
Here's one that took a half-assed stab at each of the two possible methods: Spade to the queen at trick two (that takes care of the hearts), ace of hearts, ruff a heart, diamond ace, ruff the queen of diamonds, ruff a heart, push the jack of diamonds through to the king. At least he only went down one by getting around to the diamond hook before it was too late. And I guess ruffing one diamond did give him a chance on a king doubleton falling. Still, with 9 cards out, a king doubleton is certainly not something you want to bank your hand on.
I can't go through all the malfeasance here. Let it suffice to say, you pick a line of attack that looks promising, and yes, keep your mind flexible if you get unwelcome news when you still have time to switch to another line, but you must look for a line that offers a reasonable chance for making your contract, or for the maximum number of winners, whichever is more feasible. Here I would have far more respect for a declarer who took a losing diamond hook at trick two than for those who cashed the K or Q of spades at trick 2 and then went after hearts. The former had a reasonable chance for his contract, even if it didn't pan out. The latter first wiped out a necessary entry for exploiting the hearts and then moved to the suit that could have brought the contract home.