After years of use the head of a drum can become stretched out, thus making the sound dull. To tighten the skin, you can place a small electric space heater under the drum. You can also use a hair dryer, a can with burning coal or newspaper, a lamp or just about any other source of heat that can fit under the drum. This goes without saying, but be extremely careful when putting an open flame under the drum.
If the drum is too tight and you think it sounds too high pitched, try moistening the skin slightly and pressing down on the skin carefully. Do not hit the drum while the skin isn't dry--this can cause it to stretch unevenly and ruin the sound.
Neil and Peggy, Sat, 21 Oct 2000 19:08:02 -0500
Anyway, the burning paper and heater is not that great, with very short period
of effectiveness. The best technique is one a sifu from Toisan taught me. We
had a drum that was very old.......always flat and low sound. He took a wet
towel. Turned drum upside down. And put the wet towel over the underside skin
that is untreated. Left overnight. Then in morning put drum in hot sun,(where
there was no breeze to cool it down) and rotated it during the day to get the
direct rays. The result...........amazing. That drum was the tightest drum I
ever felt, AND never went out of tune for about 2 years..........which is when
we did it again.
Jamieson, Date: Tue, 31 Oct 2000 12:13:36 -0600
My brother built a stand for My Si Fu and Si Mo's troupe a couple of years back.
Essentially he made the top that sat on a square frame. the top had a hole cut through the centre to allow the drum sound out. The square frame had wheel attached on casters at each corner. To tilt the drum towards Si Fu (who plays and is also tall) he did a three point lift with two in front and one at the back. The two in front were higher than the back piece. This drum stand has worked out well and is still in use now after a good amount of use over the years. I will submit a rough drawing of the plans at a later time ( as soon as I have some time! haha)
Chris Low, Tue, 31 Oct 2000 11:35:32 -0800
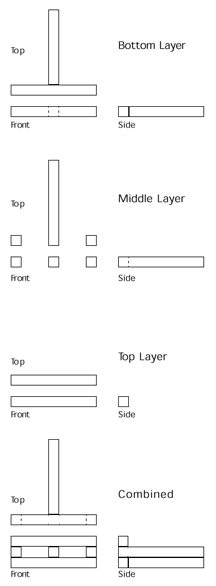
Our drum stands have lasted quite a few years and are pretty simple to make
out of a few pieces of 2x4. It's shaped like a "T" with casters on each of the
three ends and made specifically to fit each of our drums. The front is raised
by adding another 2x4 across the front and there are brackets to hold the drum
in place. We covered these with pieces of synthetic fur (carpet would work just
as well) to pad and protect the drum. We also added two eye bolts on the front
(one on each side) that we tied a cord through to pull the drum. Click here
to see a diagram of it.
Erick, Date: Mon, 27 Nov 2000 02:01:04 EST
if your cymbals happen to crack ( which happens quites often if used too hard) it is best to cut a peice out of the cymbal. like in other words, you should finish off the crack by cutting it totally off so it won't keep cracking lower and lower toward the handle part. your should take a pair of tin snips and go into the cracker area and start to cut downward a tiny bit and then start to turn the snips toward the edge and cut it off. this will prevent the crack to get any worse. this will change the sound a little bit but it will save the cymbals.
| To submit something to this page, email me with the relevant information. Thanks! | |