 |
|
|
|
|
|
|
|
|
|
|
|
|
|
|
|
|
|
|
|
|
|
|
|
|
|
|
|
|
|
|
|
|
|
|
|
|
HOW TO BEND A NAIL: Reverse Style |
|
|
|
What follows is a photo sequence of how I bend nails. I've experimented with a number of forms, trying to copy the recommended forms of Tom Black, John Brookfield and Slim Farman. I did ok, but none fit my body-mechanics, so I kept experimenting, until I found that this style instantly added over 60lbs of bending power to my max-effort bends. I now teach this style to others, and have had great results to include non-weightlifters bending a 180lb 6" Spiral nail, a small girl bending the IronMind GREEN Nail on her first try, and...
Using this technique, after my coaching, my best friend bent the IronMind BLUE Nail on his first try. He does not lift weights and would be described as a "thin and lanky man". On the other hand, some people bend the IronMind RED and can't use this form. It's all up to your body and what fits you. This is just one of many techniques. Good luck with your bending. |
|
|
|
 |
|
|
#1 |
|
|
|
|
|
|
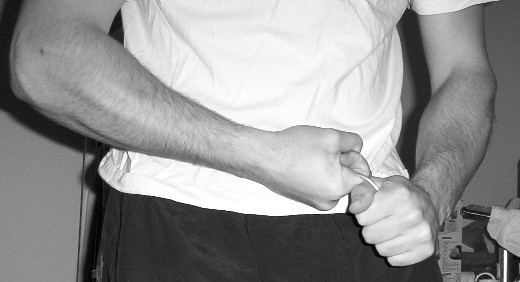
1). Start with the nail held firmly centered in each hand. For maximum leverage, ensure the hands are tightly pressed together at the main leverage points; the right fore-finger and left thumb. The nails should sit comfortably and naturally in each hand.
For a true and traditional bend, the forearms and hands should not be braced against the body at any time. As you begin bending though, brace away. It will teach you form and will build strength. Bracing is also safer, as it eliminates slippage and could prevent some serious injuries. If you want to brace for the rest of your life, that's fine. In many cases, it's recommended. Just don't bend it over your thigh or hip... That's just sad. |
|
|
|
 |
|
|
#2 |
|
|
|
|
|
|
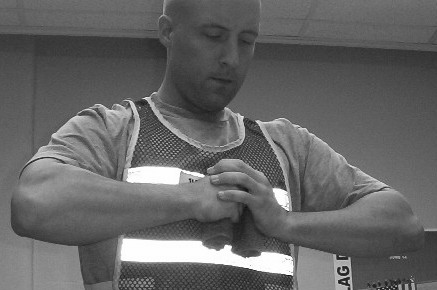
2). The Bend begins with tightening the muscles across the back, the chest and shoulders, the arms, the wrists and hands, and when the circle of strength is complete, violently EXPLODE on the nail. Of this whole circle of muscle, imagine the one weak point being the soft center of that weak little nail!... and then KILL it! If you can't bend that particular nail, it means there is a weak link in your circle, and you need to fix it through more practice and training.
As for mechanics of this bend, the Left hand squeezes the nail hard (I try to imagine squeezing the nail into a liquid!!!), and the Left braces the force from the Right hand. The Left hand mostly stays in once place, but is slightly rotated downward as necessary to keep the most torque on the nail.
The Right hand and lower arm is a giant lever whoes fulcrum is the right fore-finger. The wrist must be locked tightly and the hand must be vice-tight on the nail, and then the entire right arm rotates downward on the nail, violently!!!
Another key point to the movement of the right hand, is once there is a slight bend, I feel as if I am "pulling" on the nail with my right arm. This pulling motion forces my right fore-finger into my left thumb tighter for more leverage and keeps my right wrist tightly braced. |
|
|
|
#3 |
|
 |
|
|
|
|
|
3). The key point at this state of the bend is how the right arm dropped from photo #2 and the Left arm stays relatively in place as the nail is bent over the left thumb. (After deleating some photos, you can't see the comparison.) The movement between photos #2 and #3 is done explosively, and you should "attack" the nail to this point. Once the bend has gone this far, the hard part is over and you can now start to apply raw muscle-power onto your nail.
From here, continue to squeeze the nail tightly with each hand, and start to crush the nail together with your chest and lats. The emphasis is taken off of the Left thumb as a main bending point, and you now focus on the ends of the nails in your palms, and crushing them together. |
|
|
|
 |
|
|
#4 |
|
|
|
|
|
|
4). This is the first half of the crush. All technical aspects of bending are now replaced by raw upper body strength and wrist strength. Bring the nail directly in front of you, and crush the ends of the nail together until your fingers interfere with the bend. |
|
|
|
 |
|
|
#5 |
|
|
|
|
|
|
5). This is the second half of the crush. When the fingers interfere with the crush, change your grip by placing one hand over the other and crushing the nail together. Then, when it is crushed down far enough, continue by interlacing the fingers, seating the nail in your palms, and crush the nail ends to parallel with your chest strength. Unwrap the nail and quarter the pad/rag for this final crush.
That's it. Too easy. Now bend away, as every nail will make you a stronger and smarter bender. Every nail refines your technique and hardens your hands, bringing you a step closer to your goal piece of steel. Good luck in your bending and train smart. |
|
|
|
Back to Nail Bending
Back Home |
|


