I decided for ease to have my Prosthetic mounted on a static rubber headpiece, which would make it a lot easier to put on and take off.


Paul's First Klingon
For the 2007 SF Ball, which had a Highwayman theme for the Saturday night, I had to find something for the "Winter Wonderland" Friday night party. Short of just showing up in beanie hat and scarf, I decided to "Go Klingon" like my friend Margaret. Klingons DON'T like the cold.
Stage 1 - "If you want to get ahead -GET A HEAD!!!!"
| You can't be a Klingon without a lumpy forehead. OK, that's
not strictly true, you can be an original series Klingon with just a Genghis
Khan skin tone, a bit of facial hair and a growley voice. However most
fans like to be Klingon characters from the Star Trek Movies and the
following TV shows I decided for ease to have my Prosthetic mounted on a static rubber headpiece, which would make it a lot easier to put on and take off. |
|
| However, when I sculpted my first headpiece for a trip to a
showing of Star Trek II: The Wrath Of Khan, onto George,
my trusty sculpting head, I decided to make
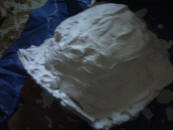
the mold from fiberglass, (see above). Unfortunately, the clay I used went
hard as rock and the fiberglass mix kept solidifying in the cup, so that
idea had to be abandoned. So I went back to the tried a tested method of doing my molds with good old fashioned Plaster Of Paris, but of course me being me, it didn't go without a hitch.......or two. |
|
|
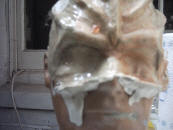
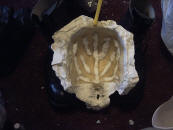
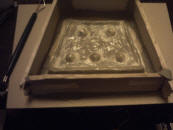
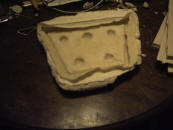
To the left is my completed second sculpt with the wall around it waiting to be plastered. Next, the plaster applied to the sculpt, and finally, the mold removed prior to the removal of the clay. As you can see from the sculpt, the nose-piece was originally planned to be part of the forehead appliance, not a separate entity as they are with the original screen makeups. |
| Unfortunately, a slight problem with the removal of the clay, meant a re-think to how I would eventually finish the design. I removed the clay, but the plaster was not thick enough in certain places. This caused it to be brittle and break away. I manage to repair the holes in the forehead with clay, which once set, could have Liquid Latex painted onto it. I could not however, repair the holes that had been made in the nose, as the fine detail had been lost. To fix the problem, I wedged a clay "gate" into the bridge of the nose and went ahead with pouring the latex. |
|
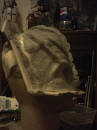
| The gate caused the finished head piece to have a small wedge at the top of the nose which I would use as a guide for attaching a separate nose piece. When I had slush filled the head piece enough to make it sturdy, I filled the remainder of the gaps inside with cotton wool ready for it's attachment to the rubber cap |


|
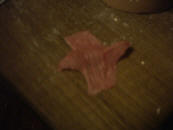
With the destruction of the nose section of the mold, some creative thinking had to be done. I made a second temporary head piece that only went from the bridge of the nose to just above the hairline and stuffed it with cotton wool, I then glued it to George. Using the prosthetic as a guide, I sculpted a new nose, and made a cast of it. From that I was able to slush pour a new nose piece that I knew would match to the headpiece. |
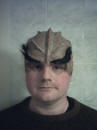
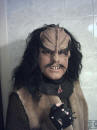
| Once the Forehead and nose were ready, it was a simple case
of gluing the forehead to the rubber head that I was going to wear. Once it was glued, I gave it a coat of red makeup to give the appearance of blood under the skin, I also did the same with the nosepiece |
|

 
 |
Once the head and nose were painted the appropriate colour,
I added shading and highlights, and then applied the Velcro pieces that
would make the application of the wig a heck of a lot easier. I also
purchased some "Billy Bob" Caveman teeth.
|
| Once the main head was done, I could work on the hairpieces. I latexed some of the leftover hair from the crown of the wig that I had to cut away on to some nylon netting, and used that to make eyebrows, mustache and a beard. Unfortunately on the night I was unable to use the beard, but the eyebrows and mustache worked fine. I then assembled it all on a polystyrene head in readiness for the big night. |


 |
Stage 2 - "He's A Dedicated Follower Of Fashion"
| Well, not exactly. But you are going to look a little
silly walking around wearing a Klingon head while wearing normal 21st
century clothing. So you are going to need a costume, which is precisely
what I did. Most Klingons have the grey armour look with black furry
arms. However due to cost and the fact I only had a limited time to do
everything including the sculpting and casting of the headpiece, I decided
to cobble together a costume with some items I already had, and make the few
things needed to make it complete.
|
| The Jacket was an old sheepskin jacket that had it's arms removed to make into a pair of Barbarian boots, while the jacket became the barbarian's upper covering. The one thing that this needed was the "Spine" that runs from the top of the jacket to the belt. Easy enough, when you have a diagram of how the spine works (obtained via the internet and available here - right click & save as please), and the nessarcery material to make it. The undershirt was my grandpa's jersey, as the wool weave looked like chainmail |
|
|
|
I also needed a belt and buckle, which required me to get creative. I sculpted a buckle from clay, and then painted a few layers of latex over it, this was to make the removal of the fiberglass buckle easier when it was cast. |
| Over the latex, I put some plaster to strengthen it and
hold the rubber in shape. Then a week before the Ball, Margaret tells
me "I've got a spare Belt & Buckle you can borrow", which saved me a great
deal of work. It also gave me a reference, so that when I DO build it,
it will look fairly close to the right thing.
|
| One thing you cant be without, is a fine pair of boots. But as I didn't have any, I had to make do (lol). I got a pair of Doc Martin style boots that a friend gave me, and added a latex horn that I cast from a mold I had made for a "Darth Maul" Head some years ago. |
|
  |
I applied them to the toe of the boots with spirit gum and painted them black to match the boots. A pair of Jack boot style boot tops completed the effect. I also made some gloves by buying some fingerless "biker" style gloves and adding some fake leather "Claws" The vambraces were another story, as i made them with fake leather, but could only scrape together enough Velcro to tack them at three points along the inside. and unfortunately, the glue on the Velcro refused to hold on the night, which meant I had to abandon them. With the addition of a pair of leggings, the costume was complete. |
Stage 3 - "The Weapon Maketh The Warrior"
| What is a Klingon without a Batt'leth, a Mek'leth, or some other weapon at his side. Not a good warrior, that's what. Thanks to Margaret lending me her Sword Of Kahless, her Batt'leth, and her Mek'leth (not shown), I was able to use them to make templates, which I drew on to pieces of MDF that I got from a local DIY store. Then It was just a case of hoofing the piece of "False Wood" over to a friend who had a convenient electric Jigsaw. |
|


  |
Once there, I turned the MDF over to my good mate Chris, who was going to do the cutting, as I do NOT trust myself with power tools. By the way, if you are going to make MDF Batt'leths or anything else for that matter, PLEASE remember to wear a mask over your mouth and nose as MDF dust is poisonous, and I don't want to be held responsible for anybody keeling over. |
| I was able to put two Batt'leths on one piece of MDF, but we only cut the one this time. Once we had cut it out, we altered it slightly on the lower blade to give it a little more curve and to balance it out better. And of course, Chris could not fight the urge to give it a little road test.....to make sure it felt right. Once it's protective coat of latex had been applied, I painted the Batt'leth with metallic Acrylic paint, and added the leather hand grips. |
Stage 4 - "Putting it all together"
| Having a friend who can do makeup is a bonus, and on the night I had Clive. From this point on I'm just going to let the pictures speak for themselves as it is pretty self explanatory how it went together...... |
 |
 |
 |
 |
 |
|
| Stage 1 | Stage 2 | Stage 3 | Stage 4 | Stage 5 | Stage 6 |
| And Voila, here is how I (with help) managed to.......... | |
 |
 |
| ........turn This....... | .......into This!! |
Special Thanks:
My Friends
Margaret for coming up with the idea and lending me various bit and pieces for
templates and the like, Clive for helping me get into it, Karen for coming up
with his name (K'rang) and helping with the headpiece, Vicky and her family
(other headpiece problems), Chris for help with the Batt'leth, Laurel for
lending me her D'tang Knife, Zebedee Fabrics for material and
Alter Ego,
for various costume pieces and the supply of the wig & teeth.
Thanks and respect go out to the people who helped bring the Klingons and their culture to us: The Late Gene L Coon, who created them in the first place, Ronald D Moore who gave them a deeper culture, Marc Okrand who gave them a language And The Late Fred Phillips & Michael Westmore who developed the look of the makeup over the years. And most importantly, thanks to Gene Roddenbury, who by creating Star Trek, gave the Klingons a universe to play in.


