
There
are lots of ways you can personalise
Outlook Express and one of the ways is
to create your own stationery to use
on your emails. For this
tutorial, you will need the picture
that you want to use on your
stationery in either .jpg or .gif
format. If you'd like to use the
one that I'm using, please right click
on the picture below and save it to
your own hard drive.
You
need to put it in the same directory
as all the other stationery
graphics. To find out where this
is, follow this quick tutorial.


When
you open up Outlook Express you will
notice the menu bar along the top and
also some buttons that provide
shortcuts to the things you do most
often within Outlook Express - things
like starting a new email and checking
for new messages.
There
are 2 ways you can get to the
stationery creating wizard... go with
whichever one you feel most
comfortable with :o)
If
you have a button that says
"Create Mail" with a little
arrow next to it, click on the arrow
so that you get a drop down list (the
names in the middle of the drop down
list may be different to the
screenshot)
 .
.
If
you *don't* have that button (or you
prefer not to use it), in the menu bar
at the top, go to "message"
then "new message using" and
you will get a drop down menu.
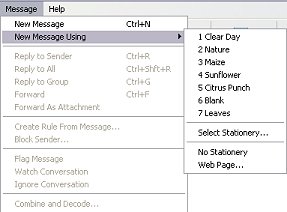
On
the drop down menu choose "select
stationery"
In
the box that appears there is a
preview window on the right hand side
and underneath that there are 2
buttons - create new and edit.
Click on the "Create New"
button

The
wizard kicks into action now and takes
you through it step by step.
Click "next" on the first
page
In
the next window you can start to make your
stationery and customise it to how you
want it to look with pictures and
colours. Play around with it
until you've got it looking the way
you want it to look and then click
"next". If you would
like to use the same settings as I
have done, please follow this
mini-tutorial (it shouldn't take too
long and it will open in a new
window). This is what mine looks
like:

The
next window lets you choose the
standard font you want to use with the
stationery. Bear in mind that if
the person reading your message hasn't
got the font they won't be able to see
it the way you want them to see it so
try and stick with standard fonts for
this bit if you can. These are
the settings I've chosen for my
stationery:

Click
"next"
In
the next window you can choose where
you want the body of your text to be -
leave enough space around the edges of
your text to be able to see your
background - use the preview window to
help you to get it to look right.
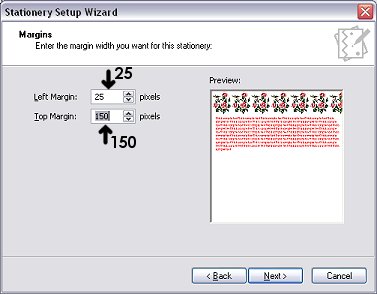
Click
"next"
Now
you need to name your stationery -
give it a name you'll recognise and
then hit "finished"
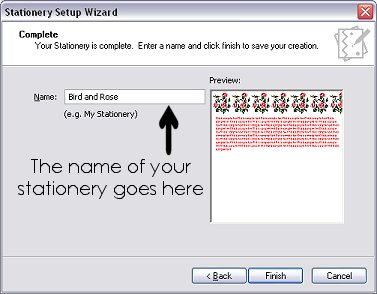
Congratulations!!
You've just made your first bit of
stationery!!!
To
use your stationery, go back to that
drop down menu that you used at the
beginning
or
Click
"select stationery" from the
drop down menu
Find
the name of the stationery you've just
made, highlight it (a preview will
come up in the window on the right)
and then hit "OK"
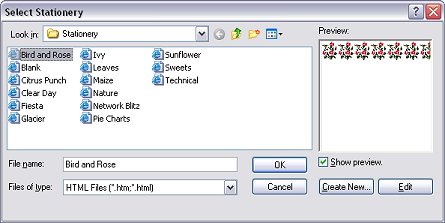
Voila!
You can now use your stationery
whenever you like! :o)
***
There
is another way to make stationery, but
it's a lot more complicated and you need
an html editor to be able to do it,
however, it give you a lot more
flexibility over how you want your
stationery to look.


