
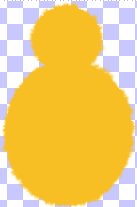
This
little cutie was inspired by a piece of
clip-art I had tubed ages ago and totally
forgotten about. I spotted him while
looking through my tubes and decided to
set myself a challenge. This is the
result of that challenge and what we are
going to make today :o)


You
will need:
A
copy of PaintShop Pro - you can download a
30 day trial version from here
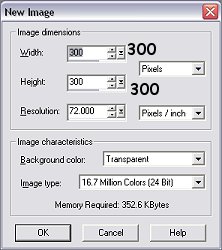
Open
a new image 300x300,
transparent and 16.7 million colours
Rename
the layer
"Background"
Select
your vector drawing tool
 with the following settings:

Eclipse
shape, don't retain style, create as vector, line
width 5, colour of
choice
Draw an egg shape
then deselect

Use
your selection tool
 - select
about half of the egg so that there is a
square box around half of the egg then click again
inside the selection so that there are
marching ants around the outside of half egg
and half without the marching ants
- select
about half of the egg so that there is a
square box around half of the egg then click again
inside the selection so that there are
marching ants around the outside of half egg
and half without the marching ants

Copy
the selected half and paste as a new
layer (ctrl + C then ctrl + L or Edit,
Copy, Edit, Paste as new layer)
Copy
and paste again then then flip that copy
of the image (Image, Flip)
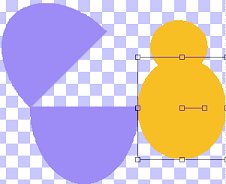
Deselect

Delete whole egg so
that only the 2 separate halves of the
egg are left
Rotate top half of egg 45
degrees left and name the layer "Egg
Top"
Rename
the layer with the other half of egg
"Egg Bottom"

Match up top and bottom
of egg at the left hand side

Now
we are going to start to make the
chick. Using your vector tool,
with the following settings
Eclipse
shape, don't retain style, create as vector, line
width 5, colour #EFCE63
Draw small circle for
head of chick
Deselect

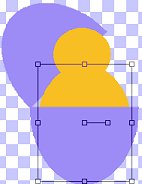
Same settings as before,
draw another circle, slightly
overlapping the first circle and a bit bigger for
body of chick then deselect
You'll
notice that box has grown to cover the
full length of the chick now, so
deselect again
using the mover tool,
move chick over to check he fits inside
the egg - if he does, skip the bits
between these *'s, if not
-
***
Use
the object selector (bottom button
 ) and select
the body of the chick. Move
in each side of body very slowly - keep
checking back against egg until he fits,
then deselect
) and select
the body of the chick. Move
in each side of body very slowly - keep
checking back against egg until he fits,
then deselect
***
Rename
the layer
"Chick" then convert it to a
Raster Layer (Layers, convert to raster
layer)
Arrange your layers so
that they read (from top to bottom):
Egg Bottom
Chick
Egg Top
Background

At
this point, you can give your chick a
feathery look to it if you would like
to. To do this, follow the
instructions between this set of *'s...
if you don't want to then skip to the
step underneath
***
Make
all the layers invisible except for the
Chick layer (click on the glasses next
to the name of the layer to make it
invisible, click again to make it
visible - if it's invisible it's got a
cross through the glasses)
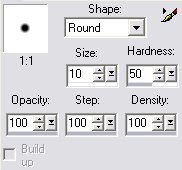
Make
sure that your Chick layer is active
then set the retouch tool
 to these settings:
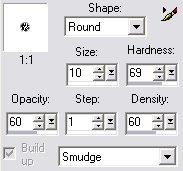
Round
shape, size 10, hardness 69, opacity 60,
step 1, density 60 and make sure Smudge
is in the bottom drop down box.
For
some reason, it doesn't always come up
with the same brush as is in the preview
of the screenshot above. The only
way (so far) I have found to get around
it is to click on the paintbrush with
the arrow next to it in the top right
hand corner, click on one of the other
options in the pop-out menu so that the
shape is different and then set these
settings again. It's a right royal
pain, but I haven't found any other way
to get around it yet... sorry!
When
you have all the same shape and settings
as in the screenshot, you can start to
make the feathery appearance.
Using
the retouch tool go around the outside
of the chick just gently smudging the
edges so that they come very slightly
away from his body.
***
Click
on the Chick layer to
make it active
Using
the airbrush tool at these settings we
are going to make the eyes
Round
brush, size 10, hardness 50, Opacity
100, Step 100 and Density 100, colour
black
Add 2 eyes to
your chick
Using
your vector tool at the following
settings we are going to make the beak:
Eclipse
shape, don't retain style, don't create as vector, line
width 1, Stroke colour #FA8100, Fill colour #FFA73C
Draw
a small oval shape for
beak


Resize
your image to get rid of any excess
background
Merge visible
(Layers, merge, merge visible)
All finished! You
can decorate the shells if you like but
I think he looks just TDC as he is :o)


