Open
the green heart (above, that you've
just saved to your hard drive) in
PSP
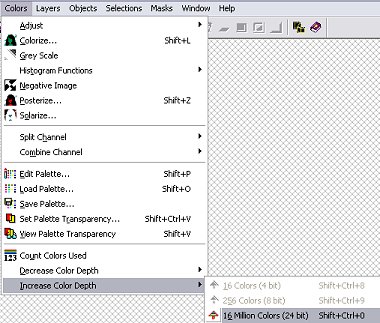
Increase
the colour depth to 16 million
colours
promote
to layer (layers, promote to layer)
using
your magic wand tool, select the
white background by clicking on it
hit
your delete button
deselect
(ctrl+d)
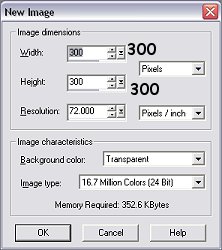
open
a new image, 300x300, transparent
background and 16.7 million colours
save
the new image as a .psp file
copy
green heart and paste as new layer

rotate
the heart 45 degrees right

copy
the green heart and paste as another
new layer
rotate
the new heart 45 degrees left

move
2 hearts together so that the bottom corners
touch

save
your work
copy
and paste the green heart as another
new layer and rotate
it 90 degrees left

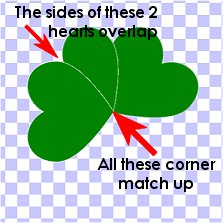
match
up hearts so that the bottom corners touch
and the top side of the new heart
sits on top of the bottom side of
the previous heart
save
your work
copy
and paste another green heart as a new layer
and rotate it 90 degrees right

match
up hearts so that the bottom corners touch
and the top side of the new heart
sits on top of the bottom side of
the previous heart

copy
and paste another heart as new
layer. Match up the bottom of
the new heart with the sides of the other 2 hearts

drag
top heart underneath the 2 hearts at
the side (between layers 3 and 4)

save
your work
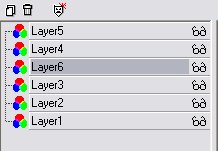
make
your bottom layer invisible (open up
the layer palette and click on the
glasses next to "layer 1")

make
sure one of the other layers is
active (single click on the layer to
select it and make it active)
merge
the visible layers (layers, merge
visible)
using
your vector
tool
 at the following settings

rounded
rectangle - don't retain style,
antialias and create as vector
checked, line width 1, straight line
foreground
and background colours #008000
(change them while your vector tool
is selected)
draw
long thin rectangle from middle of
leaves downwards

holding
down ctrl button, click on one of the
bottom handles and pull out slightly at
the bottom

drag
the stalk layer (the one you've just
made) so that it's underneath leaves

deselect
(ctrl+d)
convert
to a raster layer (layers, convert
to raster layer)
merge
the visible layers (layers, merge,
merge visible)
save
your work
using
your magic wand tool and holding down the
shift key, select all the parts of
the shamrock

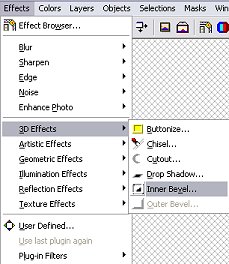
Use
either your inner
bevel button
 or the inner bevel option in the
"effects" menu (effects,
3D effects, inner bevel)
or the inner bevel option in the
"effects" menu (effects,
3D effects, inner bevel)
at
the following settings
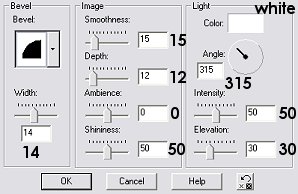
Bevel:
rounded, width 14
Image: smoothness 15, depth
12, ambience 0, shininess 50
Light: white colour, angle
315, intensity 50, elevation 30
click
OK
deselect
(ctrl+d)
crop
off any wasted space

save
as .gif (it comes out clearer than
saving as a .jpg)


