Create
Your Own Tube
Y'know,
I've seen loads of tutorials out there
that show you how to make a tube if your
graphic is already on a transparent
background and even a couple that show you
how to get the transparent background, but
it isn't always that easy, so what I've
decided to do is write a tutorial that
shows you how to make a tube from
something that doesn't have a transparent
background. When you have learnt
this technique, you will also be able to
clean up other people's tubes and get rid
of those "jaggies" that are
sometimes left on tubes.
This
is quite an advanced tutorial, but with
time, patience and lots of concentration I
think most people should be able to do
it... you just have to be determined
enough <grin> After all, *I*
did it and I'm a beginner with PSP in
every sense of the word :o)
This
is also a very long tutorial, so when I
say take a break from the screen I really
do mean it otherwise you will just get too
stressed out with it.

Hints
and tips
* The
undo feature is your friend
*Make
sure you have plenty of time where you
will be able to concentrate - especially
during the last stages
* the less detailed outline on the image
you want to tube, the better
* the brighter the background and the
darker the outline on the
image, the easier it is in the final
stages
*
When you are deleting your background,
if you click and hold the mouse button
as you are deleting you can get rid of
big chunks at the same time. Be
careful though! If you make a
mistake and hit undo, you'll loose
everything you deleted while you were
clicking and holding!
You
will need:
A
copy of PaintShop Pro - you can download
a 30 day trial version from here
A
.gif or .jpg that you would like to
tube.
If
you'd like to use the same one as me,
please right click and save this picture
to your own hard drive.

Tutorial
Open
up image you want to tube.
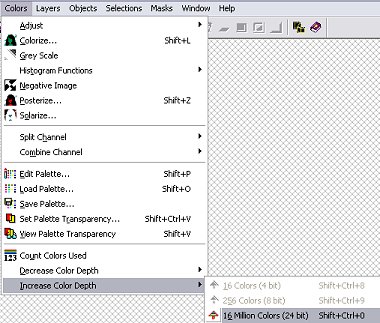
Make
sure there are 16 million colours in
your picture. If not, go to
colours, increase colour depth, 16
million colours
Promote
your graphic to a layer (layers, promote
to layer)
Add
a new Raster layer (layers, new raster
layer)
Move
the new layer to the bottom (layers,
arrange, send to bottom)
Open
up the "overview" window
(view, toolbars, tick overview box)


Save
your graphic as a .psp file (there's
method to my madness... honestly!)
Click
on the eraser
tool
 and use the following settings:

Round
shape, size 30, hardness 0, opacity 100,
step 25, density 100, don't build up
Start
by taking off the biggest parts of
background being careful not to go over
edge of picture. If you make a
mistake or go over the edge, hit the
undo button
 .
.

Save
(seriously... if you don't save your
work and you make a mistake you are
going to lose everything you have done
so far. Save it!!)
Now
you need to zoom
in on your picture

Use
your eraser tool at the following
settings:

Round
shape, size 20, hardness 0, opacity 100,
step 25, density 100. Don't build
up.
Start
to take off the background a bit closer to
image being careful not to go over edges
Save
your work again. The more you do,
the more you lose if you don't save!
Go
and grab a hot/cold drink and take a few
minutes away from the screen so that you
avoid eyestrain (I mean it!). When
you are ready, go to the next page.


