
The Authoritative Guild to
Holga Tune-up and Modifications
By Mark Hahn
Introduction
The Holga is a poorly constructed medium format camera produced in the People's Republic of China. It has more or less taken the place of the Diana for art and photography students who want to play with a cheap toy camera (Dianas often go for more than $100 on eBay now). The charm of these cameras is very akin to that of pinhole cameras; blurry images accompanied by dramatic vignetting are to be expected and can be exploited to produce "dream-like" or nostalgic images. The cameras are a blast to use, but I have found that there are a few simple tweaks and modifications that make these cameras much more usable and I outline them in this report. I also attempt to debunk some of the myths and misinformation surrounding them.
The Latch Mechanism
The biggest myths surrounding these cameras is that the latches are no good and that you have to use duct-tape or huge rubber bands to keep the back from falling off, this is totally untrue. The problem with the latches lies in the manufacturing of the cameras and not with the design. In less than five minutes you will be able to adjust the latch mechanism using a needle nose pliers so that they work as designed and will then be able to confidently swing the camera around your neck as you proudly step out to conquer the world with your stylish new Holga 120S.
Figure 1 shows the details of the latching mechanism with arrows pointing out the key points that routinely need to be adjusted. Point #1 is probably the most critical. The bent tab, as pictured, must be compressed so that it is able to fit completely into the small camera body cavity. If this is not done the latch mechanism will simply slide up and off the camera even with the smallest amount of vertically applied force.

Figure 1 The latch mechanism and points of adjustment.
Arrow #2 is pointing to the sides of the latch mechanism, you must make sure that the sides are pinched tightly around the grooved protrusion on the camera body. If this is not done the latch will simply pop off the camera when the slightest force is applied normal to the latch. The final adjustment you must perform is on point #3. This clip must apply a bit of spring force to hold the back of the camera in place, though this is much less critical than the other two adjustments since it is hard to apply any force to the smooth camera back and pry it free from the camera.
After you perform these simple adjustments you will be able to use your Holga with full confidence that your camera will not fly apart and expose your precious film.
Converting Your Holga To 6x6 Format
The Holga was designed to be a dual format camera, but currently only ships as a 645 format camera. Most Holga users prefer to shoot 6x6 format with the camera (since this increases the vignetting and edge fuzziness, not to mention that it is a nice alternate format from 35mm) and try different methods to convert it over to 6x6. The most common method is to just remove that plastic film gate and live with the resulting film curl and scratches. Other users go through elaborate measures of building new film gates out of cardboard and felt. My method is to just modify the existing film gate so it can be used directly. Figure 2 shows how I did this using a small x-acto saw blade. The only tricky part is that you also have to cut the baffle that is attached to the film gate. I then used extra fine steel wool to buff all edges of the film gate smooth which is something I would do even if I used the stock 645 film gate.

Figure 2 An original and a modified film gate.
The film gates clip into two slots in the camera and when they are not present you get stray light from your exposure spilling onto the adjoining film through the film gate clip slots leading many users to think that their camera has a "light leak," which is something that these cameras generally do not have. Once you remove the side baffles as I have done your camera will also be prone to exposure spillage so I replaced my baffles using black construction paper as shown in Figures 3 and 4 (upgraded later to "Foamies" material).

Figure 3 Laying in two black paper baffles
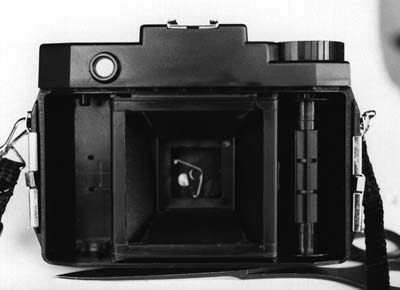
Figure 4 Re-installing the newly modified film gate
A common tip mentioned by many authors on the subject of loading your Holga, which I also concur with, is to take one flap off the end of your 120 film box, fold it in fourths and slip it under your supply roll. This provides friction in the film path and helps to hold your film taught (the takeup spool is racheted tight by the winder). Also, don't forget to slide the ruby window arrow to "12" after modifying you camera to shot 6x6.
Modifying The Holga's Aperture
According to the Holga spec sheet it is outfitted with a 1/100 sec. shutter and an f8 lens. From tests on my camera the shutter seems to be more like 1/200-1/250 sec. Aperture is selected for either sunny or partly cloudy conditions via a small switch and is reported to provide f11 and f8 respectively. Both of my Holgas are fixed at f10 for either setting since there is no secondary aperture plate installed (perhaps a cost saving measure?). Since I planned on shooting Tri-X film almost exclusively I wished to add a smaller aperture of something near f22.

Figure 5 Screws to remove to access shutter assembly
The first step in disassembling the camera for aperture modifications is to remove the two screws found inside the camera as shown in Figure 5. Once these two screws have been removed the shutter and lens housing will separate from the camera body as shown in Figure 6.

Figure 6 The lens and shutter assembly separate from the camera body.
The shutter mechanism can then be removed from the lens housing by unscrewing the two small Phillip's head screws from the shutter plate as shown in Figure 7.

Figure 7 The lens and shutter assembly separate from the camera body.
Once these screws have been removed the shutter and lens housing separate as shown in Figure 8. Arrows point to the stop-down aperture pallet and an aperture ring that is glued to the back of the lens barrel. In my cameras this prime aperture ring provides for an f10 lens, if the plastic aperture ring is removed the lens will open up and have an f8 lens. Further drilling of the lens aperture would easily result in any lens speed up to f4 (which is very fast indeed!). I personally decided to leave my camera at f10 as my fastest (cloudy) speed.

Figure 8 The aperture system.
You will note that my stop-down aperture pallet does not have any aperture plate in it so flipping the switch between cloudy and sunny does absolutely nothing. You will also note that the hole seen on the back of the lens housing contains the stop screw which prevents the lens from being screwed off the camera. By loosening this screw you will be able to remove the lens by simply unscrewing it should you ever have a need to do so.
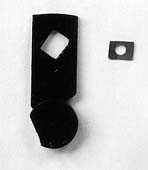
Figure 9 The stop-down pallet with custom aperture plate.

Figure 10 The stop-down pallet with custom aperture plate installed.
Having only English unit drill bits in my house I selected 1/8" for my stopped down aperture hole yielding a f19 lens aperture which is nearly 2 stops slower than my cloudy aperture of f10. To create the new aperture plate I first drilled a 1/8" hole in some brass shim stock, cut it down to fit my aperture pallet and then glued it in place using Crazy-Glue (as shown in Figures 9 and 10). Later I colored it black using a Sharpie marker, but flat black spray paint would probably be better.
Minimizing Internal Reflections and Lens Flare
As supplied from the factory, the Holga 120S is fraught with all sorts of internal reflection and lens flare problems. While some people enjoy the look that these defects add to your photos I found that they were just distractions so I went about minimizing them.
Looking in the lens of the camera (see the Title Figure) I noticed that the stepped black retaining ring was quite shiny and was certainly causing all kinds of lens reflections and flaring problems. After removing the lens from the housing (described above) you will see that the lens retaining ring is lightly "welded" in place. By pushing the retaining ring with a screwdriver in one of the welds you will cause it to rotate and break the weld so that you can remove it in an undamaged state. The high precision plastic lens (actually it doesn't look that bad when you take it out) sits directly under the retaining ring and rests on two soft gaskets. Once you have removed the retaining ring you can spray paint both sides of it with any flat black paint you choose (I used Krylon Camouflage paint). After the paint dries you can just press fit the retaining ring back into place. The layer of paint adds to the friction fit so you shouldn't need to actually glue it back in place.
The second area of concern is the secondary aperture blade. You will want to paint both sides of that flat black as well. The third area of concern is the back of the shutter as seen in Figure 7. All the shiny shutter bits should be blacked out by dabbing on flat black paint (but be careful not to get any on the shutter pivot shaft as it is very hard to clean out). The last thing I did was to paint out the entire inside of my camera as this is again a fairly shiny black plastic (masking off the film gate of course).
While I don't personally believe that these cameras actually suffer any real light leaks and that the defects usually misdiagnosed as such are just caused by internal reflects I did add a foam strip inside the light trap groove on the back of my camera. To do this I cut a 1mm slice of "Foamies" material (found at Wal-Mart and every tacky arts and craft center) and simply slid it in the groove. After replacing the camera back and clamping it down the foam will be wedged in so snuggly that it will not come out.
I performed all these refinements at once so I don't know exactly which one was the most critical, but in total they substantially increased the quality of my Holga photographs while still maintaining all the characteristics that draw so many people to use a Holga 120S in the first place.
One area that I did't black out is the recessed lens housing surfaces around the outside of the lens. This is clearly still causing some flaring in bright sunlight, but I will have to shoot a few more rolls of film with the camera before deciding if this is required (you don't want your Holga to be too good!).
Conclusion
With just a small amount of work the factory supplied Holga camera can be transformed from an unreliable hunk of junk into a fairly reliable and versatile piece of photographic equipment. You will be able to improve the overall performance of the camera while still maintaining all the characteristics that make it so dear to so many users. The camera can be easily converted into a dedicated 6x6 format camera. My aperture choices of f10 and f19 make the camera suitable for shooting outdoors under "Sunny-16" and "cloudy bright" conditions using 400 speed film. Faster lens speeds can be achieved, but at the cost of image sharpness and depth of field and have remained untested.