|
NECKTIE KNOTS
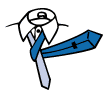
 There are several standard ways to knot a tie: the four-in-hand knot (which dates back to the days of the coach and four in England, when the men on top of the coach would knot their ties in this manner to prevent them from flying in the wind while they were driving); the Windsor knot, purportedly invented by the Duke of Windsor, though he later disclaimed the invention; and the half-Windsor.
Though many men considered good dressers use the Windsor or half-Winsdor knot, it has always struck me as giving too bulbous an appearance. For the most part, the majority of men simply do not look good wearing this knot, though there are a few notable exceptions, particularly Douglas Fairbanks, Jr. In any case, the Windsor knot only looks good when worn with a spread collar, which is how the Duke of Windsor originally wore it. My preference remains for the standard four-in-hand knot. It is the smallest and most precise of knots, and it has been the staple of the natural-shouldered, British-American style of dress in this country and in England for the past fifty years.
But whether one chooses the four-in-hand, the Windsor, or the half-Winsdor, each should be tied so that there is a dimple or crease in the center of the tie just below the knot. This forces the tie to billow and creates a fullness that is the secret to its proper draping.
|
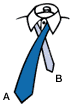
1. Situate the tie so that the end "A" is longer than end "B" and cross "A" over "B".
|
|
2. Bring "A" up through loop between collar and tie; then back down.
|

|
|
3. Pull "A" underneath "B" and to the left, and back through the loop again.
|
|

|
4. Bring "A" across the front from left to right.
|
|
5. Pull "A" up through the loop again.
|

|

|
6. Bring "A" down through the knot in front.
|
|
7. Using both hands, tighten the knot and draw up to collar.
|

|
|
Top of Page
| How to tie a Half Windsor |

|
1. Situate the tie so that the end "A" is longer than end "B" and cross "A" over "B".
|
|
2. Bring "A" up around and behind "B".
|

|

|
3. Bring "A" up.
|
|
4. Pull "A" up and through the loop.
|

|
|

|
5. Bring "A" around front, over "B" from left to right.
|
|
6. Again, bring "A" up and through the loop.
|

|
 |
7. Bring "A" down through the knot in front.
|
|
8. Using both hands, tighten the knot and draw up to collar.
|
 |
|
Top of Page
| How to tie a Four-in-Hand |
|
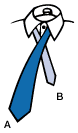
1. Situate the tie so that the end "A" is longer than end "B" and cross "A" over "B".
|
|
2. Turn "A" back underneath "B".
|
|

|
3. Continue by bringing "A" back over in front of "B" again.
|
|

|
4. Pull "A" up and through the loop around your neck.
|
|
5. Hold the front of the knot loosely with your index finger and bring "A" down through front loop.
|

|

|
6. Remove finger and tighten knot snugly to collar by holding "B" and sliding the knot.
|
|
Top of Page
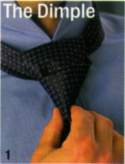   |
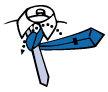
The Dimple
(1)After you've tied your knot but before you tighten it up to your throat, neatly pinch the fabric directly underneath the knot.
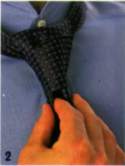
(2)Keep pinching as you tighten the knot; make sure the dimple's locked in. |
Top of Page
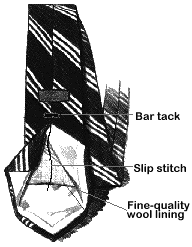
TIE CARE
Ties are the most perishable item in a man's wardrobe, and as such they should be cared for appropriately. The proper care of your neckties actually begins when you take them off your neck. No matter how convenient it seems to slip the small end out of the knot, remember that you are significantly decreasing the longevity of the tie by using this method. Instead, untie the knot first, usually reversing the steps you used when you dressed in the morning. This reversal of steps will untwist the fibers of the material and lining and will help alleviate light creases. If creases are particularly severe, put the two ends of the tie together and roll the tie around your finger like a belt. Slip it off your finger and leave it rolled up overnight. The following morning, if it is a woven silk tie, hang it in your closet. Knitted or crocheted ties should not be hung but laid flat or rolled up instead and then placed in a drawer. This should return the tie to its original state.
Most experts agree that one ought not send a necktie out to be dry-cleaned. While dry cleaners may be able to remove spots, once they press the tie, they will compress the lining and dull the luster of the silk. A water stain can generally be removed by rubbing it with a piece of the same fabric (the other end of the tie, perhaps). If you get a grease spot on your tie, don't panic. When you get home, put the tie on a clean surface and put just a little corn starch on it. Let it sit overnight. With any luck, you will brush off the corn starch in the morning and it will have removed up all the grease.
With proper care, your neckties can last almost forever.
Top of Page
|