| First let me start off with a background of what we need to know before we can start. Images look there best when there is a full amount of correction to them. In other words if they have a nice even supply of darks (Black) to lights (White).. infortunatly not all graphics have this. This is when we see faded images that do not look there best. One thing is to go and retake the picture. But what if you cant? how can you achieve a desirable picture if you cant seem to get the colors to show up? The answer is curves. This simple technique used by industry standard professionals when dealing with insatisfactory pictures that they cannot go without. Is the key to getting a picture to show up at its best. | |
|---|---|
So how do we get this curves to work? well theres two ways of doing it. The first and often what people think is the only way is to go to Image>Adjustments>Curves. This in itself is not a bad idea and works great for pictures you dont need to think twice about. But what if you want to go back and readjust your curves to better suit the picture after a second thought? Normally you would have to hope that you can go backwards enough to erase the curves adjustment. Well there is another way. This way is the same way I do it and the same way alot of the Pro's do it to. Instead of going to Image>Adjustments>Curves. Go to the bottom of your Layers Palette and look for a half white half black circle. This circle is called your New Fill or Adjustment Layer. Basicly with this you can create a new layer with your adjustment on it so that you can edit later. With this bad boy you dont have to worry about going backwards.. if you dont like it you can delete it like a normal layer.. and if you want to re adjust the setings just double click it and it will work wonders. I will be concentrating on Curves in this Tutorial there are plenty of adjustments and fills you can mess around with.. all of witch work nicely now that there on there own layer. |
 |
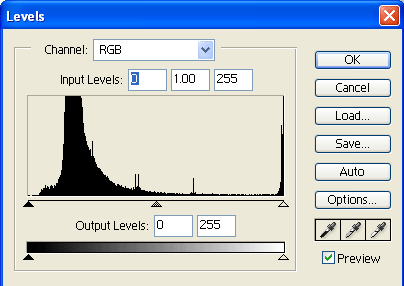
| First we will start off with this simple picture of Aragon from the trilogy Lord of The Rings. this picture doesnt look too bad. Has nice color to it but it is faded. Now we know there is color to this picture if we go up to Image>Adjustment>Levels we can see the level of black white and grey. Theres a nice amount of all white. but theres not quite a full amount of black and quite a lot of darker colors. We will scatter this and make it look better and bring out his skin tone and bring out the whites and the blacks. |
|
We will make a new Curves Adjustment layer and make a slight S shape to give this picture a slightly better appearence. This is very simpe to do. Simply make the new layer by going down to the half black half white circle click it go down to curves and click again. This will make a curves layer and bring up the Curves edit box. To make this S shape we will need to make clickable areas that we can drag. To do this simply click on the line. Make one in the middle, One towards the top (not all the way though and make sure its on the line) and one towards the bottom again not all the way and making sure to click on the line. From there we can click these boxes we made and drag them about. What we want is a slight curve or S shape. Some graphics need more of an S shape then others. What this did essentially is get rid of most of the darker greys.. there will still be quite a few because this is a dark picture. Raised the Blacks and Raised the Whites while it adjusted the greys accordingly. Once you have a slight S shape simply hit ok.
If we go into the Image>Adjustments>Levels we can see that this broke up alot of the greys added alot more to pure black alot more to pure white and (Because the Image is dark) gave alot to the lower darker grey areas. While in whole getting ride of the dullness that was in the picture. |
|
| And of course here is what the picture looks like with a simple and easy to do Curves Adjustment Layer. As you can see we have broken down the greys and increased the all blacks and all whites creating an more even picture that has alot less fade in it. | 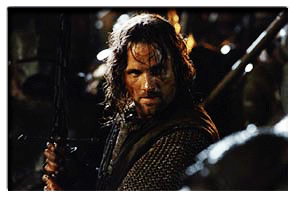 |