 |
|
|
|
|
|
|
|
|
|
|
|
|
|
|
|
|
|
|
|
|
|
|
|
|
|
|
|
|
|
|
|
|
|
|
|
|
|
|
|
|
|
|
|
|
|
|
|
|
|
|
|
|
|
|
|
|
|
|
|
|
|
|
|
|
|
Appearance Modifications |
|
|
|
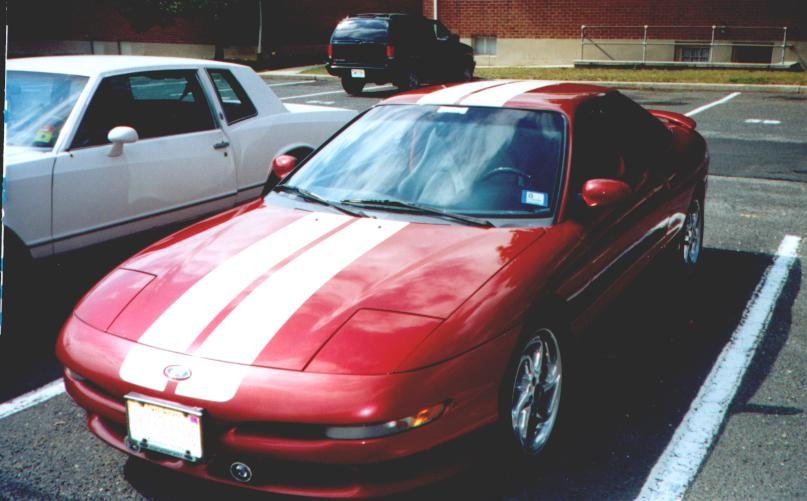
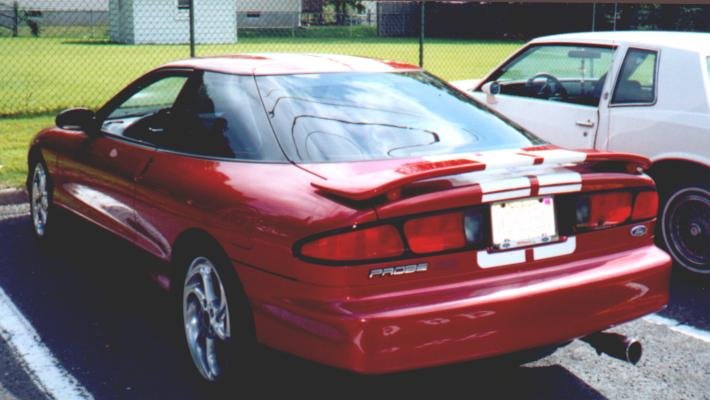
GTS Style Stripes |
|
|
|
 |
|
|
|
|
|
|
|
|
|
|
|
|
|
The GTS style stripes on this car were made by Jeremy Williams decals@jwinteractive.com. They can be seen on his website http://www.jwinteractive.com/decals.html. They are vinyl, and are wet applied. They are the original style that came from the factory. Ford had made white and black stripes. He can make any color stripe to fit your probe. The trick to putting these stripes on is to use plenty of water. This will create more bubbles, but they can be rubbed out with a squeegee. |
|
|
|
 |
|
|
 |
|
|
|
|
|
|
 |
|
|
|
|
 |
|
|
|
|
|
|
Installation of the stripes is a two man project. It is too difficult for one person to do, since the hood and roof stripes are long and need to be held up in the air while the other person positions them. The rear of the car can be performed by one person however.
It is important to make sure there is nothing under the stripes when applying them The car must be free of dust and dirt. Also to prevent paint fade I suggest taking care of the paint with aftermarket waxes or polishes. I use liquid glass.
The stipes if necessary can be removed from the car. This is obviously not an option with paint, and this is why I went with the vinyl. The stripes were 90 dollars from Jeremy's company. |
|
|
|
Fog Lights |
|
|
|
|
|
|
|
|
|
|
|
|
|
|
As far as I know none of the Base/SE probes from the years 93-97 came with fog lights. Modifying the car to host fog lights is straightfoward, but is somewhat difficult to install. Here is the method I used to install my fog lights. This techniques includes the ability to keep the fog lights on without the headlights. |
|
|
|
1. I bought a set of Road Boy fog lights, included relay and everything but a switch. The switch I used was a red rocker switch from radio shack which I mounted to my dashboard along the array of buttons.
2. Wiring instructions were included in the kit. This basically boils down to connected the plus and minus wires to the battery, and mounting the relay onto something (I used the battery). The turn on wire must be connected to a suitable 12 volt source, which I will discuss in a bit. |
|
|
|
|
|
|
|
|
|
3. I installed the lights themselves along the underside of the bumper using the pre-cut holes in the bumper. Basically I used their bracket and obtained two bolts/nuts and connected them as you can see in the picture.
4. The most difficult part of the installation is installing the switch, and connecting the fog light turn on wire to an appropriate source. The turn on wire is a +12 volt wire in which when activated turns the fogs on. What I did was run this wire and a ground wire through the white cap in the firewall. I routed the turn on wire to the array of buttons where I connected it to a switch I mounted there, in series. I then ran the wire from there along with the ground wire to the back of the car to the parking tail lights. Here I connected the ground and the positive turn on wire to wires I spliced into. This way whenever the parking lights are on, the fogs can be turned on and off with the switch in the dashboard. Is tedious but this is the methos I chose. I could have ran the turn on wire into the front parking lights but is it extremely difficult. I believe the front bumper must be removed to get to them. |
|
|
|
Window Tint |
|
|
|
|
|
|
|
|
|
|
|
|
|
|
 |
|
|
Window tint is a simple modification which can drastically change the appearance of the car, and has a practical advantage of blocking sunlight. In this picture the rear windows and the fronts are tinted. The rears are 35%, while the fronts are 70%. A good tinting job will run anywhere from 150-200 dollars. for the entire car. |
|
|
|
|
|
|
Manual Headlight Retractor |
|
|
|
|
|
|
|
|
|
|
|
|
|
|
|
|
|
The sleepy eye modification to the probe is a fairly simple procedure. I do not have pictures at the moment since I did not do the modification to my car yet. Basically the functionality will be to install a momentary on button so as the height of the concealed headlights will be based upon the length of time the button is depressed. The headlight slide switch will be set to on, whereby the headlights will be on, but will not be up until the momentary on switch is depressed. The procedure to install this modification is as follows:
(under construction) |
|
|
|
Body Kits |
|
|
|
|
|
|
|
|
|
|
|
|
|
|
|
|
|
There are a few body kits available for the SE, since the GTs kits can be applied to this model as well. There kits available are:
(under construction) |
|
|
|
|
|
|
|
metlhead25@aol.com |
|
|
|
 |
|
|
|


