
Gnome Control Center
 Red Hat Linux is one of the world's oldest and most well known distribution. Many claim it is the average Linux user's distribution of choice. Many other companies have release distributions that are in fact based upon Red Hat Linux and one of these is the popular Mandrake Linux. Red Hat was founded in 1994 in an American basement by Bob Young and Mark Ewing and over time has gown into a large corporation specialising in Linux distributions as well as support and services for registered Red Hat Linux owners. This review will look at the latest distribution released by Red Hat in the form of Red Hat Linux 7.1 and the new features and improvement it has over previous releases as well as various uses for this Linux OS including the installation of 3rd party applications and games.
You might realise this review seems a little late and Red Hat Linux 7.2 Beta is out but this is for a very good reason. By waiting a couple of months allowed the distribution to mature and allow for easy access to Red Hat Linux 7.1 related information on the Internet, thus having a better chance to get the distribution working and or working correctly on your hardware. This is a simple principle I use for any operating system I use.
| Red Hat Linux 7.1 Features | |
| Kernel: | 2.4.2-2 Stable |
| Glibc: | 2.2.2 |
| GUI: | XFree86 4.0.3 KDE 2.1.1 GNOME 1.2 WindowMaker FVWM |
| Featured Software: | Anaconda KOffice Mozilla 0.7 GIMP 1.2 AbiWord 0.7.13 Gnumeric 0.61 Netscape 4.7x |
| Installation Media: | 2 CD-ROM (Downloaded Version ISO Images) |
| Required: | i386 32MB RAM 650MB HDD |
| Recommended: | i686 300MHz 64MB RAM 3GB HDD |
Installation
The installation process has been slightly updated since the 7.0 version. You will notice the new Red Hat header throughout the installation and there some minor changes to the individual package selection, time zone configuration screen, and the introduction of a firewall configuration screen. The X-Windows setup has been revamped to give it the easier Windows display properties style configuration that was first introduced with Windows 95. I was unable to capture screenshots of the isntallation process but you'll see the changes first hand when you install Red Hat Linux 7.0 for yourself!
To start the installation, I put CD 1 in my first CD-ROM and the computer booted from that. At the LiLO prompt, I hit enter to start with the default Red Hat options. The Anaconda installation program loaded where you chose your language and then your mouse and keyboard type.
The next screen is to select your installation class. You have the four standard options of Workstation, Server, Custom, and Upgrade, along with a new class introduced in this distribution for Laptops giving enhanced support from the start for people installing Red Hat on either Laptop or Notebook computers. I chose Custom to give greater control over what was to be installed.
The partitioning options are still the same as previous releases. Since my machine runs Windows 98 and a Workstation configuration of Red Hat Linux 7.1 already, I decided to do a partitionless installation. This allows a whole Linux installation to be in one file and booted from a floppy disk. While this can cause a speed degradation on some machines, none was noticed on mine! I think quite a few bugs have been ironed out for the partitionless install because unlike Red Hat 7.0 I could finally install packages from both CD during the installation. If I tried this with Red Hat 7.0 it would crash during the package installation.
The next screen doesn't appear with a partitionless installation but I'll cover it anyway. The LiLO configuration is pretty much the same where you can set your boot parameters for RAM amounts and SCSI modes, and where you want LiLO to be installed.
The network configuration screen is next where you can enter the details for your local network if you have one. For people not on a network the default options are perfectly fine. Again there is no change over previous versions of this screen.
This next screen is the new one to the Red Hat installation program. It is the firewall configuration. You have three levels of security; high, medium, and low. High security is mainly for servers, medium is standard protection aimed at dialup and cable Internet users, and low security is only for people using non-networked standalone PCs. Of coarse if you need specific configurations, you can customise the settings to suit your needs.
The next two screens are for your language support with different variation of most languages and the time zone configuration where you select your geographical region from a map and then your UTC offset. You also have the option to tell Linux whether or not your PC clock is set to GMT. For most users this will be no!
The account configuration screen is still the same with options to type in the root password and set up user accounts. The authentication screen lets you set how Linux uses passwords and password protection. Again not much has changed here either and both these screens are pretty much the same as they were in Red Hat Linux 7.0.
Package installation has been revamped. Depending on what installation class you have, a list of main option will be available for you to install. If you chose custom like me, then you will have all the options. This part is the same as it was in previous versions. If you chose to select packages individually, you will notice the difference. The individual package selection has been cleaned up substantially. While the basic operation of this section is the same, the interface is much easier.
The X-Windows configuration is up next and this is where you configure your graphics card. This part of the installation makes a guess of what card you have and is usually around the mark but you might have to make some adjustments. In my case it was changing my TNT2 card from having the detect 4MB RAM to 32MB. The next part deals with your monitor where the installation detects the optimum settings. Again you can adjust these manually if needs be. The part where you select your desired resolution and display depth has been totally revamped. It is now based on the Windows design that was originally debuted with Windows 95. It is simple and efficient.
The next part is the package installation and at this point you can sit back and relax as the Linux operating system is installed on your hard disk. At the end of the installation you have the option of creating a boot disk and I suggest you do so. After this is completed your PC will restart where you can log on and configure your system to how you desire.
Configuring
Configuring Red Hat Linux 7.1 is pretty easy. I did have to make some minor configurations to install the nVidia Linux Detonator drivers but this is only required if you have an nVidia card and want to play 3D games. For the average user configuring is required mainly for the desktop environment you chose and this can be done with their included configuration tool and are very easy to use. Red Hat Linux 7.1 ships with Gnome 1.2 as the default desktop with KDE 2.1.1 optional. The main configuration tools are show below.
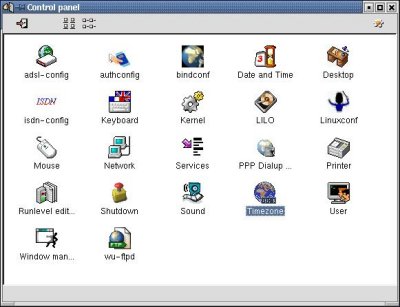
Red Hat has been slow in offering configuration tools all in the one place like SuSE and Mandrake offer. Well Red Hat have finally given us a slight improvement by creating a Windows style control panel applet for KDE, but all the utilities are still the same with many still being text based. Below is a picture of the Kontrol Panel as it's known.
Desktop Environments
Red Hat 7.1 features two fully integrated desktop environment, Gnome 1.2 and KDE 2.1.1. The default is still Gnome 1.2 but there is an option to set the new KDE 2.1.1 as default. You also have the fallback windows managers, WindowsMaker and FVWM but not many people use these light weight managers anymore.
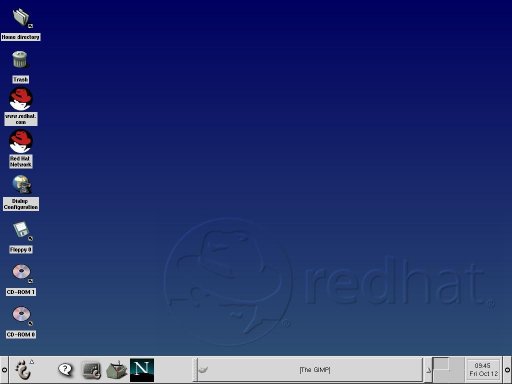
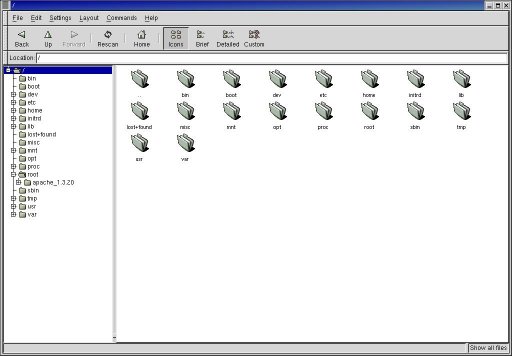
Gnome 1.2 is the older of the two and hasn't been updated that much since the previous release of Red Hat. Gnome uses Sawfish as it's windows manager and GMC as it's file manager. Gnome is the best option for low spec systems because of low resource usage. It runs well on older Pentium 2 computers and absolutely screams on my Pentium 3. The Gnome desktop is the same from previous releases with the Windows style two click interface and the Windows style file manager. Below are pictures of the default Gnome 1.2 desktop and GMC.
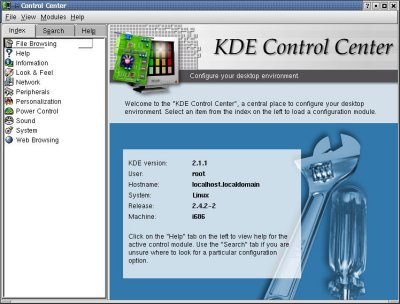
KDE is now the preferred desktop environment by most Linux users and in Red Hat Linux 7.1, it is the first time it is actually full configured to the same extent Gnome was. KDE is now in version 2.x.x and this release of Red Hat features the stable version of 2.1.1. KDE is notoriously resource hungry and it shows. It sucked up everything my machine has to offer and give it a chance, it would still ask for more. KDE is an all in one package with windows manager and file manager that doubles as a web browser included. KDE also includes an Office suite to boot. The windows manager for KDE is KWM and the file manager/web browser is Konqueror. Unlike Gnome, KDE is a one click environment and due to it's high popularity, is the most useable so long as you've got the modern hardware to run it. Bellow are pictures of the KDE 2.1.1 desktop, Konqueror file manager/web browser, and KOffice.


Konqueror File Manager & Web Browser
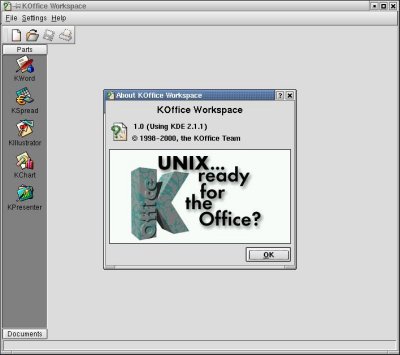
KOffice Workspace
Bundled Software
Red Hat 7.1 comes with tonnes of bundles software to accomplish almost any task. You have three web browsers at your disposal being Konqueror, the tried and true Netscape 4.7x, as well as the new Mozilla 0.7. You also have the Adobe Photoshop of the Linux world in the form of Gimp 1.2 and for productivity, you have KOffice and other programs like AbiWord 0.7.13 and Gnumeric 0.61. There is too much to list but if the above does offer you enough, you can quite easily install StarOffice 5.2 but the included software is more than enough in my opinion.
3rd Party Software and Tests
One of the best points about Linux is the ability to expand your system on both the software and hardware side of things. Linux software can be downloaded off the net with ease but not all of it installs correctly as you will see. It can take quite a bit of tweaking but like many, I didn't have that much time!
| System Configuration | |
| CPU: | Intel Pentium III EB 733MHz |
| RAM: | 256MB PC133 CAS3 SDRAM |
| Motherboard: | MSI MS-6309 (VIA Apollo Pro 133A) |
| Video: | 32MB AOpen PA3020 Pro AGP (nVidia RIVA TNT2 Pro) |
| Sound: | Creative Sound Blaster VIBRA128 PCI |
| Operating System: | Red Hat Linux 7.1 |
| Software: | Quake III Arena Apache 1.3.20 Descent 3 Netscape 6.01 |
| Kernel Version: | 2.4.2-2 Stable |
| X Version: | XFree86 4.0.3 |
| X GUI: | KDE 2.1.1 Gnome 1.2 (Quake 3) |
| X Video Driver: | nVidia Linux Detonator 1.0-1251 |
| AGP Driver/Mode: | AGP (NvAGP "1") AGP2X |
The first program I installed and fired up was the Linux version of Quake III Arena. I used to run Quake 3 well on my old Red Hat 7.0 installation and I wasn't surprise when it came to life under this OS with the aid of nVidia's drivers. I ran some benchmarks using the standard settings in Quake 3 and I switched X-Windows into native 16bit color mode for all tests except for the high quality test which required 32bit colour. This was to keep the benchmarks consistent to what Windows users get. X-Windows will not dynamically change the display depth for me. I chose Gnome as the desktop environment because it was less of a resource hog. Below are pictures of the installation and an in game screenshot. The benchmark results will follow.


Quake III Arena Demo001 Screenshot
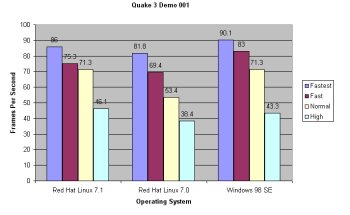
As you can see Red Hat Linux 7.1 can run Quake III Arena easily. Performance wise it is no slouch managing to outperform it's predecessor in every test as well as perform even with Windows 98 in the normal test and beat it in the high quality test. I didn't go beyond the default tests because my TNT2 video card would be a bottleneck.
The next piece of software I loaded was the Apache Web Server. I followed the instructions and configured it correctly according to the documentation. Since I don't have a proper network at home, I wasn't able to set Apache up fully. I simulated the web server on my machine by using the TCP/IP loopback address of 127.0.0.1 and what do you know, it worked! See the picture below!

It didn't take long for me to look further into the Apache configuration to work out how to set my local copy of Speed King's Website up to run on the server. As you can see by the screenshots, It works flawlessly and takes only about 15 minutes to set up!


High Resolution Page on Apache
![]() Red Hat Linux 7.1 comes with Apache but it is installed in non-standard places and very difficult to get to. I just grabbed a tarball off the Internet and did a fresh installation. The configuration only took 15 minutes and I was away. Most of the world's web servers run Apache and if I can get a decent cable connection at a decent price, I too might host my site on my own Apache server with many more downloads and gigabytes of storage space ready to be filled with goodies for you to download!
Red Hat Linux 7.1 comes with Apache but it is installed in non-standard places and very difficult to get to. I just grabbed a tarball off the Internet and did a fresh installation. The configuration only took 15 minutes and I was away. Most of the world's web servers run Apache and if I can get a decent cable connection at a decent price, I too might host my site on my own Apache server with many more downloads and gigabytes of storage space ready to be filled with goodies for you to download!
I also tried another popular game from Loki called Descent 3. It didn't have an installer so I just extracted the files into my home directory. I fired up the game and it worked like a charm with no trouble during any of the gameplay. I tried to take a screenshot but I couldn't work out how. Performance seemed up to par with the Windows version but I can't be certain.
When installing Red Hat 7.1, I deliberately left Mozilla out to see if I could get Netscape 6.01 to work. I had trouble with this browser on Red Hat 7.0 ages ago but it worked fine on some of my other distributions. This installation went smoothly with no trouble at all. I used the default directories and chose a full install. After completing the installation I checked the documentation to see if anything else had to be done and found nothing. When I went to run it, just like 7.0 it crashed with a Segment fault. I didn't have much time to tinker with it so I gave up. Bellow is a screenshot of the installation.

Kernel Compile Benchmark
No Linux distribution review would be complete without a kernel benchmark. One thing you have to remember is that Red Hat 7.1 supports many more devices by default and uses the new and bigger 2.4.2-2 kernel compared to Red Hat 7.0's 2.2.16-20 so keep that in mind when you look at the results. Well here they are!
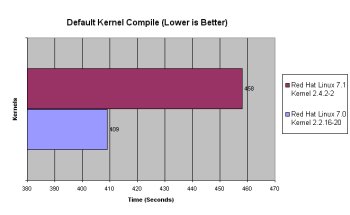
As you can see the older Red Hat Linux 7.0 default kernel is faster to compile but don't think of it as the new 7.1 being slower, think of it as supporting more devices. If the Quake III Arena results are anything to go by, Red Hat Linux 7.1 is faster than it's predecessor.
Pros
The new KDE 2.1.1 is definitely an improvement over past releases and this is the first version to properly configure KDE by default. In past versions, Gnome would be configured but KDE was up to you. The new 7.1 appears a lot more balanced feature wise. The new XFree86 4.0.3 gives better video support but I still loaded the proprietary nVidia drivers. The Laptop installation class is a real plus and it allows for a better installation on portable computers. The new firewall configuration in the installation is a major positive security wise as well.
Cons
Although it has improved from past versions, there is still an absence of a localised configuration tool featured in other distributions like SuSE and Mandrake. It would allow for quicker configuration of the system if all the tools were in one place. Netscape was also a negative. The only other fault I can pick is with the RPM system. I wanted to uninstall the nVidia drivers from the command line but it said they weren't installed, but I knew for sure that in fact they were. UDMA support also seems to be buggy because the older 7.0 release set my hard disks to allow Ultra DMA mode 4 but in 7.1 no amount of tweaking would get them out of Ultra DMA mode 2. Setting the -X68 flag would make no difference. Hardware detection also isn't as good as Mandrake because it couldn't pick up my ISA SCSI card or my IDE CD-RW. These are only minor grips to a good distribution.
Conclusion
If you are looking for a Linux distribution at the current time and require speed and stability but don't need all the latest Beta technology then look no further than Red Hat Linux 7.1! It has replaced Mandrake 7.2 as my desktop distribution and I highly recommend it!