Q
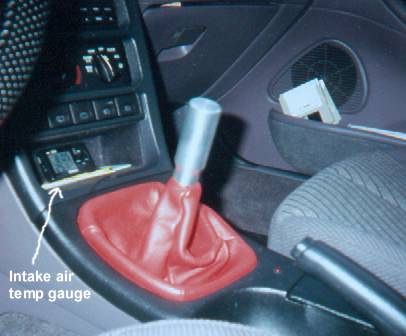
Ross' Page THE performance page for 2nd gen Probe fans. Turbo, NOS, and more. Rotors From the Taurus SHO FAQ comes this enlightening information on cross-drilled and performance rotors. S SAE (Society of Automotive Engineers) A lot of people have been trying to get a hold of this! The 1992 SAE paper on Mazda's 2.5L KL03 engine is below... Here is my shifter knob and shift boot. The shifter knob was made a friend (thanks, John!) on a lathe, and the boot was purchased through J.C. Whitney. By the way, the thread required for the knob is M10x1.25mm.
See Eibach Springs Strut Bar, homemade
A small number of companies manufacture front strut tower bars. My first attempt at a front strut bar illustrated
how little clearance there was under the hood. The space is so tight that nothing bigger than 1/2" piping will
fit. For this reason it is easy to end up with a strut bar that looks great but provides no benefit to chassis stiffness. My first sway bar modification involved making a dual 12mm rear setup. I took two stock sway bars, and
using some creativity bolted them up. Performance was better, but only slightly. I junked this set-up in favour of the Addco 22mm bar. The manufacturer part number for the bar is 699. By far
the cheapest source is J.C. Whitney ( www.jcwhitney.com ). I got my bar for US$95 plus a 10% discount.
One thing about the Addco polyurethane bushings is that they use the small stock brackets and are therefore very thin. Some have reported the bushings disintegrating. If this happens to you, Addco will send you new
ones for free. Better yet, buy decent sized replacement bushings and brackets at J.C. Whitney for US$10. Bracket/bushing combinations with grease fittings are available through Summit Racing ( www.summitracing.com ) for $15.
Whether you hacked your rear sway bar links to death when installing your Addco rear sway bar, or they
simply died from stress, instead of forking over US$80 per end link, order some of these Summit rod ends. For each side, buy one female and one male rod end and screw them together. Another Prober has confirmed that
this solution works, and has eliminated some of the clunking noises that the stock end links made.
T Timing See Ignition Timing Timing Belt In an attempt to change the water pump, I goofed up and had to reinstall the timing belt. It's really not that bad a
job. However, a servce manual is a must to know the procedure for aligning the timing belt correctly. A couple of tips to help you get the crank pulley off: 1) use the starter motor to break the crank bolt free, and 2) make a
pulley puller tool using the crank bolt, a 1.5"diam. washer, and one of the bolts from pulley tensioners. TPS (Throttle Position Sensor) A This little device is a variable resistor located on the side of the throttle body. It allows the engine ECU to
monitor the throttle position. If the TPS is out of adjustment, part throttle applications will result in jerky acceleration. Full throttle will also be affected as the ECU may not activate the VRIS butterfly valves as per
the full-throttle VRIS map.
Tough shifting into and out of 1st and 2nd gears is a trademark of the Mazda tranny we have. The situation can be improved greatly by using a thinner transmission oil like Redline MTL or better yet GM Synchromesh. The
GM Synchromesh I used was listed in the catalogue as being for all front wheel drive manual transmission vehicles. No viscosity rating was given on the bottle or in the catalogue. It's a relatively low viscosity oil
similar to ATF. The lighter weight of the oil may mean that it is unsuitable for very hot weather as its film strength may become too low to protect gear surfaces. Considering GM Synchromesh is just CDN$6.99 a bottle at any GM dealership, it's a very good investment.
Numerous people have made their own tubocharger kits for their 2.5L V6's. ATS Turbo is the only company at present that makes turbo and supercharger kits for the 2.5L V6.
|


