This is the famous, build it yourself, "Roll Your Own Altimeter" by Jeff Karpinski from the Rocketry Online forum. A great beginner's barometric altimeter with dual deployment capabilities, plus an audible readout of altitude and an optional LCD display. Capable of flying to 10.5 Km (approx. 35,000 feet) altitude.I do not have Jeff's permission to post this information because I have been unable to contact him. He noted that he was having some kind of family crisis on his site, and I have not been able to contact him since then. Jeff, if you are out there reading this, please accept my apologies for using this without your permission. I hope things are going well for you now and that whatever happened has been resolved satisfactorily. If you have problems with this site, please contact me.
This is a great place to start building your own altimeter. Jeff Karpinski designed this altimeter and taught an online course on how to build it on Rocketry Online back in the spring of 1999. I followed his course and found the construction fairly easy, but not without problems. I am posting this here because it is such a good beginner's altimeter. However, it is not my design. I do not have permission to publish construction details, programming instructions, etc. I cannot and will not support it or answer questions about it. It is placed here for reference only, and as an example of the kind of work that can easily and cheaply be done.
Although this is an easy altimeter to build, it should not be attempted as a first electronics project. It can be confusing to first time builders. Competent help should be obtained if you have never built an electronic project before.
Now that that is done, on to the AL101 . . .
To view this schematic better, use at least 1024 x 768 resolution. There are only 16 colors in the schematic so you can set the color resolution low if you need to to get the screen to go this large. If you have trouble seeing the vertical and horizontal traces against the background of the grid paper, you can right click the image and view it separately.
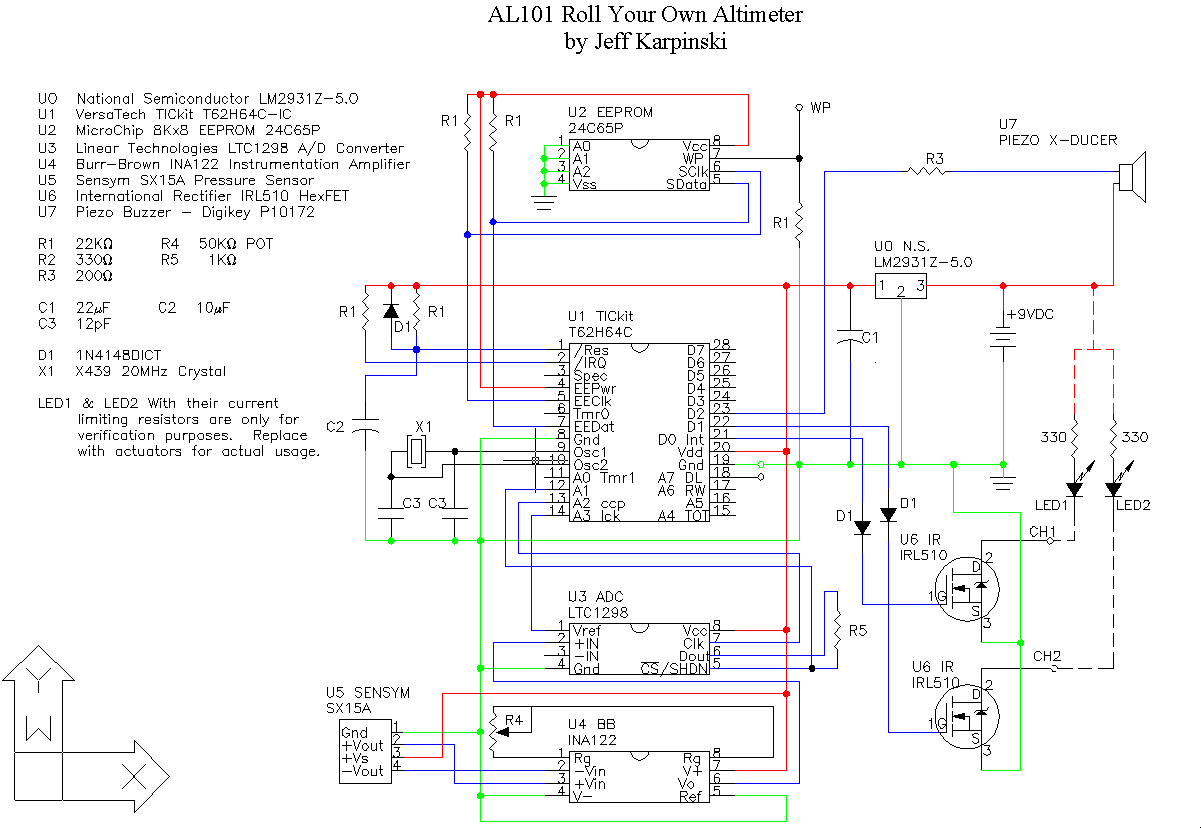
Several things to point out on this schematic. The write protect pin (PIN 7) on the EEPROM is left tied to ground. If pulled up to +5 volts you can overwrite the contents of the EEPROM.
Pins 18 & 19 on the TICkit are the serial communications ports. Details for the serial communications cable are in the book that comes with the TICkit.
Pin 3 on the A/D converter is left unconnected. This seems to be a bad idea to me, and if you are going to use the A/D single ended like this it would be a good idea to connect this to ground.
Channel 1 and Channel 2 are the outputs of the HEXFETs and are shown connected to LED1 & LED2 with 330 ohm current limiting resistors. Notice that they are switching the current through the resistors. For pyrotechnic actuators I think it would be safer to connect the drain of the HEXFET directly the battery and connect the actuator between the source and ground.
More information about this design can be found (hopefully) by searching the forum archives on ROL or by contacting Milliways Electronics (Jeff Karpinski's site.) Also there are several individuals who have built the AL101 altimeter (but may call it by slightly different names) and have posted information on their sites. They are listed below: