Wow, this rolling stock bash was a great deal of fun. Most of the inspiration and techniques to follow came from fellow COGRA members and / or information I collected from MyLargeScale.com’s forum and contributors. The flatcar itself is of course a simple Bachmann® flatcar Item number 95670, described by the manufacturer as a 1:20.3 20 foot flatcar. The first step was to disassemble the car and wash all the plastic parts. I then used a Dremel® tool, a scribing awl and a utility knife to rough up the planking and beams. Note that I cut all the way through between some boards to simulate larger gaps between planks. On this model I also added some fairly parallel scratches running lengthwise down the deck to represent drag marks. Unfortunately most of the drag marks ended up covered by the loads. I then spray painted a grayish primer on the frame and deck. I choose not to primer the “metal” parts such as the carriages and truss rods. I find that inexpensive Zehrs® primer works fine.
While that paint dried, I took a piece of old, very rusty muffler and filed the rust onto a paper plate. After some sifting, I had a good size pile of rust dust. Some people would caution you about using real rust for fear of it ending up in bad places like gearboxes and the like. They are probably right, but for the small amount this project requires, I used it anyway. With the primer dry, I proceeded to brush and rub combinations of browns and black latex craft paints on all wooden surfaces. Because I do not leave any rolling stock exposed to the elements when not running, I have found that these inexpensive paints stand up quite well. Let this dry for a couple of days. Once it was really dry I added some washes of brown and a rub of Indian ink diluted in isopropyl alcohol. The black ink really helps the details and gouges stand out. The alcohol will attack the paint, that’s why I wait days before proceeding. The benefit is the alcohol can be used to remove or lessen painted areas that you are unhappy with. Occasionally I spray a first coat of dulcote on the paint prior to the ink wash. This lessens the effect the alcohol has on the paint.
The CWN letters and numbers for the flatcar were generated on an inkjet printer. I printed a dark wood grain background around the white letters and numbers. I then sanded the back of the paper very gently until the image is showing through the back quite easily. You may have to experiment a bit here. The thinner, more tissue paper like, the better the result will be. I had to practice a bit to find that breaking point where the paper was thin but not quite ripping through. Next I cut the letters out, cropping them as close as possible. To affix them to the car, I put a very small amount of Welbond in the area where the letters were to be placed. I’ve tried spray adhesives and CA etc, but prefer Welbond because it affords some movement to slide the label into place. Do not put the glue directly on the paper. It is now so thin that it will be unmanageable. The next couple of steps help secure the letters, hide the edges and provide some, minimal durability.
Once the glue has dried overnight, I take a dilute wash of the same pallet of colours used to originally paint the car and brush the areas next to and between the letters. To dirty things up I will occasionally rub some black latex paint over part of the lettering. This also helps make the paper backing disappear. Do not use ink in this area. I find that the paper absorbs too much too quickly. I have previously sprayed dulcote on my lettering prior to weathering so that the paper will not absorb the paint but the ink tends to soak in anyway. It does have the benefit of allowing me some opportunity to correct minor errors of too much paint over the lettering. As a side note, I have yet to be successful in creating large logos or lettering for light coloured backgrounds using this technique. For instance I tried to produce a logging company logo for the side of the bulldozer and a simple, but large number for the rear. As you can see from the final produce, neither is present, they just would not work out well enough for me. Against a light background the edge of the paper always shows up and is further highlighted by weathering. So instead the lettering on the bulldozer is all dry transfers that are over sprayed with dulcote.
Next I painted the molded in castings such as the stake pockets and Nut Bolt Washers (NBWs) with a Testors® Burnt Sienna enamel paint. As I was painting these details, I selectively and sparingly sprinkled fine sand and rust dust in spots. The sand just added some texture that will pop out a bit when dry and washed with black ink.
I tend to do minimal work to the underside of my cars because my railroad is at ground level unfortunately so the under carriage is almost never seen. I therefore choose to cut costs and efforts there. The existing Bachmann air cylinder, truss rods, queen posts and Kadee coupler boxes are painted and rusted like the stake pockets. Once all of these parts were dry, I added some washes and swipes of brown and black. This is when the sand begins to look like pitting rust. No additional details were added to the underbody. Once all of this was dry, I inspected the paint for areas that need to be touched up for too much or too little weathering. When satisfied, I sprayed these parts with a couple of coats of Testors® Dulcote.
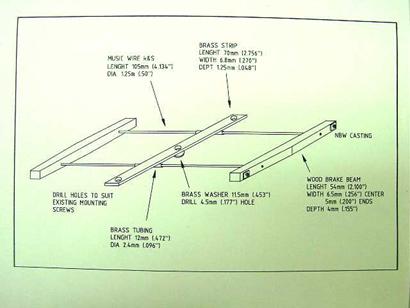
The Bachmann trucks were painted with a brown black mix similar to but redder than the basic mix used to paint the deck. As each area was painted, I spread liberal amounts of the finest rust shavings over them. Once this dried for 24 hours I sprayed them with a couple of coats Dulcote. Meanwhile I also cut 1.25 mm dia. welding rod and brake beams from scrap cedar. I glued Ozark Miniatures® casting OM 16-6 Monarch brake shoes and Ozark NBW castings to the cedar beams after weathering the beams. All Ozark castings and the welding rods were dipped in patina to rust them prior to assembly. The rods were bent to the necessary shape and then passed through holes cut in the cross-member of the Bachmann wheel carriages. I glued one beam to one end then dry fit the other beam to measure for the final rod length. I cut the rods glued them to the other beam.
http://4largescale.com/spence/index.htm
Property of Wayne Spence
At this point I sub assembled the couplers to the undercarriage and sat the deck in place. This is necessary because the cut levers need to be custom made to fit. To mount the Kadee® 830 couplers I chose to use, the rear mounting hole/boss of the couple box body has to be cut off. I removed the lip from the top cover plate as well. This lets the coupler sit back a little further. I like that look better. I also found it necessary to file the outside diameter of the mounting hole on the truck itself to maximize available wheel swing. Don’t make the same mistake I did. I did not realize I had to file this O.D. until I had already painted the trucks. Filing it first would of course be a better idea. Nonetheless, with these changes made, the coupler assembly can be mounted through the existing mounting hole in the Bachmann frame using the centre hole in the Kadee box.
Using the eyes from fish hooks and a paperclip bent into shape, I made the cut levers. Because I used Kadee couplers, my levers are not functional. One hole was drilled into the top of the coupler to accept an eye and two were drilled in the end beam of the car frame. Inexpensive chain from a children’s craft set was used to connect the lever to the eye on the coupler. The chain must be long enough to allow the full range of motion of the coupler. I learned this the hard way. I cut my first chain to length to look pretty, that is to say that it had minimal sag from the end of the lever to the coupler, just enough so that when the bar was raised the chain would go taut. Unfortunately it was way too short and eliminated all hope of the car tracking around any tighter curves so a longer, droopier chain had to be installed.
The grab irons were similarly made from bent paper clips and Ozark NBW castings. The paper clips for both projects were blackened using patina. I know that Ozark makes various grab iron castings that would simplify this part of the project. I chose to use what I had on hand at the time and am happy with the results.
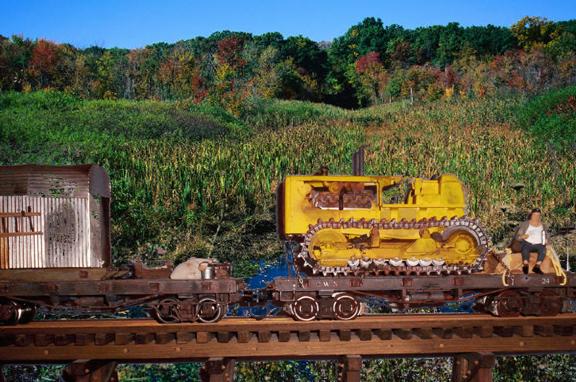
The bulldozer is an AMT/Ertl® 1/25 scale kit. A quick internet search leads me to believe that this model was last produced in 2002. I generally built the kit as designed with a couple of minor exceptions. I made no attempt to rescale this model. A 1.20.3 figure does not fit in the driver’s seat for instance.
The front grill air intake for the radiator was supplied as a decal to represent a whole bunch of round holes. The decal looked fair, but not great. After looking a pictures of some vintage bulldozers and tractors, I chose to cut an opening in my nose piece and fashion a protective grill from some unknown stiff wire I had laying about. The bulldozer looks much tougher with this change.
I was initially disappointed about having to eliminate the plow. There were interferences on the right of way, including a bridge I had just completed. At 15˝ cm, this plow is wide! I did not want this to be a static model sitting on a siding so I eliminated the plow. As the project came together, I missed the blade less and less. It may come in handy for a bash down the road. Styrene plates had to be made to cover over assembly holes meant for the plow arms. To keep the older, backwoods look; I also did not add a pair of hydraulic cylinders and trenching blade that were supplied. For the look I was trying to achieve, I just couldn’t manage to age the hydraulic circuit well enough.
I encrusted some real dirt mixed with dilute white glue on the treads. This remains as a weak spot in this project and needs some additional attention.
The hold down chains are as with the cut levers, children’s jewelry cast offs, source unknown. The hooks and binders are Ozark castings.
The driver on his lunch break is a Preiser figure. He needed to be repainted to look a little less clown like. Originally his hat and shoes were bright white and his pants were bright sky blue. The crate he is sitting on is a scrap of pine cut to size, with 5 of the 6 sides faced with rails to add interest and texture. The crate was lightly stained. Once dry, a piece of tissue paper, the gift wrap type not the nose type, was soaked in dilute white glue, draped over the crate and left to dry on a piece of glass. The dried tissue covered crate was then cut off of the glass with a straight razor and painted with a latex mix to approximate a canvas colour. Darker washes were used to add a cloth like appearance and to highlight the folds and wrinkles. The rigging holding the crate down is chalk line string that I purchased at Home Depot. I recoloured it by dragging it through dilute paint. I remembered reading about rigging ship models and that a good way to secure knots was to add a few drops of dilute white glue to the knot. So that’s what I did. I chose this rope over conventional “kitchen” string or twine because of the nice visible braid in the chalk line rope.

Materials List
(Substitute as you like, this is simply my materials list)
Bachmann® flatcar Item number 95670
AMT/Ertl® Bulldozer Model number 31769
Preicer® sitting figure from set 45037 Workers Eating Snacks
Welding rod 1.25 diameter
Ozark Miniatures® castings;
. Monarch brake shoes OM-16 (5051)
. NBW ľ” Bolt, 2” Hex Nut O7B
. NBW 3” Mallable Iron O7D
. Chain hooks OM 5057
. Chain binder OL-814 (5058)
Chalk line rope
Various discount store chains (jewelry dept)
Kadee® 830 couplers
6 paper clips
6 fish hooks
Tissue paper
Isopropyl alcohol
Black India ink
Folk Art® craft Latex paints
Grey all purpose spray primer paint
Testors® Burnt Sienna