
CWN Back Shops
CWN Back Shops
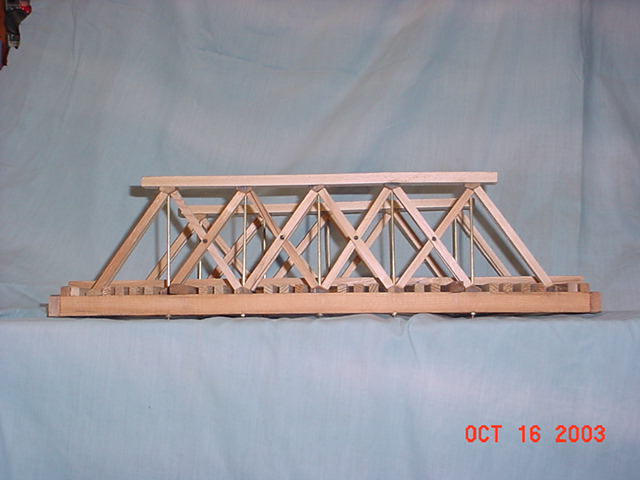
So I broken down and tried building a bridge. I used the plans from Garden Railroader. It was a very enjoyable and educational process. The plans were sufficient. I figure, in hindsight that there are some modifications I would have made. Some of the beams seem too large to be prototypical. I haven’t done any research to confirm that however. There were almost no assembly instructions, which caused me to overlook a couple details that I had to add at a less than ideal time in the construction process. For instance I missed two beams that go on the underside of the bridge and all of the diagonal cross members for the underside of the structure until I had the entire deck and one side built. It’s all there on the plans. I simply missed them. They weren’t too difficult to install after the fact, but it hurt my pride that I missed them! I would have also liked to make the sides of the bridge about ˝ inch, real not scale, taller for personal aesthetic preference.
Before starting this project, I had made a few attempts at cutting lumber to scale on my table saw. This was regularly an exercise in futility. I was ultimately quite successful after I purchased a quality fine finishing blade. I now use it only for cutting scale lumber. I also found it necessary to make a custom blade cover insert that had near zero clearance for the width of the blade. I’m sure neither of these points are a surprise to any veteran woodworkers but for this first timer it made all the difference in the world. Oh and one more thing. Safety glasses, push sticks and lots and lots of patience. A table saw is a dangerous tool at the best of time. It is particularly so when working with smaller stock like this.
As have many others before me, I used 3/32 brass rod for the truss rods. I purchased the appropriate die and threaded the ends of the rod to accept brass washers and nuts. I purchased the rod from a local Canadian Tire (hardware) and mail ordered the nuts and rods from MacMaster – Carr. It was suggested to me that I use some oil on the rods to ease the threading process. I put a couple of drops of 3 in 1 oil on the end of the rod prior to threading. The process goes much quicker as a result. I tried one rod without the oil. It does a fine job, but the oil makes things run smoother.
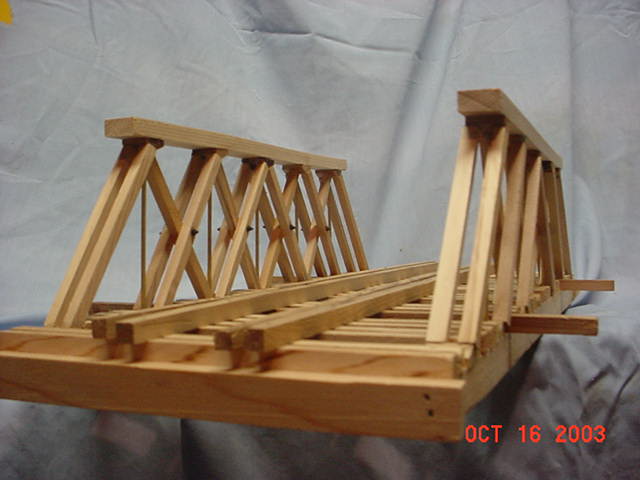
I excluded the truss rods that run the length of the bridge under the decking. My bridge was installed low to the water it is crossing. The trusses as laid out in the plan would be almost dipping into my stream. For strength purposes, I could have simply run two rods the length of the bridge without the characteristic bends. Due to the short length of my bridge and the oversized look of the nuts and washers I opted to delete all of the truss rods on the undersize of my model. I installed some Ozark miniatures castings to simulate the existence of the rods and did include the wooden diagonal cross members.
The outrigger supports for the sides of the bridge were glued and pinned in place. Then I added more NBW castings over the pinholes. I also pinned the vertical cross members where they intersect each other and likewise hold the pins in place by gluing NBW castings over the pinholes.
For the same reasons I deleted the undercarriage truss rods, I buried the “real” nuts and washers for the vertical members under the top beams. I then installed NBW Ozark miniature castings on top of the beams to represent the ends of the trusses. This of course reduces the overall strength of the bridge, as I am now relying on the glue joint for transfer of forces along the upper member. In the case of this particular bridge, given the short span, strength of the rails and strength of the lower members relative to the weight of the heaviest possible trainload this bridge will see, there is no chance of mechanical failure due to loading. If 100% of the glue fails the deck beams will themselves carry the load.
An alternative to consider if you want to retain this added strength, particularly if you are building a longer bridge, would be to either notch the beam to accept the cross member blocks or to thread the trusses through a half size beam and laminate the other half on top to hide the oversize nuts. The easiest solution would be to just let the oversize rods and nuts show through.
Due to the low level of installation of this bridge, I did not find it necessary to hide the bottom ends of the real trusses. Once the bridge was installed they could hardly be seen. If I were to build a high bridge I would use the notch or lamination technique to hide these as well.
Cutting the angled blocks for the side beams or cross members was one of the biggest challenges for me due in large part to a limited number of tools and a lack of experience. I never achieved perfection with them. This flaw was overcome by custom fitting each cross member as it was assembled. Once complete, the minor variation is not at all noticeable. In retrospect I think accurate blocks could have been cut with a better band saw or at least a blade more appropriate for the job and a fixture to hold the stock accurately once the first side angle had been cut.
There are a number of nooks and crannies in this project. Glue will want to get into some of these areas. Despite quick cleanup and taking care to avoid it in the first place, I found I ended up with glue spots that I could not sand out. As a result I had to opt to not stain my bridge, although I will treat it with water sealant. Next time around I will pre-stain my lumber after it is cut to size prior to assembly. As a result of not staining the cedar, I intend to age this bridge outside untreated for about a year then I will water seal it.
The bridge has been outside, year round now for three years. It aged very well and is holding up fine. I intend to reseal it this spring.
A good place to go for additional information about Howe Truss bridge construction
is the website of George
Schreyer. This is where I started from.


Last Modified Dec 8, 2005