The Original Ford Ranger Lowering FAQ


DISCLAIMER: The information on this page was acquired from many sources, not limited to manufacturers catalogs, magazine articles, and personal experience. Nothing on this page should be taken as god given, carved in stone fact. There are variables involved, and no two trucks are the same, this page is intended to be used only as a guide. If you have any specific questions on how any of these modifications will affect your truck, you should consult a certified mechanic and/or the manufacturer of the components you intend to use.


SECTIONS


  1. Front end lowering
  2. Rear end lowering
  3. Extreme lowering
  4. Suspension Parts Sources
  5. Front end instructions
  6. Rear end instructions


FRONT END LOWERING


METHOD PRO'S CON'S

Cutting the coils

Approx 2" by removing 1 turn
  • Cheap, its virtually free
  • Increases spring rate, should improve handling
  • Exact drop is unknown until truck is reassembled
  • Ride will be rougher, due to increased spring rate
  • Truck will bottom out sooner, due to shorter distance to the bump stops
  • Care must be taken when cutting, to prevent the spring from getting to hot, and the temper being removed and weakening the spring.


Lowered coils

1" or 2"
  • Relatively inexpensive
  • Increase in spring rate, should improve handling
  • Choice of constant rate, or progressive spring rate coils
  • Ride will be rougher, due to increased spring rate
  • Truck will bottom out sooner, due to shorter distance to the bump stops


Dropped I-beams

3"
(1983-1997)
  • Factory ride is maintained
  • Most expensive, non-adjustable method
  • Rather labor intensive


Spindle and control arms

3"
(1998+)
  • Factory ride is maintained
  • Most expensive, non-adjustable method
  • Rather labor intensive


Notes on front end lowering

  1. If the 3" drop from a set of I-beams isn't enough, you can combine the I-beams with shorter springs to get you 5" lower. Any lower than that, and you probably won't be able to get it aligned.
  2. Speaking of getting it aligned, to straighten the camber out on a I-beam ranger, you have to replace the camber bushing, sometimes referred to as a "slug". Most alignment shops use bushings that aren't adjustable, so you need a new bushing for every adjustment. That's why it usually costs more to align a Ranger, its that "plus parts" clause. Well, there are aftermarket, adjustable bushings available so they may be a good investment if you think you are going to be needing realignments, and with expensive low profile tires, its a good idea.
  3. Watch the offset and width of your wheels on the pre 1989 Rangers too. The top of the wheel well in the fender is pretty low, so you don't want it to make contact with your tires when you hit a bump. Ford Probe wheels bolt right up, and will allow you to "tuck tire".
  4. If you want to make the height adjustable, you can use hydraulics, or air bags. See more on these options below.
  5. You should not cut the front bump stops, because they keep the tierod from hitting the frame.
  6. If you go lower than 2" you should also get new shocks, since the lowered suspension will put your factory shocks in compression. Make sure you get shorter shocks.
  7. Constant rate VS. Variable (or progressive) rate Springs
    1. For a comfortable ride, you want a "soft" spring, or one that will allow easy movement of the suspension. But, for load handling, and performance driving, you don't want the spring compressing too much, or you will bottom out, or cause excessive suspension travel.
    2. A constant rate spring will give you the same amount of resistance to compression, all the way until it is fully compressed. So, if the spring is soft, you will have a comfortable ride, but it may not hold as much weight, or handle as well. And, if the spring is too stiff, the ride may be harsh, and handling may suffer as well, due to lack of suspension travel, but you will be able to carry a heavy payload. So, you may have to find a happy middle ground, and compromise some ride for payload or handling characteristics.
    3. A variable or progressive rate spring is the spring designers compromise between a soft comfort spring, and a stiff payload spring. It works like this, one portion of the spring has the windings spaced farther apart, and they get closer together, as you near the other end of the spring. This way, when the spring initially starts to compress, it is easy, and "soft", but as the compression continues, the spring gets stiffer. With a progressive spring, you *should* get comfort, handling, and payload capabilities.
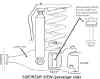
    4. Front suspension images:
      I-beam, front view I-beam, side view


REAR END LOWERING


METHOD PRO'S CON'S

Removing a leaf

Approx 2-4" by removing the middle leaf of the pack
  • Cheap, its virtually free
  • Decreases spring rate, should improve handling
  • Exact drop is unknown until truck is reassembled
  • Load capacity will be reduced, due to decreased spring rate
  • Truck will bottom out sooner, due to shorter distance to the bump stops


Flip kit

4"
flip kit
  • Relatively inexpensive
  • Load capacity is maintained
  • Spring rate/ride will stay the same
  • Truck will bottom out sooner, due to shorter distance to the bump stops


Dearched leaf springs

2"-4"
  • Decreases spring rate, should improve handling
  • Springs can be purchased, or factory springs can be dearched by a spring shop
  • Load capacity will be reduced, due to decreased spring rate
  • Truck will bottom out sooner, due to shorter distance to the bump stops


Spring hanger/shackle kit

4"
  • Load capacity is maintained
  • Spring rate/ride will stay the same
  • Involves removing the old hanger rivets, which requires an air chisel, or grinder
  • Truck will bottom out sooner, due to shorter distance to the bump stops


Notes on rear end lowering

  1. If the 4" flip kit doesn't get you low enough, you can add lowering blocks, lowering leaf springs, or the lowered hangers. BUT, you will need to c-notch, or step notch the frame, otherwise you will be sitting on the bump stops, and your ride will suck. Also, I have been informed that if you have a pre 1993 standard cab (not sure on the newer ones), you may have interference between the drive shaft and the cross member near the rear of the cab (its the forward cross member that the fuel tank mounts to) (this is with 6" of lowering).
  2. To make the rear suspension height adjustable, you can use air shocks, air bags, or hydraulics. See below for more info.
  3. You should also replace your factory shocks with shorter ones if you go lower than 2" since you don't want to run them in a constant state of compression. OR, you can make shock extenders out of 2x2 tubing attached to the lower shock mount on the rear axle, OR remove the upper shock mounts, flip over them, and use Chevy truck ('73-'87) front shocks on the rear of the Ranger.


ADVANCED/EXTREME LOWERING


METHOD PRO'S CON'S

Hydraulics

aka juice
  • Adjustable ride height
  • Very attention grabbing
  • Expensive
  • High maintenance
  • You can break parts easily, you are using high pressure pumps
  • Front end alignment is impossible
  • Rough ride


Air bags

aka Air Springs
  • Adjustable ride height
  • Smooth ride
  • Unlike hydraulics, you can keep your shocks
  • Expensive
  • Some routine maintenance is involved
  • Front end alignment is only possible at one ride height


4 Links and Ladder bars

  • Can work with airbags, hydraulics, or coil-overs
  • 4-link eliminates pinion angle change
  • Allows for the ultimate in low
  • Expensive
  • Ladder bars are NOT good for street use(4 links are)
  • Involves a completely new rear suspension


Body Dropping

aka "channeling"
  • Lowers the truck without a suspension change
  • Allows you to "lay body" rather than just frame
  • This is the ultimate in low
  • Very expensive
  • Involves cutting out, and moving the floor of the truck up
  • Defiantly not for a beginner, requires an experienced body man


PARTS


LOWERING PARTS SOURCES
MANUFACTURER YEAR FRONT REAR
AMT. METHOD AMT. METHOD
Bell Tech
2822 East California Ave.
Fresno, California, 95721
1-800-445-3767
19XX-XX -3 I-beams
P/N=XXXX
-4 Hanger/shackles
P/N=XXXX
Street Master
420 Jay Street.
Coldwater, MI 49036
(517) 278-4011
1983-88 -3 I-beams
P/N=RL25
-4 Flip Kit
P/N=RL25
1989-97 -3 I-beams
P/N=RL26
-4 Flip Kit
P/N=RL26
DJM Suspension
580 W. 18th Street
Gardena, CA 90248
(310)538-1538
1983-88 -3 I-beams
P/N=DB3002-3
-4 Flip Kit
P/N=FK3001-4
1989-97 -3 I-beams
P/N=DB3001-3
-4 Flip Kit
P/N=FK3001-4
1998-XX -2 Control arms and coil springs
P/N=CS3098-2
-3 Hanger and shackle
P/N=HS3098-3
1998-XX -4 Lower control arms
P/N=CA3098L-4
Upper control arms
P/N=CA3098U
Coil springs
P/N=CS3098-2
-5 Flip Kit
P/N=FK3098-5
Full Effect
Suite 135
1364 Camino Real
San Bernardino, CA 92408
(909)888-1014 or (800)471-1014
Email Full Effect
1998-XX -5 Control arms(-3") and coil springs(-2")
P/N=?
-5 Flip Kit
P/N=?
California Super Trucks
774 South "E" Street
San Bernardino, CA 92408
(909)383-5454 or fax(909)383-5454
1998-XX -5 Upper and lower Control arms and coil springs
P/N=?
-6 Flip Kit and c-notch
P/N=?
Ground Force
P.O. Box 149
Mount Braddock, PA 15465
(412)430-2068
19XX-XX ? ? ? ?
EIBach
17817 Gillett Ave.
Irvine, CA 92714
(714)752-6700
19XX-XX -2 Drop coils
P/N=3540.520
-4 Drop leafs
P/N=N/A
Quickor Suspension
17029 Se Mcloughlin Boulevard
Portland, OR 97267
(503) 654 2175
1983-XX -2 Drop coils
P/N=XXXX
-2 Drop leafs
P/N=XXXX
Superior Spindles
(800) 640-3767
N. Indiana Street
Los Angeles, CA 90063
USA
1989+ -2 N/A
N/A
-2

-4

Drop leafs
P/N=1900
Flip Kit
P/N=1904
Chassis Engineering
1500 Ave R
Riviera Beach, Fl 334041
1983-97 N/A N/A Four link See website
Ultimate Customs
(800)-410-4853 717 Finley AVE
Ajax Ontario l1s-3t1
Canada
1983-97 N/A N/A N/A N/A
Art Morrison Enterprises
(800)929-7188 5301 8th Street East
Fife, WA 98424
1983-97 N/A N/A N/A N/A
Chisholm Enterprises
(800)848-2333 10051 Greenleaf Ave.
Santa Fe Springs, DA 90670
19??-?? N/A N/A ? Leaf Springs
Hellwig
(800) ?
?
?
19??-?? N/A ? N/A ?
Stillen
(800) ?
?
?
19??-?? N/A ? N/A ?
Steeda
(954)960-0774
1351 NW Steeda Way
Pompano Beach, FL 33069
19??-?? -2.5 Coil springs
P/N=121-SSS4.OE
(97 Ext. cab Ranger call for other years)
-3 Leaf springs
P/N=555-0001
(97 Ranger call for other years)
Saleen
(800) ?
?
?
19??-?? N/A ? N/A ?

FRONT CAMBER PARTS
MANUFACTURER YEAR PART
NUMBER
AMT OF
ADJUSTMENT
INGALLS ENGINEERING
303-651-1297
34 Boston Court
Longmont, CO 80501
1983-88 543 Adjustable Bushing Up to 2-1/4 degrees
1989-97 594 Adjustable Bushing Up to 2-1/2 degrees
560-? Non-adjustable Bushing Up to 3.0 degrees
1998-? 290 Adjustable Cam +/-2.0 degrees
SPECIALTY PRODUCTS
800-525-6505
4045 Specialty Place
Longmont, CO 80502-0923
1989-96 23180
87150
? degrees
? degrees

STOCK FRONT SHOCK INFO
Stud top---Eye bottom
Year Extended
Length
Mid
Length
Collapsed
Length
1983-96 14.79" 12.23" 9.67"
STOCK REAR SHOCK INFO
Eye top---Eye bottom
Year Extended
Length
Mid
Length
Collapsed
Length
1983-96 22.89" 18.42" 13.49"


FRONT END LOWERING INSTRUCTIONS

Coil spring removal and installation

  1. Raise front of the vehicle and support it. Place jack under the I-beam.
  2. Disconnect the shock absorber from the lower bracket.
  3. Remove the spring lower retainer attaching nuts and remove the lower retainer.
  4. Slowly lower the I-beam and remove the spring. Rotate the spring to clear the upper spring retainer.
  5. Installation is done in reverse.


I-beam removal and installation

  1. Raise and support the vehicle. Remove the front wheel spindle, the front spring, and the front sway bar (if it has one).
  2. Remove the spring lower seat from the radius arm then remove the bolt and nut that attaches the sway bar bracket and radius arm to the front axle.
  3. Remove the axle to frame pivot bracket bolt and nut.
  4. Installation is done in reverse.


Here is a more in depth set of instructions.


REAR END LOWERING INSTRUCTIONS

Leaf spring removal and installation

  1. Raise the vehicle frame and support it, until the weight is off the rear spring with the tires still touching the ground.
  2. Remove the nuts from the spring U-bolts and drive the U-bolts from the U-bolt plate.
  3. Remove the spring to front-hanger nut and bolt at the front of the spring.
  4. Remove the shackle lower nut and bolt at the rear of the spring.
  5. Remove the spring assembly from the vehicle.
  6. Install the lowered leaf spring by reversing the procedure.


Flip kit installation

  1. stuff


If you have questions, comments, suggestions, etc., email me.