| My
retro handset! |
||||
| It
took a long time to get together, but my own retro
handset is finally complete. It works like a champ. The final product: 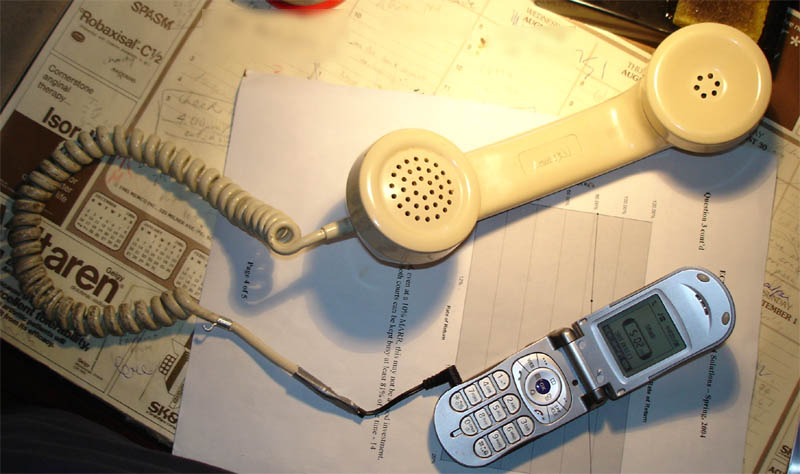 Here's how I did it: Parts
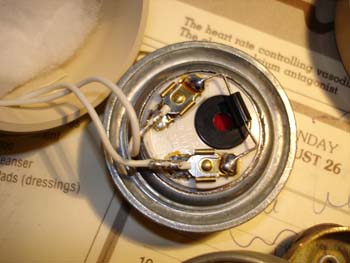
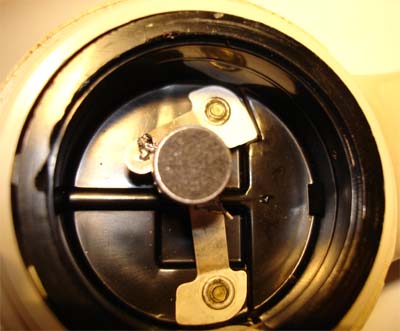
To be clear, when I write 'headset', I am referring to the small thing you plug into your mobile phone that lets you talk with the phone in your pocket. When I write 'handset', I am referring to the part of the old telephone that contains the microphone and speaker. Here's a look at the old phone that I used. It's best to use a phone that will allow you to easily open the handset. As you can see, this handset can be unscrewed by hand, allowing easy access to the microphone and speaker.  I snipped the cord connected to the base. The next part is figuring out the wiring inside the handset. If you're good, you can do this just by looking at how it connects to the base of the old phone (so don't go cutting it right away). But if you're not good, here's how I did it. There are four wires inside the headset. There is a speaker signal, speaker ground, microphone signal, and microphone ground. My unit had two white wires going to the speaker, below.
I ended up using the original handset's
speaker in the final product, so I didn't touch this.
Unfortunately, I do not know the impedance of the speaker. I
didn't know which speaker terminal was positive and which was negative,
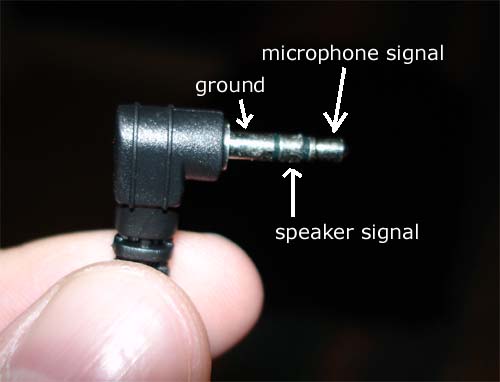
as it was unmarked. To figure this out, I used the loose 2.5 mm
stereo jack that I had. Now would be a good time to go over the
wiring of that thing. For the exposed plug:
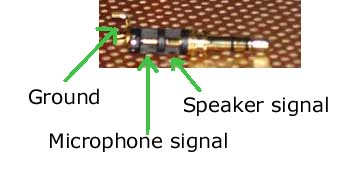
And for the
insides:
So plug the loose 2.5 mm stereo jack into
your mobile phone. Strip (carefully) the ends of the two speaker
wires to expose the metal wiring. Attach one to the ground
connector, and the other to the speaker signal connector. Then
holding those in place, call someone. If you hear ringing out of
the old handset's speaker, you got the wiring right. Put a piece
of tape or something around the signal wire for future
indication. If you didn't hear anything, reverse the two wires
and try again. If you still hear nothing, you might need to
replace the handset's speaker with something else, or your cell phone
may be unhappy seeing only a speaker plugged into the handsfree jack. Next comes the microphone. The old telephone came with an ancient dynamic microphone that would never work with a mobile phone. This is it:
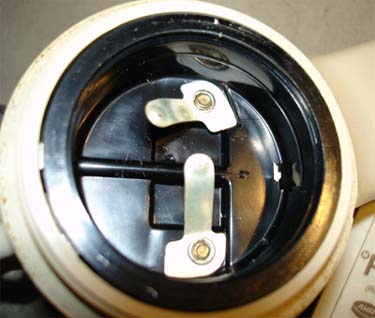
Luckily, this sits loose inside the handset, so it plops right out. That leaves you with two bare terminals:
The wiring, of course, is dumb. Pick one of these terminals to be positive (ie, the mic signal), and the other is ground - of course, you must be consistent with this. The black plastic well to which the two terminals are connected pulls right out of the unit to reveal the wiring. One of the terminals was connected to a red wire, and the other was connected to a black wire. I chose red as positive and black as negative. Examine your electret microphone. It should have two pins. The pin connected to the outside case of the mic is the ground, and the other is the positive terminal. Carefully solder the electret microphone into the plastic well inside the handset. Make certain you match up the terminals and pins properly. Mine looks like this:
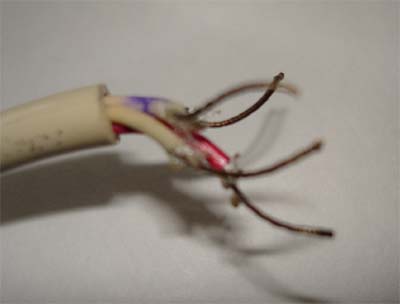
Yes, it's not a pretty joint, but I only have two hands and it works well. To summarise, at this point you should have the wiring of the handset figured out. You should have replaced the old dynamic mic with a new electret one. At the end of the long, tortuous cord that comes out of the handset, make sure all four wires are separated and stripped, like so (you should already have done some of this for figuring out the speaker wiring, if necessary):
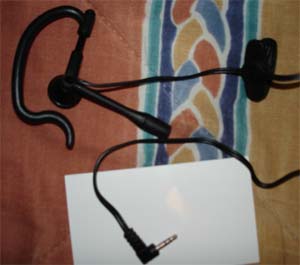
Excuse the bad photograph. I got my headset from freeheadset.org. Despite the name, it wasn't free. The thing cost me ~$4.50 CDN in 'shipping' costs, and it took 1.5 months to get here. Anyway, I got this:
We only need the 2.5 mm plug, so what type of headset you get doesn't matter. Cheap is good. Yes, you can solder the thing together yourself with a loose 2.5 mm jack like the one I showed above. This was my original plan. However, it would be the toughest soldering job ever. It wasn't worth it. Cut the wiring so that you have a few inches of wire to the jack. There should be four distinct wires. Like in the handset, we have two for the mic and two for the speaker.
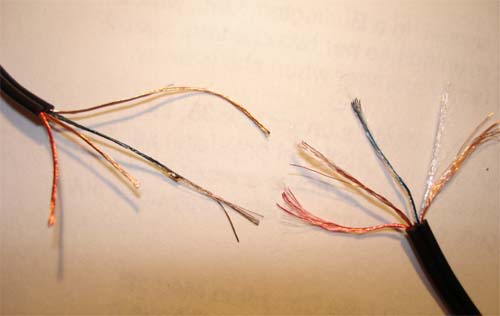
You'll likely notice that the wiring is made up of copper wire mixed with some sort of textile (I'm not saying it's cotton, but it looks like cotton. It's definitely something synthetic). The cotton and copper wire are stranded together. It should look like this (I separated some cotton so you can see it better):
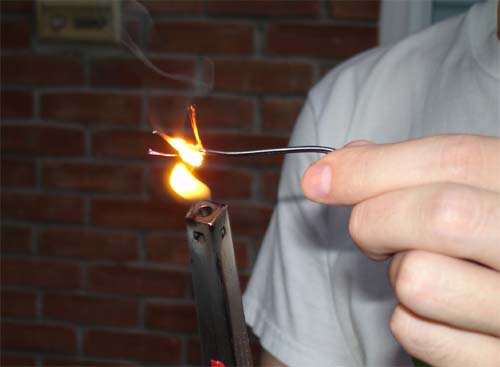
So we want to get rid of the cotton, because it will just get in the way. There's only one way to get rid of this cotton but leave the copper wiring untouched:
Only keep the exposed wiring in the flame for a split second, because that's all it takes. If you want to see the difference pre and post flaming, here it is:
The ones on the left are much easier to work with! You probably have to do the same thing for the telephone handset wiring. So now we need to figure out which wires does what. My four copper stranded wires were coloured differently: orange, blue, and two 'plain'. I (correctly) assumed that two plain coloured strands were the ground for the mic and speaker. So I needed to figure out what the blue and orange did. I used a battery, LED, and resistor like this:
Yes, there are
easier ways, but I like watching an LED light up. Connect the
positive battery terminal to one of the segments on the exposed
plug. Here it's connected to the microphone signal segment.
Then try the wire connected to the resistor on the exposed strands at
the end. When the LED lights up, you've found the microphone
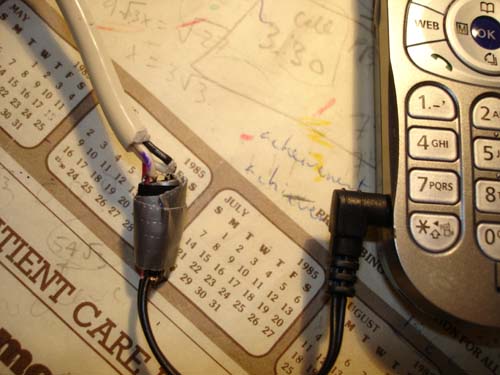
signal wiring. The other coloured one would be the speaker signal. So now we have the wiring of the headset figured out, with four separated, stripped wires at the end of the long dangly cord, and we have the wiring of the handset figured out, with four separated stripped wires. Now we put the two things together. To test that everything worked, I initially twisted them together by hand, and wrapped everything in electrical and duct tape:
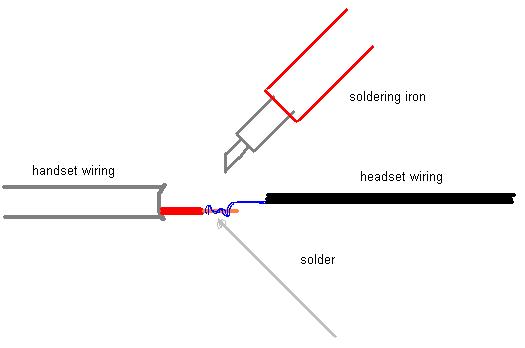
It worked fine (when I squeezed that node between my fingers), so I decided to go ahead with soldering. Unfortunately, I have no pictures of soldering. It wasn't too difficult, though. The wires from the cellular headset are thinner than the wires from the old telephone handset, so I wrapped the headset wire around the corresponding handset wire, then I covered the whole twisted connection with solder. Here's my artistic depiction (showing only one wire from each side):
The grounds should be the same everywhere, so I twisted the two ground wires from the handset together, and I twisted the two ground wires from the cellular handset around those two...and then covered the whole thing with solder. Once each connection is soldered together, wrap each one separately in electrical tape, then cover the whole thing with duct tape. It should look like this:
Now you're all ready to go (assuming that it actually works)! BOOYAH Thanks to Nik Roope for his advice, and freeheadset.org for the cheap headset.
|
||||