[ Home | NPS Non-Profit Organization | Fundraising
| Medical Involvement | In
Appreciation ]
[ Medical Symposiums | Frequently Asked
Questions | Related Links | Contact
Us | Site Map ]
NAIL-PATELLA
SYNDROME WORLDWIDE, INC.
Suggestions
regarding musculoskeletal and biomechanical issues for the Nail-Patella Syndrome
individual
Disclaimer-the
information presented in this handout are suggestions only.
Each participant must first seek the advice of their physician before
starting any kind of exercise regime where a thorough evaluation can be performed to
determine what is appropriate for them. |
|
| Flexibility Stretching is a very important part of
a well rounded fitness program. It should
not be overlooked.
When to stretch:
Stretching should be done before and after any physical
activity to help prevent injury. It is highly recommended for everyone to stretch
daily.
How to stretch:
The correct way to stretch is to hold the stretch position
of the muscle or muscles for a relaxed, sustained duration of time, at least 15 to 30
seconds. Stabilization is important here. Each stretch requires certain areas
to be stabilized in order to fully stretch the desired muscles. Do not stretch to
the point of pain, it should feel tight, not painful. Bouncing is not appropriate, a
sustained stretch is more beneficial. Do not hold your breath while stretching.
Since duration of the stretch is the important factor, 15 to 30 seconds, it is not
necessary to do more than 3 to 5 repetitions. Therefor, stretching doesn't not take
very long to complete. It is the duration of the stretch, not how many, that is
important.
Benefits Of Stretching:
- Increases range of motion of joints.
- Decreases muscle tension.
- Prevents injuries such as strains.
- Helps Circulation
|
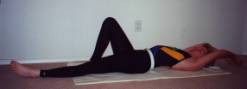
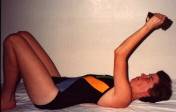
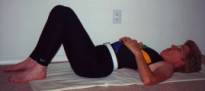
| 1. Supine Overhead Upper Extremity
With Simultaneous Single Hip Flexor Stretch.
Lay on back, extend one leg and raise arms overhead then
pull up and in with stomach and squeeze tight the buttock of extended leg. Do the
same for other leg.
|
2. Prone
press-up
Lay on stomach and slowly raise up to
prop on elbows.

3. Hamstring
stretch
Lay on back next to an open door. Place one foot on the frame of door and slowly
straighten the leg. Keep other knee bent then
switch legs and repeat.

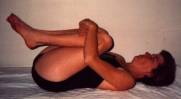
4. Double
knee to chest
Lay on back and slowly bring both knees
toward chest and hold there. Can place your
hands under the calf instead of what is pictured if pushing down on knees is painful.
5. Standing
wall heel cord stretch
Face a wall and place one foot back with
heel down and knee straight. Bend front knee
and slowly lean into wall. Keep stomach
pulled up and in.
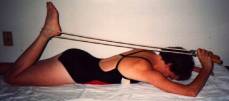
6. Prone
quad stretch
Place a rope around your ankle and hold
onto it with hands. Lay on your stomach and
slowly bend your knee then gently pull further with rope for further stretch.
B. Strengthening
Adequate strength is necessary for
people to carryout daily activities without difficulty.
Strengthening specific muscles helps to strengthen, shape and tone the body.
When to strengthen
Strengthening should be carried out when a weakness has been determined in specific
muscles and muscle groups. Weak muscles
contribute to difficulties in completing daily, recreational and athletic activities. Weak musculature also contributes to an increase
risk of injury to the body.
How to strengthen
Always warm up, stretch before beginning your strengthening exercises. Proper technique while strengthening is very
important. Proper positioning on
Cybex/Nautilus/Universal gym equipment etc. is necessary to avoid injury. Where applicable, be sure to always have the axis
of motion on the equipment in line with the axis of the body part being exercised. When lifting from a standing position, be sure
to: 1) feet
hip width apart. 2) equal balance forward and behind. 3) keep
knees in line with the feet. 4) keep knees slightly bent, not locked. There should be no pain while performing
strengthening exercises.
If using free weights, proper body
positioning is very important to strengthen the intended musculature and to avoid injury. Again, as previously mentioned under stretching,
stabilization is vitally important to strengthen correctly.
An important comment to note here is
that strengthening via the use of free weights is more beneficial when beginning a
strengthening program. Free weights
strengthen individual muscles when isolated and if there is any imbalances, free weights
do a better job. Larger strengthening
equipment such as cybex/nautilus/universal gym, all tend to work groups of muscles and are
usually completed bilaterally. This bilateral
workout tends to allow the stronger muscle groups to dominate thereby not helping to
strengthen the weaker group. Larger
strengthening apparatus serve a better purpose later in the strengthening regime.
How often
Three times per week with at least a days rest between workouts. If you choose to workout daily with strengthening
exercises, then complete upper body strengthening one day followed by the lower body on
the next day. This method would allow a days
rest for each part of the body.
SETS-A set is a fixed number of repetitions. Best
strength gains are achieved when 1 to 5 sets per exercise are completed. 3 sets of 10 repetitions are considered beneficial
for the average person.
REPETITIONS-10 repetitions are considered average except when you wish to build
more endurance. Endurance improves when you
increase the repetitions to 15, 20, 25 and more per set, and keeping the resistance lower. Both strengthening and endurance are achieved. For NPS, it is recommended that higher
repetitions coupled with lower resistance be performed particularly for the knee joints. This minimizes the compressive forces on the joint
thereby reducing irritation and still allowing strengthening and endurance to occur. Speed is also a very important issue, the faster
the repetitions the better for minimizing the time that compressive forces are acting on
the joint. This same approach can be used for
any other joint where there is abnormal joint mechanics taking place.
How much weight
Use as much weight as you can tolerate for 10 repetitions. The last repetition should be fairly difficult to
perform but done so correctly. Once you are
able to do more then 10 repetitions comfortably, then increase the resistance by the
smallest increment available. You may need to
drop down in your repetitions to 6 or 8 reps and progress back up to 10 repetitions. You can progress to 2 sets of 10, then onto 2 sets
of 15 or 20 reps to get the endurance component while still strengthening.
CAUTION
Do not hold your breath while working with weights.
Always exhale while performing the exertion portion of the exercise. Always relax other muscles not involved in the
exercise. Therefore, you will not substitute
other muscles for help and take energy away from the muscles you are trying to strengthen. It is best to work the larger muscle groups first
and progress downward to the smaller muscles. This
is because the smaller muscles fatigue sooner than the larger ones and you could tire out
before finishing your program.
1. Upper
Extremity
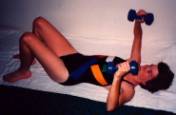
a. Supine
triceps
Lay on back with knees bent. Hold weights in your hands and point your elbows
toward the ceiling and keep them there. Fully
extend the elbows and repeat. Keep shoulder
blades placed down and in.
b. Supine
chest press
Lay on back with knees bent. Hold weight in both hands at chest level and
extend your arms up and down toward the ceiling. Keep
your shoulder blades down and in.
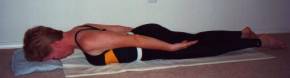
c. Prone
scapular retractions
Lay on stomach with a towel roll under
forehead. First squeeze down and inward with
your shoulder blades then lift hands off surface a few inches and hold for 3 seconds and
repeat.
d. Sitting
abduction raises with elbows bent
Sit up tall in chair with good posture
and with weights in hands. Starting with
weights at shoulder height, raise upward then downward to starting position and repeat. Keep your shoulder blades down and in.

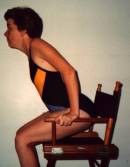
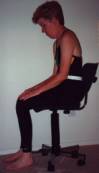
e. Arm
chair push-ups
Sit up tall on the front edge of a chair
using good posture. Place your hands on the
arm rests. Place your feet on floor behind
the knees and lean forward and push down with your hands into arm rests and attempt to
stand. Do not need to stand up, this is just
to work out the tricep muscle in the back of the upper arm.
f. Standing
bicep curls
Stand with weights in both hands. With one arm fully extended and palm of that hand
facing the body. Bend elbow slowly rotating
your palm upward to full flexion of elbow then extend the elbow rotating the palm towards
the body again. Keep shoulder blades
down and in.

2. Trunk
and pelvis
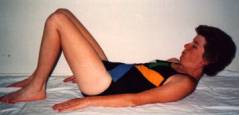
a. Posterior
pelvic tilts
Lay on back with knees bent. Pull up and in with abdominals to posteriorly tilt
the pelvis. Two pictures are shown here only
to visually demonstrate the posterior tilt. The
second picture is the pelvis posteriorly tilted causing a flattened back.

b. Posterior
pelvic tilt for upper abdominals
Lay on back with knees bent. Pull up and in with your abdominals which flattens
the back, tilting the pelvis posteriorly and perform a small curl up and repeat.
c. Posterior
pelvic tilt for lower abdominals
Lay on back with knees bent. Pull up and in with abdominals as above, then
while maintaining this lift one leg up slightly then place it back down. Repeat with the same leg and complete before
moving onto the other leg.

d. Sidelying
hip abduction with knees bent and over pillow
Lay on your side with a pillow between
your thighs. First pull up and in with your
abdominals then raise your upper thigh up and outward from the pillow and return. Do same for other leg.

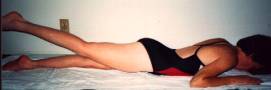
e. Sidelying
hip adduction
Lay on your side and bend your top leg
and place the foot in front of bottom leg. Keep
the bottom leg straight. First pull up and in
with abdominals then lift bottom leg up a few inches then return. Do same for other leg.

f. Prone
gluteus lift with knee bent and over a pillow
Lay on stomach with a firm pillow under
your pelvis and forehead resting on a towel roll. Bend
one knee then squeeze that buttock tight then lift that leg upward a few inches and hold
for 3 seconds and relax. Repeat and do same
for other leg.

g. Prone
gluteus lift with leg straight
Lay on stomach with forehead resting on
a towel roll. Squeeze one buttock tight then
lift that leg upward a few inches and return and repeat.
Do same for other leg.
3. Lower
Extremity
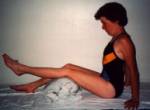
a. Short
arc quads
Sit up tall with a firm roll under one
knee. Turn that foot slightly outward. Beginning with the knee bent over the roll, fully
straighten the knee then relax and repeat. Do
same for other leg.
b. Straight
leg raises
Lay on your back with one knee bent and
other one straight. Pull up and in with the
abdominals then lift the straight leg up parallel with the other thigh then lower and
repeat. Do same for other leg.

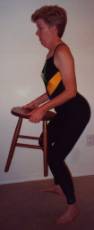
c. Standing
double leg mini squats
Stand with your back to a wall and your
feet approximately 6 inches from the wall. Feet
are shoulders width apart and perform a slight squat.
Hold this position until you feel fatigue in the quad muscles just above the
knee. Repeat. Keep stomach tucked in.

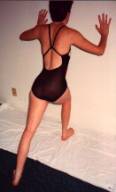
d. Mini
step-ups, forward, sideways and backwards
Place a phone book on floor and stand
facing it. Using good posture form and
holding your stomach muscles up and in, step onto the book with your heel then step back
down. Do this until fatigue of quad muscles
just above the knee. Do same for other leg. Can also do this moving sideways via a side step
as shown and also backwards via a back step. The
backward step is the most challenging. Use
good posture for all.


C. Cardiovascular
Endurance
Cardiovascular exercise, also known as
“aerobic” exercise, is probably the most important aspect of a total fitness
program. Strength and flexibility are also
important but it is aerobic exercise that keeps the heart and lungs strong and more
efficient. Aerobic training also keeps body
fat levels down. Aerobic activities are those
activities that demand oxygen and that utilize large muscle groups in a continuous,
rhythmic fashion. Aerobic exercise causes the
body to burn fat for its fuel during the activity. Examples
of aerobic exercise are walking, swimming, indoor and outdoor bicycling, treadmill,
stairmaster etc. Of course, jogging and
running are also aerobic but are much harder on the joints.
Before engaging in any aerobic activity, it is important to first warm up by
completing general stretching or flexibility exercises and brief walking to prepare the
body. Before starting any aerobic training,
it is best to first check with your doctor. This
is particularly true if you have a history of heart disease or are over the age of 35
and/or have not engaged in any regular exercise. If
you have any other concerns regarding your present health status, it is best to check with
your doctor.
Key components of an aerobic workout
are
1. Know
your target heart range.
2. Type
of activity-choose an activity which is best suited for you based on your medical history
and your interests.
3. Duration-it
is best to carryout your aerobic activity for at least 20 minutes or longer to achieve
aerobic benefits.
4. Frequency-it
is best to complete your aerobic activity 3 times per week or more in order to gain any
benefit.
5. Progression-aerobic
exercise should be progressed by either increasing the intensity or the duration or a
combination of the two in order to further your progress and condition your cardiovascular
system.
Determining your target heart range
220 – age = MHR (Maximal heart rate)
MHR x .5 = 50% of maximal heart rate (for beginners)
MHR x .8 = 80% of maximal heart rate
50 to 80% of your maximal heart rate is
considered a safe target heart range to exercise aerobically in, unless otherwise
indicated.
Monitoring your heart rate
Your pulse should be monitored regularly to ensure that you are exercising properly
in your target heart range and progressing as you should.
Counting your pulse
Place your first 2 fingers on your opposite wrist just below the thumb. You should feel a pulsating sensation, this is
your pulse. Count the beats for 6 seconds and
multiply that number by 10, this is your heart rate per minute and this rate should fall
in your target heart range.
As you become more fit, your heart rate
will drop at the same workloads. You will
need to either increase the duration as long as your heart rate is still in your target
heart range or increase the intensity of the activity to keep your pulse in your target
heart range.
How to choose the right aerobic
activity
You must consider your interests and also your present health status. Some activities are not appropriate for certain
health conditions, for example, jogging or running on arthritic knees. It is also equally important that you choose an
activity that you like, therefore, you will be more likely to continue the activity
indefinitely.
Benefits of aerobic exercise
1. Helps
to decrease body fat
2. Helps
to reduce cholesterol levels
3. Builds
endurance
4. Lowers
the resting heart rate
5. Increases
the ability of the heart to supply oxygen to the body
6. Increases
lung capacity
7. Helps
with blood pressure control
8. Reduces
stress and tension
Do not be afraid to choose several
different activities for your aerobic conditioning. This
will allow you to use different muscles and offer variety to your program.
Remember that you do not have to
complete your whole program at one time. You
can choose to do your aerobic workout on certain days and do your strengthening exercises
on other days. Stretching is best to be
completed daily and you should always warm up before and after your aerobic activity and
strengthening exercises.
Just before meal time is a good time to
complete an aerobic workout since it helps to curb your appetite.
Examples of aerobic exercise are:
1. Ergometer-also
known as indoor bicycle. For NPS knees, it is
best to place the seat high enough so that there is little bend in the knee when the pedal
is up but still keeping the foot on the pedal when the pedal is down. This position will minimize compressive forces on
the knee joint and emphasize use of the vastus medialis muscle which helps to pull the
patella away from the outside of the knee where it can cause pain. The same principle can be applied for outdoor
biking.
2. Walking-While
walking, this is an opportunity to practice good posture technique. Also, good walking shoes with good arch support
and cushioning.
3. Swimming-This
activity offers the least weight bearing through the joints because of the buoyancy of the
water. Arthritis sufferers benefit from this
activity. Stretching, strengthening and
aerobic conditioning can be completed in the water.
D. Posture
Exhibiting proper posture for sitting,
standing and while doing your everyday activities is very important. It helps to maintain an equal balance of the
muscles on the skeleton. As we age, gravity
takes it toll on our bodies and if we do not use proper posture practices, muscles
imbalances begin to occur throughout the body and can be one of many reasons for pain and
can contribute to injuries. Poor posture
produces a forward head, forward or rounded shoulders, very little curvature in the low
back or just the opposite with extreme swayback, locked in knees for standing and flat
feet. These are just a few of the more common observations.
Indicated below are examples of poor
posture and good posture. Awareness and
simple cues can begin to correct poor posture along with corrective exercises. NPS people can benefit tremendously from this
knowledge as it is known that there are bone and muscle structure differences in the body.
Good
Forward Forward
with extreme back curve
(Poor)
and knees locked in


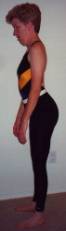
Good Poor

In conjunction with proper posture
practices, as the saying goes, everything starts from the ground up, so the feet are very
important with regards to the arch and NPS people. There should be proper arch support and
this can be achieved if needed by the use of arch supports/orthotics. Maintaining the proper arch helps keep the patella
in its proper place allowing it to track as it should when bending and extending the knee. When there is no arch, the patella tends to place
itself laterally and can cause irritation/pain.
If not corrected, this could lead to degenerative changes in the knee
such as osteoarthritis.
Another point to make here is NPS
presents anywhere from no patellae to normal sized patellae and some people can have a
decreased lateral ridge of the femur bone which can predispose the patella to track
laterally just like mentioned above regarding the arch issue. This makes strengthening the medial knee muscles
and arch support even more important to counteract the lateral pull on the patella.
It
has been found that when there is pain in the knee due to any of these reasons just
stated, it is best to minimize the time the knee is spent in a flexed position. The flexed position of the knee is the position
where there are the most compressive forces acting on the knee. Be very careful not to sit too long without
straightening your knees periodically to relieve this compression, otherwise, symptoms can
increase.
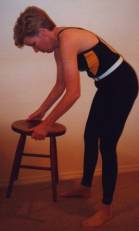
E. Body
Mechanics
As with proper posture awareness, body
mechanics play an equally important role in minimizing pain and injury to the body. By utilizing proper posture positioning of the
body along with good mechanics of moving about and foot placement, lifting activities are
much easier and less likely to produce pain or injury.
Included in this handout is a sheet which demonstrates good body mechanics
for lifting and points out the details that are important.
(See appendix A)
Good mechanics Poor
mechanics
F. Modalities
A modality is a method of application
or the employment of any therapeutic agent. In
Physical Therapy, a modality refers to heat, cold, electrical stimulation, ultrasound etc. Any one of these or combination of these can help
with NPS symptoms and this can be determined by evaluating the symptoms, acute vs.
chronic, severity, cause and many other factors. Consult
with your doctor regarding this.
APPENDIX A
BODY
MECHANICS
Your back has small joints and
smaller muscles which makes it weaker than the larger joints in your legs where the
muscles are bigger and therefore stronger.
TO LIFT:
1. Get
close to the object.
2. Face
object directly.
3. Bend
your knees to lower self to object.
4. Grip
object securely.
5. Keep
spine straight.
6. Let
legs raise the object
7. Once
up, turn your feet to walk with object, do not twist.
8. To
place object down, lower with your legs.
Common mistakes made when lifting,
which can cause injury:
1. Bending
forward at the waist with knees straight.
2. Object
is too far away from you.
3. Bending
then twisting with the object.
4. Lifting
and twisting at the same time.
5. Off
balance with the object.
6. Object
too heavy for 1 person or too bulky.
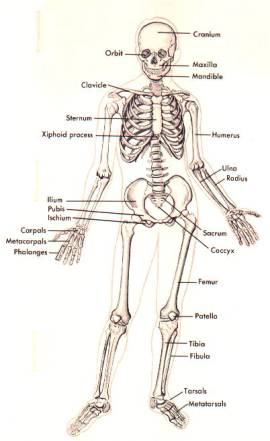
Skeleton picture from
“Mechanical Kinesiology” by Jerry N. Barham, Copyright 1978. Page 49. (Modified
from Anthony, C.P., and Kolthoff, N.J.: Textbook
of anatomy and physiology, ed. 9, St. Louis, 1975, The C.V. Mosby Co.)