|
A Natural Wonder
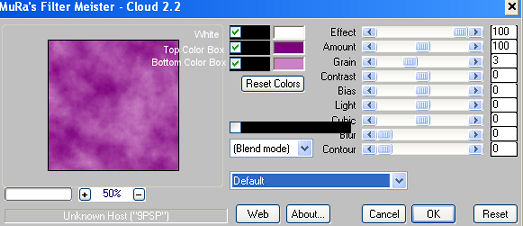
Supplies Jasc/Corel's Paint Shop Pro any version. Tube of Choice - The tube image I am using was created by Marilyn Allen. Both she and Bobbi are budding artists with wonderful tubes they share at their MSN Group B.A.M.A. Tubes. Do join, you will not be disappointed. Mura Meister's Cloud Filter which can be downloaded here. Butterfly tubes can be downloaded here. Font of Choice. SETTING USED IN THIS TUTORIAL Magic Wand Settings used in this tutorial are: Mode: Add/Shift, Match Mode: RGB Value, Tolerance 0, Contiguous checked, Feather: 0, Anti-Alias checked and outside selected. Step 1 Open a new transparent image 600 width by 400 height. At the material palette, in the top color box, select a deep color you wish to outline your elliptical shape. In the bottom color box, select a lighter color to fill the shape. Step 2 Left click the preset shape tool and set it to ellipse with a solid line and width of 5.05. Going from left to right and down, draw your ellipse on the right side of the transparent image. Step 3 Go to Layers/Duplicate. Do this one more time. Step 4 Open up the layer palette and make sure you are now on the bottom layer. Left click the magic wand and using the settings from above, left click the magic wand inside the ellipse to select it. Step 5 Go Effects/Plugins/Mura's Meister/Clouds and use these settings as you see below. The top color box inside the filter should be white. The second color box, select the same color you have in your top color box at the material palette. The bottom color box, select the same color you have in your bottom color box at the material palette. At the drop down menu, select Default.
DO NOT DESELECT. Step 4 Open your layer palette and go to the second layer. Apply the cloud filter again using the same settings but change the amount to 90. DO NOT DESELECT. Step 5 Open your layer palette and go the top layer. Apply the cloud filter again using the same settings but change the amount to 69. DO NOT DESELECT. Step 6 Open up your tube image and go to Edit/Copy. Make your tag image active and go to Edit/Paste as New Layer. We want the image that will be placed within the selection to be a portion of the original image but not the full image. To do this, before moving the image within the selection, go to Image/Resize, using the percent option at a number over 100%, such as 110% or higher, bicubic and resize all layers NOT checked. Once you have a nice larger version of your original image, left click the mover tool and move the image within the selection. Go to Selection/Invert and click the delete key. Go to Selections/Select None. A portion of your image should now fit within the ellipse of your tag. Step 7 Mirror your full sized original graphic image (Go to Image/Mirror) so that this image is facing the image that is within the ellipse. Go to Edit/Copy. Make the tag image active and go to Edit/Paste as New Selection (NOT NEW LAYER). If the graphic is too large for the tag do NOT deselect it, but go to Image/Resize and this time select a percent less than 100%, bicubic and resize all layers NOT checked. Move the graphic to where you want it on the tag and go to Selections/Select None. Step 8 Again on the same layer add your text and copyright information. DO NOT paste your text and copyright on a different layer. Step 9 Open up your butterfly tube and select one of the butterflies for your tag. Again on the same layer where you applied your text and copyright information, you will be adding the butterfly graphic. Go to Edit/Copy. Make the tag image active and go to Edit/Paste as New Selection. Place your butterfly on the same layer as you have your full sized image, text, graphic and copyright. Go to Selections/Select None. Step 10 Open up your layer palette and you will see you have three layers that have your ellipse filled with the cloud preset and only one layer containing the partial graphic, full graphic, text, graphic and copyright. We need to have the same number of layers with the graphics and text as we do the ellipse. Make sure you are on the layer with the graphics and text (it will be highlighted in blue) and go to layers/duplicate. Do this one more time so you now have three layers of the graphics, text and copyright and three layers of the ellipse. I have renamed the layers below. You can rename your layers to follow along with the next steps.
Step 11 Left click the eye on ellipse 2, ellipse 3, graphics and text 2 and graphic and text 3 layers. You will see a red X on these layers. Make sure you are on the ellipse 1 layer and go to Layers/Merge/Merge Visible. Left click on the eye of this merged layer to close it off. Step 12 Left click the red x on the ellipse 2 layer and on the graphics and text 2 layer. The eyes will now appear without the red x's. Make sure you are now on the ellipse 2 layer (it will be highlighted in blue). Go to Layers/Merge/Merge Visible. Left click on the eye of this Merged Layer to close it off. Step 13 Left click the red x on the ellipse 3 layer and on the graphics and text 3 layer. The eyes will now appear without the red x's. Make sure you are now on the ellipse 3 layer (it will be highlighted in blue). Go to Layers/Merge/Merge Visible. Left click on the red x's on the other two merged layers to open them up. Step 14 Crop off any transparency not being used with the tag. Go to Image/Resize using the percent option at 90%, bicubic and resize all layers checked. Save this tag as a psp or psd file. We will now finish the tag in animation shop. Click here to continue.
|