|
BEAUTY FROM WITHIN
Supplies Jasc/Corel's Paint Shop Pro. Filters Needed: Mura Pro Shift at Wave Filter (included with the supplies due to the fact that the site no longer is up) 2 Moon Filters - Cut Glass Filter VM Distortion Filters - Kaleidoscope Filter Tube of Choice - For this tutorial, I used a delightful image created by Suzanne Woolcott. You can purchase her wonderful art in tube and full form at AMI which stands for Artistic Minds, Inc. Supplies - Supplies include the Mura Pro Shift at Wave Filter, Circular Word Art created by me, and Bows by Rainbow Coffi. The full collection of Rainbow Coffi's wonderful images is housed at PSP Playground. Anyone can join, free of charge. To view and obtain Rainbow Coffi's superb graphic tubes, do join PSP Playground, where Rainbow Coffi's and many other wonderful artist tubes are shared.
SETTINGS USED IN THIS TUTORIAL Drop Shadow: Vertical Offset 2, Horizontal Offset 2, Opacity 80, Blur 5, Color Black Step 1 Open a new transparent image 600 width by 500 height and the tube graphic you will be using. At the Material Palette, in the top and bottom color boxes, select two colors that will work with your tube graphic either from the same or different color families. Left click the top color box and when the color selection window opens, select gradient, foreground/background linear style with angle and repeats set to 0. Flood fill the transparency with this foreground-background linear gradient. Step 2 Go to Image/Resize using the percent option at 80%, bicubic and resize all layers NOT checked. Step 3 Go to Effects/Plugins/Two Moon/Cut Glass and use the default settings. Step 4 Go to Effects/Plugins/Mura Pro/Seamless/Shift at Wave and use these settings:
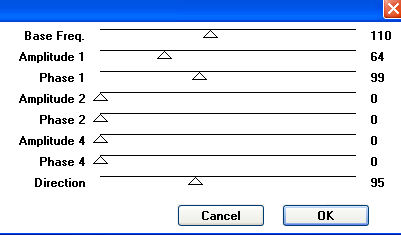
Step 5 Repeat Step 2 but resize 90%. Step 6 Go to Layers/Duplicate. Go Image/Rotate/Right/90 degrees. Step 7 Repeat Step 5, resizing 90%. Step 8 Go to Layers/Merge/Merge Visible and Repeat Step 5 again, resizing 90%. Step 9 Go to Effects/Plugins/VM Distortion/Kaleidoscope and use these settings:
Step 10 Go to Layers/New Raster Layer. Flood fill this layer with white. Go to Layers/Arrange/Send to bottom. This will allow you to see what your tag will look like as you add the final steps. Step 11 Make your tube image active and go to Edit/Copy. Make your tag image active and go to Edit/Paste as New Layer. Resize your tube image using the percent option, bicubic and resize all layers NOT checked. Step 12 Go to Effects/3D Effects/Drop Shadow and use the settings from above. Step 13 Open up your circular word art which is in gray. Go to Adjust/Hue and Saturation/Colorize and move the sliders over until you have a color that will work well with your tag. Go to Edit/Copy. Make your tag image active and go to Edit/Paste as New Layer. Make sure the circular word art is on the top layer. Left click the mover tool and move it so it fits well around the tag. If you would like to add a drop shadow to the text, you can use the same one from above. Step 14 Open up the Rainbow Coffi bows and select one that works with your tag. Copy and paste the bow as a new layer and resize as needed. Apply the same drop shadow as you did in Step 12. Step 15 Add your text and apply a drop shadow to your text. You can use the same drop shadow from above but change the color from black to white. Step 16 Add the appropriate copyright information to your tag. Step 17 Go to Layers/Merge/Merge All (flatten) and save your tag as a jpg. We hope you enjoyed this tutorial. Purrs, Nikki, Nichie and Sue
|