|
The Colors of Autumn
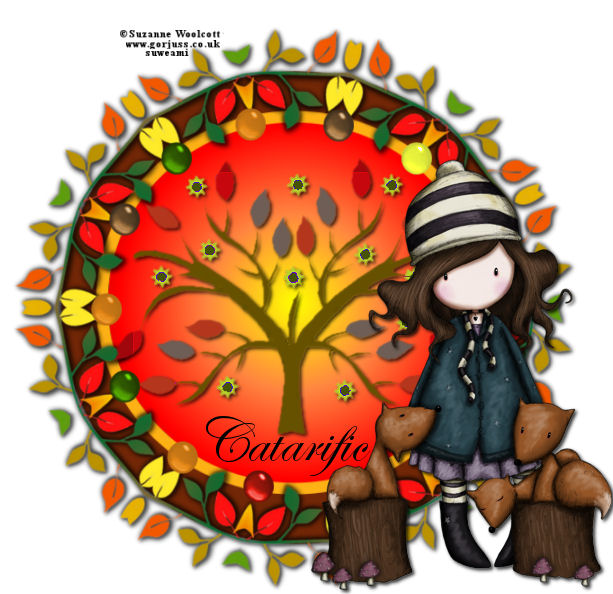
Needed: Jasc/Corel Paint Shop Pro. Medhi Kaleidoscope 2.1 filter. You can find it here. Tube of Choice - For this tutorial, I used a delightful pay to use tube image created by Suzanne Woolcott. You can now purchase Suzanne Woolcott's Gorjuss graphics at her online store, located here. If you did my Autumn Tenderleaf Frame tutorial, you already created the frame element for this tutorial. If you haven't done this tutorial, you can make this frame from scratch following the tut. BUT, if you would rather have the frame element already made, it is included with the supplies. Supplies: Included in the zip are Autumn Frame Template, color beads, and color inserts all created by me Autumn Tree from Microsoft Clipart Media, tubed, modified and colorized by me. Optional - Any additional elements you wish to include. I add this because you may want to substitute and use your own elements. Remember, tuts are just guides - the finished product with your creativity, is yours. This tutorial is going to show you how you can modify already made images to produce new, exciting and very interesting tag backs using the kaleidoscope filter. I could literally play with that filter for hours on end and come up with some really exciting effects. SETTINGS USED IN THIS TUTORIAL Magic Wand: Mode: Add/Shift, Match Mode: RGB Value, Tolerance 0, Contiguous checked, Feather: 0, Anti-Alias checked and outside selected Drop Shadow: Vertical Offset 2, Horizontal Offset 2, Opacity 80, Blur 5, Color Black Step 1 Open up the autumn frame template. Open up the layer palette and make sure you are on the frame layer. Go to Image/Resize, using the percent option at 90%, smart size, and resize all layers NOT checked. Step 2 Go to Effects/Plugins/Medhi/Kaleidoscope 2.1 and use these settings:
Step 3 Open up the Color Insert File and go to Raster Layer 1 where you see a dark colored ellipse. Go to Edit/Copy. Step 4 Make the autumn frame template active. Open up the layer palette and make sure you are now on the background layer and go to Edit/Paste as New Layer. The ellipse should now be placed beneath the frame layer and on top of the white background layer. Step 5 Go to Adjust/Hue and Saturation/Colorize and move the sliders over until you have a nice, deep, autumn color. Step 6 Go back to the Color Insert File and go to Raster Layer 2 where you see the light colored ellipse. Go to Edit/Copy. Step 7 Make the autumn frame template active. Open up the layer palette and make sure you are now on the layer where you had placed your dark colored ellipse you just colorized in Step 6. Go to Edit/Paste as New Layer. The lighter ellipse should now be placed above the darker ellipse and beneath the frame layer. Step 8 Repeat Step 5, colorizing the lighter color ellipse. Step 9 Open up your layer palette and make sure you are on the layer where you placed the lighter color ellipse. Left click your magic wand using the settings from above and left click inside the lighter color ellipse. Go to Selections/Modify/Expand 3. Step 10 Go to Layers/New Raster Layer. Step 11 At the Material Palette, left click the top color box. When the color selection window opens up, left click the gradient tab and locate the pre-made, Paint Shop Pro, Red-Orange-Yellow gradient. Under style, left click sunburst, and use these settings:
Flood fill the new layer with the sunburst gradient and go to Selections/Select None. Go to Layers/Arrange/Move down so that the gradient is beneath the lighter color ellipse. Step 12 Go to Image/Resize using the percent option at 90%, smart size and resize all layers checked. Step 13 Open up the layer palette, and close off the white background layer by left clicking the eye. You will see a red X. Go to Layers/Merge/Merge Visible. Step 14 Go to Effects/3D Effects/Drop Shadow and use the settings from above. Step 15 Open up the layer palette and open up the white background layer by left clicking the Red X on the eye on that layer. Step 16 Open up the Autumn Tree. Copy and paste it inside the lighter color ellipse, over the gradient layer. Step 17 Repeat Step 14, applying the drop shadow. Step 18 Open up your tube graphic and copy and paste it on the tag. Resize as needed and apply the same drop shadow as you did in Step 14. Step 19 Open up the color beads and copy and paste them around the lighter ellipse inside your frame. Step 20 Add your copyright information and save as a psp file. Step 21 Add your text, go to Layers/Merge/Merge All (flatten) and resave the file as a jpg with a different name. Doing it this way, you can make multiple tags for friends and group members. We hope you enjoyed this tutorial. Purrs, Nikki, Nichie and Sue
|