|
HELLO SPRINGTIME
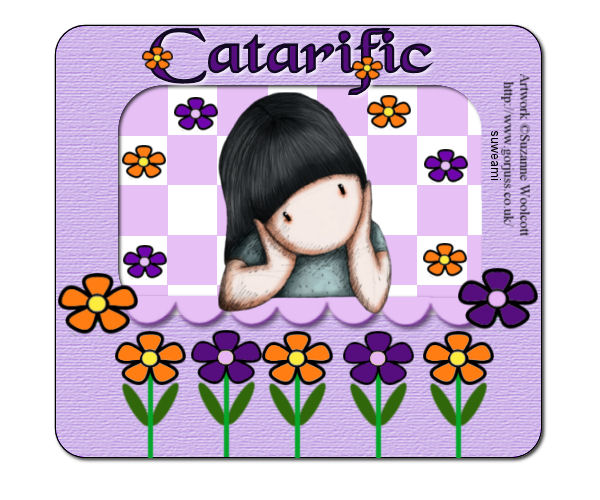
Supplies Jasc/Corel's Paint Shop Pro. Tube of Choice - For this tutorial, I used a delightful image created by Suzanne Woolcott. You can purchase her wonderful art in tube and full form at AMI which stands for Artistic Minds, Inc. Accessories - Scallop Edge, flower head, the flower with leaves, two-tone color seamless check tile background. All accessories created by me. Please remember, when creating your signature tags, to only use permission art and to apply the copyright information on the tag. If you have purchased a commercial image, do add your license number as well. **When creating your Signature tags with Paint Shop Pro, do remember to save continually. Nothing worse than to use up your memory resources and lose everything!** SETTINGS USED IN THIS TUTORIAL Magic Wand Settings: Mode: Add/Shift, Match Mode: RGB Value, Tolerance 10, Contiguous checked, Feather: 0, Anti-Alias checked and outside selected Drop Shadow Settings: Vertical Offset 2, Horizontal Offset 2, Opacity 80 Blur 5, Color Black
CREATING THE TAG Step 1 Step 2 At the Material Palette, in the top color box, select a color for your tag that coordinates with your tube image. In the bottom color box, select the color black. Step 3 Left click the preset shape tool set to rectangle. At the preset shape ribbon use these settings: Horizontal and Vertical Radius set to 29.70, line style: solid, line width 2. Nothing else should be selected. Going from left to right and down, draw your preset shape so it looks like this:
Step 4 Go to Effects/3D Effects/Drop Shadow and use the settings from above. Step 5 Left click the selection tool set to rounded rectangle with these settings: Selection Type: Rounded Rectangle, Mode: Add (Shift) Feather 0. Draw a rounded rectangle as you see below:
Click the delete key and go to Selections/Select None. Step 6 Repeat Step 4 applying the same drop shadow and you should now have this base.
Step 7 Left click the magic wand and use the settings from above. Left click the magic wand on your tag. Go to Effects/Texture Effects/Texture and apply one of the default textures to your tag. I used Canvas Simple at the default settings. Go to Selections/Select None. Step 8 Open up the check pattern seamless tile. Left click the magic wand and left click it on the lavender color squares. Flood fill those two squares with a pastel shade that will work with your graphic. Go to Selections/Select None. Step 9 At the Material Palette, left click the top color box. When the color selection window opens, left click the pattern tab and locate the check tile pattern setting the angle to 0 and scale to 100. Step 10 Left click the magic wand inside the opening of the tag. Go to Selections/Modify Expand 15. Step 11 Go to Layers/New Raster Layer. Flood fill this selection with check pattern tile and go to Selections/Select None. Step 12 Go to Layers/Arrange/Move Down. Your pattern should now be below the tag. Step 13 Open up the scallop light gray edge. Go to Adjust/Hue and Saturation/Colorize and move the color settings to achieve a color for your scallop edge that will work with your tag's color. Step 14 Open up the Layer Palette and make sure you are on the top layer. Copy and paste the scallop edge to the bottom of your tag's opening. (See above) Step 15 Repeat Step 4 applying the same drop shadow. Step 16 Open up your tube graphic and copy and paste it to your tag. If your image is too large, go to Image/Resize using the percent option, bicubic and resize all Layers NOT checked. If you want your tube placed on top of the tag base, then leave it as is. If you want the tube placed below the tag base, go to Layers/Arrange/Move Down. Step 17 Open up the flower head graphic. Left click the shift and D keys to duplicate the graphic. Left click the magic wand on the petal portion of one of these graphics and flood fill the pedals with a color of choice. Go to Selections/Select None. Left click the magic wand and left click the middle circle within the petals and flood fill the circle with a second color. Do the same with the duplicate image but use two different colors for this flower head. Step 18 Copy and paste each of the flower heads to the sides of the scallop pattern. If you want your flower head to be smaller, go to Image/Resize using the percent option, bicubic and resize all layers NOT checked. Step 19 Copy and paste each of the two different flower heads on the check background pattern and resize these flower heads even smaller so they fit nicely in the squares. Paste as many of the flower heads as you like on your background check pattern. Step 20 Open up the flower with stem and leaves graphic and duplicate the graphic. Colorize these flowers (using the flood fill method) with the same colors as you used for your flower heads. Step 21 Copy and paste each of these flowers to your tag and resize as needed, alternating the flower colors. Step 22 Add your text and copyright and go to Layers/Merge/Merge All (flatten). Step 23 Left click the crop tool and draw a rectangle around the areas you wish to keep, eliminating any excess white palette. Once your rectangle is drawn, double left click within the rectangle. Save your tag as a jpg. We hope you enjoyed this tutorial. Purrs, Nikki, Nichie and Sue
|