|
HOLIDAY TAG
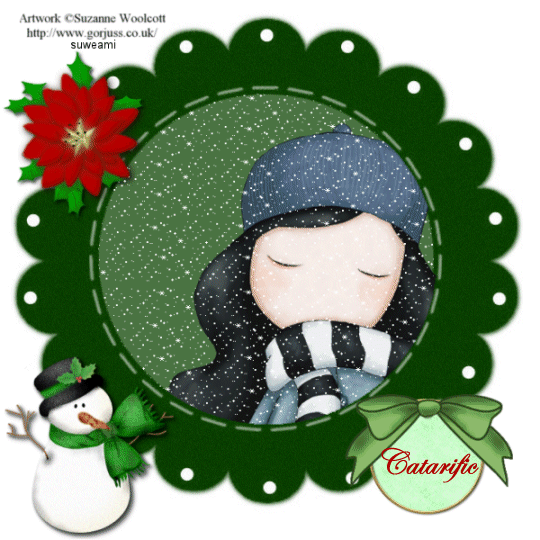
Supplies Jasc/Corel's Paint Shop Pro. Toadies Band Supressing Noise Filter Tube of Choice - For this tutorial, I used a delightful image created by Suzanne Woolcott. You can purchase her wonderful art in tube and full form at AMI which stands for Artistic Minds, Inc. Supplies to Download: The daisy mask created by me The poinsietta and snowman created by Snickers Doodles. The full collection of these charming images is housed at PSP Playground. Anyone can join, free of charge. To view and obtain Snickers Doodles adorable graphic tubes, do join PSP Playground, where Snicker's Doodles and many other wonderful artist tubes are shared. The ribbon was created by Rainbow Coffi. The full collection of Rainbow Coffi's wonderful images is housed at PSP Playground, also. The tags were created by Dozi aka Katzerl. Do visit Dozi's amazing site for so many wonderful scrap elements you can download to use with your signature tags.
SETTING USED IN THIS TUTORIAL
Magic Wand Settings Mode: Add/Shift, Match Mode: RGB Value, Tolerance 22 (more or less depending on your PSP version), Contiguous checked, Feather: 0, Anti-Alias checked and outside selected. Drop Shadow: Vertical Offset 2, Horizontal Offset 2, Opacity 80, Blur 5, Color Black
Step 1 Open up your tube graphic, daisy pattern mask, and a new transparent image 600 width by 600 height. At the Material Palette, select deep green (#104505) for your basic tag. Flood fill the transparency with that color. Step 2 Go to Layers/New Mask Layer/From Image. At the source window's drop down menu, locate the daisy pattern mask with source luminance and invert mask data checked. Click ok. Step 3 Go to Layers/Merge/Merge/All (flatten). Step 4 Left click the magic wand using the settings from above. Left click the magic wand on the petal portion (outside portion) of the tag. Go to Effects/Plugins/Toadies/Band Supressing Noise and move the slider to 94. Go to Selections/Select None. Step 5 Left click the magic wand on the center portion of the tag to select it. Open up your tube graphic and go to Edit/Copy. Make the tag image active and go to Edit/Paste as New Layer. Left click the mover tool and move the image within the selection. If the image is too large to fit, go to Image/Resize using the percent option, smart size and resize all layers Not checked. Step 6 Once the image is moved within the selection go to Selections/Invert, click the delete key and go to Selections/Select None. **DO NOT MERGE YOUR LAYERS. KEEP ADDING ALL YOUR ELEMENTS ON SEPARATE LAYERS.** Step 7 Go to Layers/New Raster Layer and add your copyright. Step 8 Go to Layers/New Raster Layer and apply the poinsetta. Go to Image/Resize using the percent option at 80%, smart size and resize all layers Not checked. Place your poinsettia anywhere except in the inner circle of the tag. We need to keep that area clear as you will see soon. Step 9 Go to Effects/3D Effects/Drop Shadow and use the settings from above. Apply the drop shadow again. Step 10 Go to Layers/New Raster Layer and apply the snowman. Resize the snowman 85% and repeat Step 9. Step 11 Open up the Dozi tags. Select any tag and copy and paste it on the tag on a new layer. Resize the tag 50%. Go to Adjust/Hue and Saturation Colorize and move the hue and saturation settings until you get a green color you like. Step 12 Copy and paste the gold frame to your tag and resize it 50%. Move the frame to surround the tag portion. Step 13 Open up the satiny bows and draw a selection around the bow. Go to Edit/Copy. Make the tag image active and go to Edit/Paste as New Layer. Resize the bow 90% and colorize it a green shade. Step 14 Open up your layer palette, and left click the eye on the bottom layer (the layer with the original background tag only) and you will see a red X. Go to the layer directly above this layer and go to Layers/Merge/Merge Visible. Left click the eye on the top layer to close it off, and left click the red X on the bottom layer to open it up. Make sure you are on the bottom layer (the layer with the original background tag only). Left click the magic wand left click within the inner circle to select it. Left click the red X on the top layer to open that layer back up and go to Layers/Merge/Merge All (Flatten) BUT DO NOT DESELECT. Keep that inner circle selected. Adding the Snow Step 1 Go to Layers/Duplicate and Duplicate this layer 9 times so you have a total of 10 layers. Open up your layer palette, and starting with the second layer, right click the layer, go to Rename and left click and rename the second layer 2. Go to the layer above it, and rename that layer 3. Rename the layer above that layer, and name it 4. Continue doing this until you have all 10 layers renamed from background though 10. All 10 layers should be selected. Step 2 Open up your snow2 psp file and the layer palette. Go to Frame 1 and go to Edit/Copy. Go to your tag file and make sure you are on the background layer and go to Edit/Paste into Selection. DO NOT DESELECT. Step 3 Back to your snow2 psp file - go to Frame 2 and go to Edit/Copy. Go to your tag file and make sure you are on layer 2 and go to Edit/Paste into Selection. DO NOT DESELECT. Step 4 Continue going to the corresponding Frame and Layer and copying and pasting the snow to your tag until all 10 layers have snow pasted on the corresponding layers. You would be pasting the snow as follows: Frame 1 - pastes into selection on background layer Frame 2 - pastes into selection on Layer 2 Frame 3 - pastes into selection on Layer 3 Frame 4 - pastes into selection on Layer 4 Frame 5 - pastes into selection on Layer 5 Frame 6 - pastes into selection on Layer 6 Frame 7 - pastes into selection on Layer 7 Frame 8- pastes into selection on Layer 8 Frame 9- pastes into selection on Layer 9 Frame 10 - pastes into selection on Layer 10 Now go to Selection/Select None. Step 5 Go to Image/Resize using the percent option at 90%, smart size and resize all layers checked. Step 6 Save your file as a psp or psd file. We will complete the tag in animation shop. We will not add our text until after the tag is completed. This will be done in animation shop. Click here to continue.
|