|

Step 1
Open up the magic1.psp file (the tag file) and go to View/Normal Viewing.
Also open up the star wand animation file and go to View/Normal Viewing. Make
the star wand animation active and click the control and A keys to activate all
the frames. Go to Edit/Copy. Make the tag file active and click the control and
A Keys to make all the frames active. Go to View/Normal Viewing.
Now go to Edit/Paste into current
frame. Holding the the left mouse button, place the star wand in the very FIRST
frame in or on the hand of your main stationary graphic. Once you have the star
wand where you want it, release the left mouse button. The wand will be in all
the frames of the tag.
Step 2
Open up the magic2.psp file (the fading image) and duplicate the file by left
clicking the file to active it and clicking the Shift and D Key. Left Click on
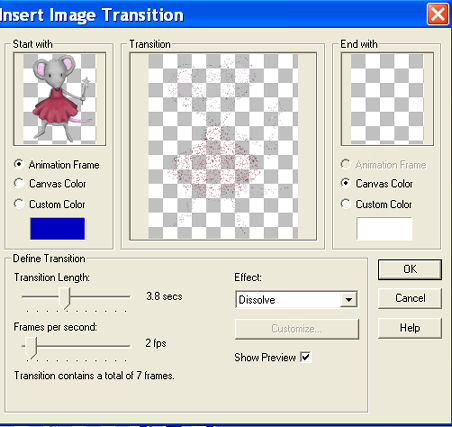
one of the magic 2 files and go to Effects/Insert Image Transition/Dissolve and
use these settings:

This file should now have 8 frames. Go to View/Normal Viewing
Step 3
Left click the control and A keys to activate all the frames of the magic2.psp
file. Go to Animation/Reverse frames.
Step 4
Go to Edit/Copy.
Step 5
Make the magic1.psp file active. Holding down the control key, left click on
frames 2 through 9 to make them active and go to Edit/Paste into selected frame.
Holding down the left mouse key, place the magic 2.psp file into the 2ND
Frame of the magic1 animation exactly where you want the image to be. Once
you have the image placed in the 2nd frame, release the left mouse button
and you will have the fading transitional images in all of frames 2 through 9.
Step 6
Left click on frame 9 to select it. Right click on the frame and go to
delete and left click. You should now have 8 frames.
Step 7
Left click the control and A key to activate all the frames of the animation.
Right click on any frame and go to Frame Properties and type in 35.
Step 8
Left click the first frame of the animation and right click on that
frame. Go to frame properties, left click and change the frame properties to
250.
Left click the 7th frame of this animation and right click on that frame.
Go to frame properties, left click and change the frame properties to 100.
Left click the last frame of the animation and right click on that frame.
Go to frame properties, left click and change the frame properties to 350.
Step 9
Go to Animation/Resize Animation using the percent option at 90% or smaller,
smart size and maintain aspect ratio checked.
Step 10
Before we continue to save the animation, let's first click the Customize button
to make sure you have all the correct settings for this animation.
Click the Customize button and you will see three tabs: Colors, Optimizations
and Partial Transparency.
Here is what each setting should be under the separate tabs:
Colors
255 Colors, Optimized Median Cut and Error Diffusion should be checked.
Optimizations
The middle three selections should be checked.
The top and bottom selections - unchecked.
Partial Transparency
Convert pixels less than 40 should be checked.
Yes blend with this color and make sure that the color in the color box is
WHITE.
After customizing all the animation settings, click Ok and click Next and you
will get the following screens:
Screen 1
Animation versus output Size - just click next.
Screen 2
Optimization process - just click next.
Screen 3
Optimization preview - just click next.
Screen 4
Optimization results - click finish.
Step 11
Make sure to save your image as a gif file.
We hope you enjoyed this tutorial.
INDEX
|

