|
On the Beach
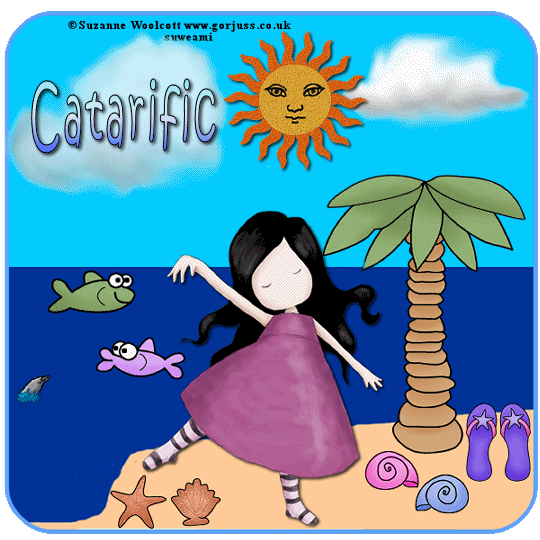
Supplies Jasc/Corel's Paint Shop Pro. Tube of Choice - For this tutorial, I used a delightful image created by Suzanne Woolcott. You can purchase her wonderful art in tube and full form at AMI which stands for Artistic Minds, Inc. Supplies - Supplies include: Beach tag template. Clouds Tube - Provided by Jasc in an earlier version of Paint Shop Pro Sun Sense Tube - Created by me Lori's Ocean Stuff Doodles. Lori has awesome doodles. She now has her own blog, located here, where you can download all of her wonderful graphics. The Ocean Stuff Doodles are provided in the zip file. Dolphin Animation.
SETTINGS USED IN THIS TUTORIAL Drop Shadow: Vertical Offset 2, Horizontal Offset 2, Opacity 80, Blur 5, Color Black Magic Wand: Mode: Add/Shift, Match Mode: RGB Value, Tolerance 18, Contiguous checked, Feather: 0, Anti-Alias checked and outside selected. CREATING THE TAG Step 1 Open up your beach tag template and you will see it is in shades of gray. What you will do is colorize it. If you wish to use the same colors as I have in my tag, here is the template provided with the html color codes I used.
Step 2 Left click the magic wand using the settings from above. Left click the magic wand in one of the three areas on the tag. At the material palette, left click the top color box. When the color selection window opens up, select the color tab and type in the html code I used for the area you selected or your own color of choice. Flood fill that area with the selected color and go to Selections/Select None. Step 3 Repeat Step 2 filling in the remaining two areas with either my choice of colors, or your own. Step 4 With the magic wand, left click the outline border of the tag. Go to Adjust/Hue and Saturation/Colorize and Select a blue shade for your border. Go to Selections/Select None. You will find by doing it this way, the border is filled without any jagged edges which you might get if flood filling.
***If you want to add some texture effects - such as noise to the sand to give it a grainy look - that would work great! Or if you own the Flaming Pear Flood Filter - you can even give your water some wavy effects.** Step 5 Open up the Clouds Tube and with your selection tool set to rectangle, select one of the clouds. Go to Edit/Copy. Make your tag image active and go to Edit/Paste as New Layer. If you want to resize your cloud either bigger or smaller, go to Image/Resize, using the percent option, bicubic and resize all layers NOT checked. If you want your clouds larger, you will need to adjust the percent option to be more than 100%. Step 6 Open up the sun sense tube and resize it. Copy and paste the tube on your tag. If you would rather use the sun from Lori's doodles or one of your own, you can do that too. Step 7 Go to Effects/3D Effects/Drop Shadow and use the settings from above. Step 8 Open up your tube graphic. Copy and Paste it to your tag. Resize as necessary. Step 9 Repeat Step 7 applying a drop shadow to the tube graphic. Step 10 Open up Lori's Ocean Stuff Doodles. Using the freehand selection tool, draw a selection around one of the doodles you wish to use on your tag. Copy and Paste it to your tag and resize as necessary. Step 11 Continue selecting all the Doodles you want for your tag using the freehand selection tool and resizing as necessary. Step 12 Add your text and copyright. Step 13 Go to Layers/Merge/Merge Visible. Step 14 Go to Image/Resize using the percent option at 90%, bicubic and resize all layers checked. Step 15 Go to Layers/Duplicate. Do this 5 more times so you now have a total of 7 layers. Step 16 Save this file as a psp or psd file. We will finish the animation in Animation Shop, adding the dolphin to the tag. Click here to continue.
|