|
Patterned Sweetheart Tag
Supplies Jasc/Corel's Paint Shop Pro. DSB Flux Bright Noise Filter. If you do not have this filter, substitute the PSP Add/Remove Noise Effect Instead. Tube of Choice - For this tutorial, I used a delightful image created by Suzanne Woolcott. You can purchase her wonderful art in tube and full form at AMI which stands for Artistic Minds, Inc. Supplies - Sweetheart Template created by me. The beautiful ribbons were created by Rainbow Coffi. The full collection of Rainbow Coffi's awesome images is housed at PSP Playground. Anyone can join, free of charge. SETTINGS USED IN THIS TUTORIAL
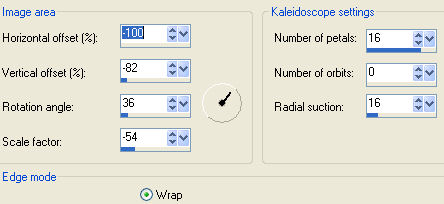
Drop Shadow: (1)Vertical Offset 2, Horizontal Offset 2, Opacity 80, Blur 5, Color Black (2)Vertical Offset -2, Horizontal Offset -2, Opacity 80, Blur 5, Color Black Step 1 Open up the sweetheart template and your tube graphic. Step 2 Go to Effects/Texture Effects/Weave and use these settings: Gap and Width 1, Opacity 5, Weave and Gap Color Black, Fill Gaps checked. Step 3 Go to Adjust/Hue and Saturation/Colorize and move the sliders over until you achieve a basic color for your tag that will work with your tube graphic. Step 4 Go to Effects/DSB Flux/Bright Noise and use these settings: Intensity: 28 and Direction: Mix If you do not have DSB Flux/Bright Noise filter do this: Go to Adjust/Add/Remove Noise/Add Noise and use these settings: Gaussian, 22%, and Monochrome checked. Step 5 Go to Effects/Reflection Effects/Kaleidoscope and use these settings:
Step 6 Go to Effects/3D Effects/Drop Shadow and apply the (1) drop shadow settings from above. Step 7 Repeat Step 6 but apply the (2) drop shadow settings. Step 8 Open up your tube image and go to Edit/Copy. Make your tag image active and go to Edit/Paste as New Layer. If the image is too large, go to Image/Resize using the percent option, bicubic and resize all layers Not checked. Step 9 Repeat Step 6 applying the #1 drop shadow. Step 10 Open up the Rainbow Coffi bows. Using the freehand selection tool, make a selection around the bow you want. Copy and paste the bow to your tag. Colorize, if necessary. Repeat Step 6 applying the #1 drop shadow to the bow. Resize, if you desire. Step 11 Go to Layers/Duplicate. Left click the mover tool and place the duplicate bow on the other side of the tag. Step 12 Add your copyright information. Step 13 If you want a smaller tag, go to Image/Resize using the percent option, bicubic and resize all layers checked and save this as a psp or psd file. You now have a tag template with all your layers in place (in case you want to make changes to them). Step 14 All that is left is to add your text, go to Layers/Merge/Merge all (flatten) and save as a jpg.
We hope you enjoyed this tutorial. Purrs, Nikki, Nichie and Sue
|