|
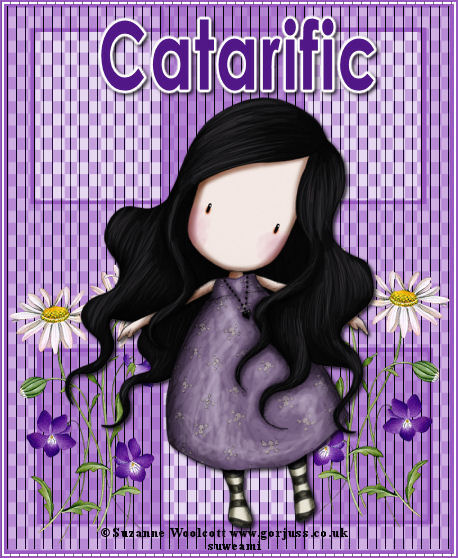
TRANSPARENT STRIPED TAG
Supplies Jasc/Corel's Paint Shop Pro. Filters - Two Moon - Wish it Would Rain Filter EyeCandy 4000 Gradient Glow Filter (optional for text) Tube of Choice - For this tutorial, I used a delightful image created by Suzanne Woolcott. You can purchase her wonderful art in tube and full form at AMI which stands for Artistic Minds, Inc. Supplies to Download. This file contains the following: One Squared Mask, One Square Pattern, and Flower Tube. You can substitute this flower tube to a flower tube of your choice. SETTINGS USED IN THIS TUTORIAL Drop Shadow: Vertical Offset 2, Horizontal Offset 2, Opacity 80, Blur 5, Color Black Magic Wand: Mode: Add/Shift, Match Mode: RGB Value, Tolerance 32, Contiguous checked, Feather: 0, Anti-Alias checked and outside selected. CREATING THE TAG Step 1 Open a new transparent image 450 width by 550 height, your tube graphic and the squared mask. Flood fill with white. Step 2 Go to Layers/New Raster Layer and flood fill this new layer with a prominent color from your tube graphic. Step 3 Go to Layers/New Mask Layer/From Image. At the drop down menu, select squared mask with source luminance and invert mask data checked. Go to Layers/Merge/Merge Group. Step 4 Go to Layers/New Raster Layer. Open up the square pattern psp file. Left click one of the color boxes at the material palette and when the color selection box opens, select pattern. Left click the drop down menu, locate the square pattern and set the angle to 0 and the scale to 27. Flood fill the tag with this pattern. Go to Layers/Arrange/Move down so the transparent pattern is beneath the mask layer. Go to Layers/Merge/Merge Visible. Step 5 Go to Adjust/Hue and Saturation/Colorize and move the sliders to a color that is similar to the one you selected in Step 2 and click ok. This will colorize the transparent pattern. Step 6 Left click the selection tool set to rectangle/Add(Shift)/Feather 0 and Anti-alias checked. Draw a selection inside the tag but do not include the border. Step 7 Go to Effects/Plugins/Two/Moon/Wish it Would Rain with these settings: Lines-O-Colour 25 How Many Lines 227 Make it Rain 255 Go to Selections/Select None. Go to Layers/Merge/Merge All (flatten). Step 8 Open up your tube flowers (or your own flowers). Copy and paste the tube flowers on your tag. Resize as necessary. Go to Effects/3D Effects/Drop Shadow and use the drop shadow settings from above. Step 9 Go to Layers/Duplicate and Image Mirror. Place the flowers on the bottom portion of the tag. Step 10 Open your tube graphic and go to Edit/Copy. Make your tag graphic active and go to Edit/Paste as New Layer. If the image is too large, go to Image/Resize using the percent option, bicubic and resize all layers NOT checked. If the image is too small, do the same but change the percentage to a number over 100%. Step 11 Apply the same drop shadow settings from above. Step 12 Add your copyright information to the bottom of the tag. Go to Layers/Merge/Merge All (flatten).
APPLYING THE TEXT WITH EYECANDY GRADIENT GLOW FILTER Go to Layers/New Raster Layer and apply your text as follows: Step 1 At the Material Palette, leave the top color box null (no color) and for the bottom color box select a color that will work for your tag. It can be the same color or a different one. Don't worry it it doesn't show up on the tag - it will after you apply the gradient glow filter. Step 2 Select a nice medium to thick font and make your font size large and type in your text. Make sure the text is NOT selected. If you used vector text, make sure you convert your layer to a raster layer. Step 3 Go to Effects/Plugins/EyeCandy 4000/Gradient Glow and click the basic tab. Change the glow width to 3 (which is the lowest) and leave everything else as is. Step 4 Click on the color tab. At the drop down menu - select fat and click ok. Step 5 Apply the same drop shadow from above and go to Layers/Merge/Merge All (Flatten).
COMPLETING THE TAG Step 1 Go to Image/Add Borders. Select the color white, symmetric and border width 2. Step 2 Repeat Step 1 but change the color to the same color as the original border color. Step 3 Left click the magic wand (using the settings from above) and left click it on the white border of the tag to select it. Go to Effects/Plugins/Two Moon/Wish it Would Rain and apply the same settings as you did in Step 7 under CREATING THE TAG. Go to Selections/Select None. Step 4 If you want a smaller tag, go to Image/Resize using the percent option, bicubic and resize all layers checked. We hope you enjoyed this tutorial. Purrs, Nikki, Nichie and Sue
|
