|
Very Easy Thick Frame Tag
Supplies Jasc/Corel's Paint Shop Pro. Tube of Choice - For this tutorial, I used a delightful image created by Suzanne Woolcott. You can purchase her wonderful art in tube and full form at AMI which stands for Artistic Minds, Inc. Lori's Doodle Plants. Lori has awesome doodles. She now has her own blog, located here, where you can download all of her wonderful graphics. The Doodle Plants are provided in the zip file. Any texture - whether it be from Paint Shop Pro, or an outside filter such as Filters Unlimited 2, Texturizer Filter, etc.
SETTINGS USED IN THIS TUTORIAL
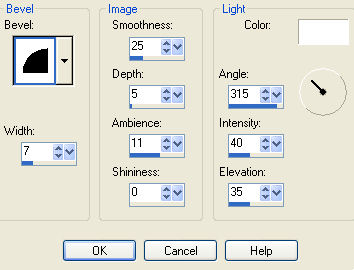
Magic Wand: Mode: Add/Shift, Match Mode: RGB Value, Tolerance 0, Contiguous checked, Feather: 0, Anti-Alias checked and outside selected. Drop Shadow: Vertical Offset 2, Horizontal Offset 2, Opacity 80, Blur 5, Color Black Step 1 Open a new transparent image 650 width by 650 height and the tube graphic you will be using. At the Material Palette, in the top color box, select a solid color for your frame that works well with your tube graphic. Flood fill the transparency with this color. Step 2 Go to Image/Resize using the percent option at 90%, bicubic and resize all layers NOT checked. Step 3 Go to Layers/Duplicate. Go to Image/Resize using the percent option at 65%, bicubic and resize all layers NOT checked. Step 4 Left click the magic wand using the settings from above and left click inside the duplicate layer so that you see it is selected. Click the delete key but do not deselect. Step 5 Open up the layer palette, go the bottom layer and again hit the delete key. Go to Selections/Select None. Step 6 Go to Layers/Merge/Merge Visible. Step 7 Left click the magic wand and left click on the frame. Either go to Effects/Texture Effects/Texture and apply your favorite texture to the tag or Go to Effects/Plugins and select your favorite outside filter and texture and apply it to the tag. DO NOT DESELECT. Step 8 Go to Effects/3D Effects/Inner Bevel and use these settings:
Go to Selections/Select None. Step 9 Left click the magic wand inside the transparent rectangular section of the frame and go to Selections/Modify/Expand 2. Step 10 Go to Layers/New Raster Layer. Step 11 At the Material Palette, in the top color box, select a light color that works with the frame color. In the bottom color box, select a darker color from the same color group. Left click the top color box and when the color selection window opens up, select gradient, foreground/background, linear style, with angle and repeats set to 0. Flood fill the selection with this gradient but DO NOT DESELECT. Step 12 Go to Layers/Arrange/Send to Bottom but DO NOT DESELECT. Step 13 Make the tube image active and go to Edit/Copy. Make the tag image active and go to Edit/Paste as New Layer. If the image is too large, go to Image/Resize using the percent option, bicubic and resize all layers Not checked. Step 14 Left click the mover tool and place the image within the selection. Go to Selections/Invert, click the delete key and go to Selections/Select None. Step 15 Go to Effects/3D Effects/Drop Shadow and apply the settings from above. Step 16 Go to Layers/Merge/Merge Visible. Step 17 Open up the Lori's Doodle Plants. Using the Freehand Selection Tool, draw a selection around the doodle you wish to use. Go to Edit/Copy. Make the tag image active and go to Edit/Paste as New Layer. If the doodle image is not on the top layer of the frame, go to Layers/Arrange/Bring to Top. You want the Flower to be facing outward - (not facing your tube image) as you see on my tag. If your doodle flower is facing inward, just go to Image/Mirror. Left click the mover tool and place the flower on the left hand side of the frame. Step 18 Go to Image/Resize using the percent option at 150%, bicubic and resize all layers NOT checked. This will make your flower large enough to fit the entire length of the frame. Step 19 Repeat Step 15, applying the drop shadow. Step 20 Go to Layers/Duplicate. Go to Image/Rotate/Free Rotate/90 Degrees/Right. Left click the mover tool and move the doodle plant across the bottom of the frame. Go to Layers/Merge/Merge/Visible. Step 21 Add your copyright information on a separate layer. Go to Layers/Merge/Merge All (flatten). Step 22 Go to Image/Resize using the percent option, bicubic and resize all layers checked. Save this file. Step 23 All that is left is to add your text and resave the file with a different name. This way you can make multiple tags for yourself, friends and group members. We hope you enjoyed this tutorial. Purrs, Nikki, Nichie and Sue
|