|
WINTER WONDERLAND
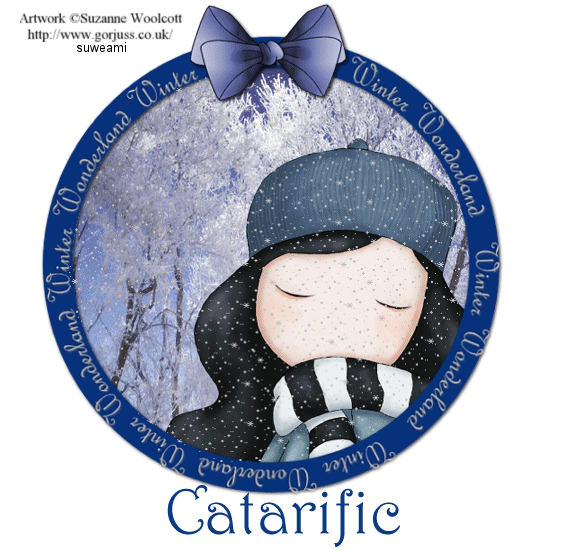
Supplies Jasc/Corel's Paint Shop Pro. Tube of Choice - For this tutorial, I used a delightful image created by Suzanne Woolcott. You can purchase her wonderful art in tube and full form at AMI which stands for Artistic Minds, Inc. Supplies to Download: This file contains the following: 1 winter scene downloaded from Microsoft Clipart Media 1 circle psp file, 1 circle topper, and 1 Winter Wonderland circular word art created by me. Snow Animation - shared and edited by me to make the snow darker to show up on the tag. Bow by Rainbow Coffi. The full collection of Rainbow Coffi's awesome image is housed at PSP Playground. Anyone can join, free of charge.
SETTINGS USED IN THIS TUTORIAL Magic Wand: Mode: Add/Shift, Match Mode: RGB Value, Tolerance 18, Contiguous checked, Feather: 0, Anti-Alias checked and outside selected. Freehand Selection Tool: Set to Point to Point, Mode Add (Shift), Feather 0, Smoothing 2, Anti-Alias checked Step 1 Open up the circle psp file and the snow jpg image. Step 2 Left click magic wand and use the settings from above. Left click the magic wand into the middle of the circle. Step 3 Make the snow picture active and go to Edit/Copy. Make the circle file active and go to Edit/Paste as New Layer. Move the snow picture within the selection, choosing a section of the picture you want for your tag. Go to Selections/Invert, click the delete key and go to Selections/Select None. Step 4 Open the topper image and go to Edit/Copy. Make the tag image active and go to Edit/Paste as New Layer. Left click the mover tool and move the topper so that it nicely surrounds the snow image. Step 5 Open up the circular winter wonderland text file and go to Edit/Copy. Make the tag image active and go to Edit/Paste as New Layer. Left click the mover tool and move the text into place. Step 6 Open up the layer palette and go to the layer where you have the white circle. With the magic wand left click inside the white circle. Still at your layer palette, make sure you are back at the top layer but do not deselect. Open up your tube image and go to Edit/Copy. Make the tag image active and go to Edit/Paste as New Layer. Left click the mover tool and move your tube within the selected area. If the tube is too large, go to Image/Resize using the percent option, bicubic and resize all layers checked. Go to Selections/Invert, click the delete key and go to Selections/Select/None. Step 7 What you want to do now is move the tube image so that it is beneath the topper. Open up the layer palette, left click on the top layer, the tube image you just placed, and physically move it below the topper but above the snow picture and release your left mouse button. Step 8 Open up your bows and with your selection tool select the bow you want and go to Edit/Copy. Make the tag image active and go to Edit/Paste as New Layer. Place your bow on your tag and go to Layers/Merge/Merge Visible. Step 9 Left click the mover tool and move the entire tag as far up to the top of the palette and go to Layers/Merge/Merge All (flatten). Step 10 Go to Image/Resize using the percent option at 80%, bicubic and resize all layers checked. Step 11 Left click the crop tool and draw a rectangle around the area you wish to keep, eliminating any excess white palette. Double left click within the rectangle. Step 12 On the same layer, add your copyright information but do not add your text. If you added another layer for your copyright information, make sure you go to Layers/Merge/Merge All (flatten). Step 13 Left click your freehand selection tool (it looks like a lasso), set it to point to point and use the settings from above. Holding down the left mouse key, start moving the tool around the inside of the circle, beneath the topper. When you want to change directions, release the left mouse button, angle the tool to where you want it to go, hold click the left mouse button and proceed. Each time you need to change the angle, release the left mouse button. You will need to use the selection tool to make a selection around the inside of the tag, as close to the topper as possible. When you have gotten to the end of the circle, double left click and release your mouse button. You should now have a selection surrounding the interior portion of your tag. DO NOT DESELECT. We will need this selection to add snow to the tag. Adding the Snow Step 1 Go to Layers/Duplicate and Duplicate this layer 9 times so you have a total of 10 layers. Open up your layer palette, and starting with the second layer, right click the layer, go to Rename and left click and rename the second layer 2. Go to the layer above it, and rename that layer 3. Rename the layer above that layer, and name it 4. Continue doing this until you have all 10 layers renamed from background though layer 10. All 10 layers should be selected. Step 2 Open up your snowdark psp file and the layer palette. Go to Frame 1 and go to Edit/Copy. Go to your tag file and make sure you are on the background layer and go to Edit/Paste into Selection. DO NOT DESELECT. Step 3 Back to your snowdark psp file - go to Frame 2 and go to Edit/Copy. Go to your tag file and make sure you are on layer 2 and go to Edit/Paste into Selection. DO NOT DESELECT. Step 4 Continue going to the corresponding Frame and Layer and copying and pasting the snow to your tag until all 10 layers have snow pasted on the corresponding layers. You would be pasting the snow as follows: Frame 1 - pastes into selection on background layer Frame 2 - pastes into selection on Layer 2 Frame 3 - pastes into selection on Layer 3 Frame 4 - pastes into selection on Layer 4 Frame 5 - pastes into selection on Layer 5 Frame 6 - pastes into selection on Layer 6 Frame 7 - pastes into selection on Layer 7 Frame 8 - pastes into selection on Layer 8 Frame 9 - pastes into selection on Layer 9 Frame 10 - pastes into selection on Layer 10 Now go to Selection/Select None. Step 5 Go to Image/Resize using the percent option at 80%, bicubic and resize all layers checked. Step 6 Save your file as a psp or psd file. We will complete the tag in animation shop. We will not add our text until after the tag is completed. This will be done in animation shop. Click here to continue.
|