1.4 Buttons
So, now you are probably wondering can you create buttons? Well the answer to that question is YES. Making buttons is almost the same as making Labels. This is a simple button:from Tkinter import *
root = Tk()
root.title("buttons")
button = Button(root, text = "i'm a button!, press me!",fg = "red", width = 34)
button.pack()
root.mainloop()
Press F5 and you should get:
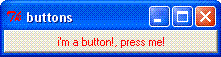
Look at line 4: making a button is just like a Label except instead of writing "Label" you need to write Button. still line 4:the root(after the bracket) means that the button should be on the root (root is the box) the text is whats writen on the button, colored red and the width of the button is 34.
Can i have more than 1 button on a window? Yes you can. It's just like having lots of text. example:
from Tkinter import *
root = Tk()
b = Button(root, text = "button 1")
b2 = Button(root, text = "button 2")
b3 = "Button(root, text = "button 3")
b.pack()
b2.pack()
b3.pack()
root.mainloop()
Good, nw we have 3 buttons one on top of the other. But what if you want them side by side?
well, here is what you do.
from Tkinter import * root = Tk() b = Button(root, text = "button 1") b2 = Button(root, text = "button 2", fg = "brown") b3 = Button(root, text = "button 3") b.pack(side = "left", padx =6, pady =4) b2.pack(side = "left", padx =6, pady =4) b3.pack(side = "left", padx =6, pady =4) root.mainloop()
running it will result in:

By puttin (side = "left") inside the pack, you control where you want the button or text or image to go. And the padx and pady are just to make space between the buttons.
Knowing lets play around with button locations.
code:
from Tkinter import *
root = Tk()
button = Button(root, text = "1", width = 8, height = 8)
button2 = Button(root, text = "2", width = 8, height = 8)
button2.pack(side = "left" )
button.pack(side = "left")
root.mainloop()
will result in the following:
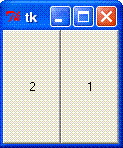
but if we do this:
from Tkinter import *
root = Tk()
button = Button(root, text = "1")
button2 = Button(root, text = "2")
button.pack(side = "left" )
button2.pack(side = "left")
root.mainloop()
It will result in this:
img src = "22.GIF">
You can also change button locations ; top or bottom the same way
There also are Tkinter's error boxes, a exampleof one below:
from Tkinter import *
import tkMessageBox
tkMessageBox.showinfo("Window Text", "don't be a chicken")
#you can change the "dont be a chicken" into whatever you want
Press F5and here you go:(a cool Tkinter message, used in games)
picture will be added shortly
Now you know how to make buttons!!(see, wasn't so difficult)
To learn how to make it that when you press on a button a action is prformed, visit Tkinter-Interaction with humans part 2
1.5 radiobuttons
How to make a radiobutton? Making a radio button is a little bit more difficult. Here is a program with a radiobuttonfrom Tkinter import *
root = Tk()
root.title("Radiobutton")
v = IntVar()
Radiobutton(root, text="One", variable=v, value=1).pack(anchor=W)
Radiobutton(root, text="Two", variable=v, value=2).pack(anchor=W)
root.mainloop()
When you run it you'll get this:
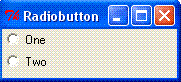
Basically we said that "v" is the variable, and that on every Radiobutton the variable value is different, because it's different whenever you select the first radiobutton the second unselects and vis versa. If we put the same variable value on each button then the button will have no connection with each other(try it).
To learn how to make it that when you press on a button a action is prformed, visit Tkinter-Interaction with humans part 2
Entry box
Now I'll teach you how to make those entry boxes and how to use them. Just to clarify, this is a Entry box
The code to create such a entry box follows:
from Tkinter import *
root = Tk()
entry = Entry(root, width = 14)
entry.pack(pady = 10)
root.mainloop()
line 3 means put a Entry(entry box) on the root, that has a width of 14.
line 4 means show the Entry(entry box)
You also can color your entry box, change it's size, put more than one on a window, whatever you can come up with. exs:look at the following picture create it's code with out looking at the answer below.
picture:
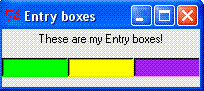
code:
from Tkinter import *
root = Tk()
root.title("Entry boxes")
text = Label(root, text = "These are my Entry boxes!")
entry = Entry(root, width = 10, bg = "green")
entry2 = Entry(root, width = 10, bg = "yellow")
entry3 = Entry(root, width = 10, bg = "purple")
text.pack(side = "top")
entry.pack(pady = 10, side = "left")
entry2.pack(pady = 10, side = "left")
entry3.pack(pady = 10, side = "left")
root.mainloop()
To learn how to make it that when you press on a button a action is prformed, visit Tkinter-Interaction with humans part 2
I'll add more to this section next week