 1. Toss Ball from Hand 1 |
 2. Catch Ball in Hand 1 |
Welcome to my Juggling Page! This page is mostly for beginners, so if you're already juggling six live pigs, then I'd suggest going to some other site which has more info. I'm going to explain to you how to do basic juggling, using my Paco Method. It's easier to understand when someone shows you, but if you have enough willpower, this method will work, even by computer. I've taught many people to juggle, some naturals, and some that had no coordination, so I know this method works, as long as you don't give up. It took me two attempts and about five years between attempts to learn how, so I know that I can do it, you can too!
Contents:
Before you can even attempt to juggle, you need something to juggle. The easiest thing I know of is three square bean bags, about 3 inches per side. These are good to start with because they are soft enough and heavy enough to easily nest in your hand, and more importantly, don't roll away when you drop them. The downside is that they are often hard to come by. Another thing you might try are tennis balls. Many people say that they don't like juggling them because they are too light, but they are actually my preferred item. But try to find something about the size of a tennis ball to start with. You can also use oranges, but these get squishy after a while. Just make sure that whatever you get isn't too heavy or hard, too small or too big, and is not easily breakable, since you will be dropping them.
A key to understanding my drawings:
You'll notice that I've put drawings in each step to illustrate how it should work. There are a few things that should be understood while looking at these drawings. First, these drawings are designed to be in first-person view. In other words, the right side would be your right side, as if you're looking at yourself juggling. Second, those little grey paddle-like things are supposed to be your hands. I apologize for the Pong-like graphics, but I didn't have much to work with. Third, the text below the drawings are color-coded. So, if Ball 1 is in green, it's referring to the green ball in the drawing. And finally, some of the text is in italics, while some of it is in bold. The bold text is a reference as to when you should perform the actions, while the italic text actually is the actions you should perform.
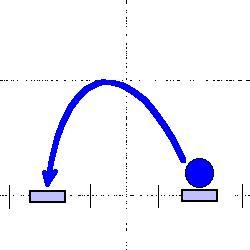
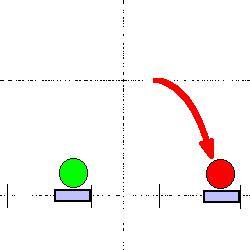
Step 1: The Toss
This is an important first step, so don't rush through it too quickly. Start with only one ball in your dominant hand (probably the one you write with). The toss is accomplished by throwing the ball into the air and catching it in the same hand. Almost anyone can do this with some level of proficiency, but this still needs to be gone into in more detail. First off, the ball shouldn't go any higher than forehead level. Second, the arm shouldn't go much above the chest level when the ball is thrown. Third, when the ball is tossed, it should go straight up and drop into the hand which should stay below the chest level when the ball is caught. Ideally, you should get to the point where you can do the above steps with your eyes closed. Of course, I still drop them when I do this, so don't worry too much if you don't get this far. So the pattern here is:
|
1. Toss Ball from Hand 1 |
2. Catch Ball in Hand 1 |
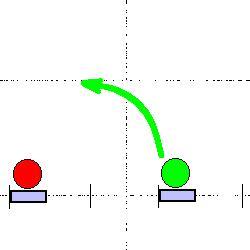
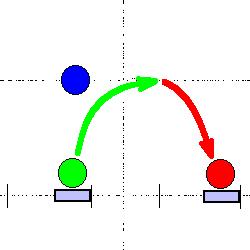
Step 2: The Exchange
Now for the basic move in juggling. This is the most basic move, which you will be repeating every time you juggle, thousands of times. Once you have this down, you've learned how to juggle. After this, it's all about adding more balls. Once again, you start with one ball. Now, all you do is toss the ball from one hand to another. Simple, isn't it? Of course, I am going to complicate things. The trick here is to take the hand that is going to catch the ball and put it out at your side, at about a 90 degree angle from the rest of your body. Now, when you toss the ball, try and get it to arc about the same height as it was going when you were tossing it with one hand. Another thing to remember is to not let the tossing hand cross in front of your body. The hand should toss the ball at your side, not in front of you. And when you toss it, the receiving hand shouldn't have to move to get the ball. The ball should fall right into the unmoving hand. The key word is 'should,' because the first few times probably won't happen this way. Don't worry if it doesn't happen the first time, and don't worry if you drop the ball at this stage. You've got so many things to concentrate on that sometimes catching the ball is the last thing on your mind. Just pick up the ball and start again. Once again, try and get proficient at doing this with both hands before going on to the next step. The pattern is:
 1. Toss Ball from Hand 1 2. Catch Ball in Hand 2 |
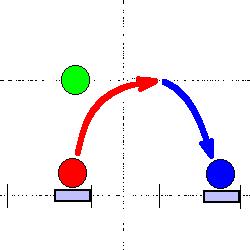
Step 3: The Two Ball Exchange
The last step was the basic juggling move. Now, I'm going to teach you the basic pattern in juggling. This is the move that takes the basic move, jazzes it up a bit, and turns it into juggling. Believe it or not, this is the second-to-last step. Congratulations! You're halfway done! This time, you start with two balls, one in each hand. Position your arms as before. Now, for the fun part. Start with one hand, say, for the sake of argument, the right hand. Start by tossing this ball in your right hand, just like you were doing in step 2. When it get to the highest point in its arc, it's time to toss the other ball. What you want to do is toss the ball in your left hand so that it passes under the path on the other ball. In other words, if you start with the right hand first, as you toss the other ball, the ball traveling left should be directly over the ball travelling right. Of course, if you start with the left, hand then everything is reversed.
Confused? I hope not, but it probably will happen. I'll try and explain it once more, so hopefully, one of my explanations will make sense. Let's call the ball in the right hand Ball 1, and the ball in the left hand Ball 2. Now, you start by throwing Ball 1 into the air, in an arc, just like you were doing in step 2. When Ball 1 gets to the highest point of its arc (the apex), toss Ball 2 in another arc. Ball 2 should pass directly under Ball 1, and end up eventually getting to the same height as Ball 1.
Now the next trick. So now both balls are in the air. Unfortunately, due to the effects of the gravitational pull of the Earth (assuming you're trying this on Earth), the balls won't stay in the air for very long. So, what do you do? The idea here is to catch the balls. But of course, even this has a specific way to do it. You should catch Ball 1 just about the time that Ball 2 is reaching the apex of its arc. So, the pattern here should be:
 1. Toss Ball 1 from Hand 1 |
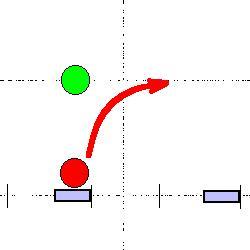 2. Ball 1 reaches apex of arc, Toss Ball 2 from Hand 2 |
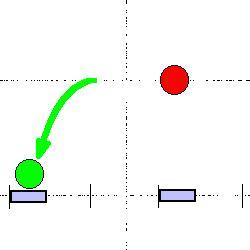 3. Ball 2 reaches apex of its arc, Catch Ball 1 in Hand 2 |
 4. Catch Ball 2 in Hand 1 |
Step 4: The Three Ball Exchange
Guess what? If you've mastered that last step, all you're doing in this next step is adding the third ball and continuing. So, what does that mean? It means that you're almost juggling! This time, start with two balls in one hand and one ball in the other. Another thing to remember when you have two balls in a hand. Hold one ball in the palm of your hand and the other in your fingertips. Always toss the ball in your fingertips first, and always toss the ball in the hand that has two balls. Now that you've got the balls in your hands, let's go back to our step by step guide:
 1. Toss Ball 1 from Hand 1 |
 2. Ball 1 Reaches Apex, Throw Ball 2 from Hand 2 |
 3. Ball 2 Reaches Apex, Catch Ball 1 in Hand 2, AND Throw Ball 3 from Hand 1 |
 4. Ball 3 Reaches Apex, Catch Ball 2 in Hand 1, AND Throw Ball 1 from Hand 2 |
 5. Ball 1 Reaches Apex, Catch Ball 3 in Hand 2, AND Throw Ball 2 from Hand 1 |
 6. Ball 2 Reaches Apex, Catch Ball 1 in Hand 1, AND Throw Ball 3 from Hand 2 |
 7. Ball 3 Reaches Apex, Catch Ball 2 in Hand 2, AND Throw Ball 1 from Hand 1 |
 8. Ball 1 Reaches Apex, Catch Ball 3 in Hand 1, AND Throw Ball 2 from Hand 2 |