The Human Gnome Presents
Slaying The Dragon
A Monograph by Lester Cheung
Games | Openings Lab| Endgame Notes | Links | Home
Section 1: Introduction and Early Deviations
Introduction - Aidan Rawlinson
The Sicilian Dragon contains many of the the sharpest lines in chess. It remains my fravourite sicilian variation providing both
sides with excellent chances for attack and activity. Due to the fine balance of the positions reached, where one tempo is often
fatal, careful opening preparation is especially essential as a mistake in the opening is nearly always fatal. By the same token
a little study can provide a player with many wins against strong opponents.
This approach to handling the white pieces has been written as a Monograph by Lester Cheung and adapted for this website by
Aidan Rawlinson. From now on Lester's work adapted for the web by me will be given in blue, whilst my notes and comments are given in
black. Comments are invited by the author.
Monograph: Slaying the Dragon by Lester Cheung (9th Dec 2001)
"Ye olde variant old de Dragon. Fire Breathing
and never boring. Tis how to slayeth de fiery beast."
(Perhaps we can find some suitable poetic quote?)
The dragon is defined by the following variation:

6. Be3! Entering the Rauzer Attack/Yugoslav Attack variation. Here black will normally continue with Bg7, less successful ideas are:
- 6... Ng4?? 7. Bb5+! Winning a piece.
- 6... Qb6? 7. Ndb5! Qa5 (Qd8 Nxa7) 8. e5! Ng4 (dxe5 9. b4! Qd8 10. QxQ KxQ 11. Bxa7 with advantage) 9. exd6! Nxe3+
10. fxe3 +/-
- 6... Bd7?!/Nbd7/Nc6 7. f3 (followed by Qd2 and 0-0-0) and play will transpose into lines covered later.
- 6... a6?! (An important line which can also arise from the Najdorf sicilian.) 7. f3 Bg7 8. Qd2 Nbd7 (...b4?! Nd5! Adorjan-Fuller, 1975)
9. 0-0-0 b5 10. g4! Bb7 (...b4!?) 11. h4 Nb6?! (...b4, ...Rc8) h5 +/=
Black continues with 6... Bg7
7. f3 (necessary to avoid Ng4) and now black has two other options other than play the mainlines:
- 7... 0-0 8. Qd2 d5?! Black tries to refute the Rauzer attack. 9. e5! Nd7 (... Ne8 10. f4. see Germicide-CutterStanly and Polugaevsky-Chekhover, 1954)
10. f4 Nb6 (...Nc6 0-0-0) 11. 0-0-0 Nc6 12. Nf3 Be6 (...e6 13. h4 h5 14. Bc5! Ne7 15. Nb5 a6 16. Nbd4 Nd7 17. Bd6 +/- Karaklajic-Nedelkovic, 1957) 13. h4 Nc4?? (...h5!?) 14. Bxc4 dxc4 15. Qf2 Qa5 16. h5 +/- Palac-Afek, 1991.
- 7... Nc6 8. Qd2 without 8... 0-0 Black tries to gain a tempo for his queenside attack, whilst sheltering his king in the center.
Section 2: 9. 0-0-0 Mainline Dragon
We now contend with the more mainline continuations of the Yugoslav attack.
1. e4 c5 2. Nf3 d6 3. d4 cxd4 4. Nxd4 Nf6 5. Nc3 g6 6. Be3 Bg7 7. f3 0-0 8. Qd2 Nc6 - the Mainline. Here we recommend 9. 0-0-0.
Rather than preventing ...d5 with Bc4, white allows black to carry out his counterblow in the center, relying on the activity of his major pieces to sway the game to his advantage. The lack of bishop on c4 makes counterplay based on Nc6-e5-c4 ineffective here as white will save two tempi on capturing the Knight on c4.
Black has three plans here:
- 9... d5 Long considered the most important move. Black plays for the center.
- 9... Nxd4/9... Be6 Black plays for a straightforward attack on the white king.
- 9... Bd7 Black plays centrally with pieces, looking not to play Nc4, but rather sacrifice a piece on the kingside for pawns and positional activity.
LINE 2A: 9. 0-0-0 d5 10. Qe1!?
10. Qe1 - This logical move attempts to take advantage of the x-ray attack against the black queen. Although black's last move is a pawn sacrifice, white should not consider taking it. Despite what your computer may claim black gains sufficient counterplay (just ask Mickey Adams). With Qe1 white gains excellent winning chances and initially enjoys excellent central control. Black requires great accuracy to withstand whites pressure. Whilst I (AR) suspect that the continuation 10. exd5 exd5 Bd4! may be theoretically better, in practical play 10. Qe1 is hard to face and one of the major reason I gave up playing the dragon.
 Here black has two main alternatives:
- 10... e6
- 10... e5
However first we give two examples of how white secures his advantage against other 'sensible looking' moves:
- 10... Nxd4 11. Bxd4 e6 12. Kb1 a6 13. g4 Re8 14. g5 Nh5 15. Bxg7 Nxg7 16. Qd2 +-
- 10... Re8 11. Bb5 Bd7 12. Bxc6! bxc6 (...Bxc6 13. e5 Nd7 14. e6 +/=) 13. e5 (+-) c5 14. Nb3 c4 15. Nc5 Bc6 16. exf6 Bxf6 17. Qf2?? +/= (Kb1!?, h4!? +/-) Jansa-W.Watson, 1992.
- 10... e6 11. h4!
- ...Qa5?! 12. exd5 (resolving central tension before committing) exd5 (...Nb4!? {sharp, tricky, but flawed} 13. Bc4! Nfxd5 {...Qc5 14. Bb3 +/=, ...exd5!? } 14. NxN exd5 15. Bb3 Nxa2 16. Kb1 QxQ 17. Rhxe1 Nb4 And white has some advantage due to the black isolated Q-pawn ?? WHAT ON EARTH ?? White is a pawn down in this position. White is better, but only due to 18. Nb5! Bd7 19. Nc7 Rc8 20. Nxd4 with advantage due to better pieces!) 13. Qd2 Re8 14. Nb3 Qc7 15. Bh6 Bh8 16. h5 Be6 17. Bd3 Ne5 18. hxg6 fxg6 19. Bb5 Nc4 20. Qf3 with advantage to white (Liss - Kahn, 1995)
- ...Qe7?! 12. h5 dxe4 13. Nxc6 bxc6 14. Qh4 Rb8 (... exf3!?) 15. Rd4 Qb7 16. b3 exf3 (... Nxh5!?) 17. Ne4! Nxe4 (... Nxh5!?) 18. hxg6 h6 (... Nf6!?) 19. gxf7 etc... and white is better. Mortensen - Tisdall, Reykjavik Z 1995.
- ...h5!?
- ...Qc7 (The main move) 12. Ndb5! Qa5 13. exd5 exd5 14. a3! Re8 (...Be6 should transpose, ...a6? Qf2 +-) 15. Qf2 Be6 16. Be2 (h5!?) Rad8 17. Nxa7! d4 18. NxN dxe3 (bxc6 19. Bxd4 and careful defense should win the day, however this is blacks best practical chance) 19. NxQ exQ 20. RxR RxR 21. Nxb7 Bh6+ 22. Kb1 Rd2 23. Bd3 +/-
- 10... e5 11. NxN bxc6 12. exd5
- ...exd5 Now white assaults white's weak pawn centre. 13. Bg5 Be6 (...d4 Qxe5 +-) 14. Bc4 Qc7 (...Qb6?! 15. Bxf6 Bxf5 16. Nxd5 Bxd5 17. Rxd5 e4 18. Rb5 Villa - Gallego, 1991) 15. Bxf6 dxc4 16. Bxg7 Kxg7 Here we reach a critical position. White can try either Ne4, or Qe3... Analysis with Fritz tends to favour black intially, but then drift slowly more towards white.
- ...Nxd5 13. Bc4 Be6 14. h4!?
- ...Re8?! see Bauer, R (2035) - Fischer, M (2030) 2001
- ...Qa5 15. NxN! QxQ 16. Ne7 and white wins a piece ?? REALLY WHAT PIECE IS THAT? White is however winning at least a pawn (16. Rhxe1!? is perhaps even clearer) [N.B. I think this was misanalysed missing that white has played Bc4!]
- ...Qc8 15. h5 Nxe3 16. Bxe6 Qxe6 (...Nxg2 17. BxQ NxQ 18. hxg6! hxg6 19. Bb7 Rab8 20. Bxc6 Rfc8 21. Be4 Ng2 22. Rd7 with Nd5 to follow) 17. QxN f5!? 18. Qc5 Rf6 19. Rhe1 Re8 20. Qxa7 +/=
- ...Qc7 The most natural move. 15. NxN cxd5 16. Bxd5 with another critical position. Play could continue: ...BxB 17. RxB Qc4 18. Ra5 Rfc8 19. c3!? e4 20. Qf1 (h5!? FRITZ) Qb4 Rb5 +/=
LINE 2B: 9. 0-0-0 Nxd4 10. Bxd4 Be6 11. Kb1!
- ...Qa5?! 12. Nd5! Qd8 13. Nxf6 exf6 14. h4!? +/=
- ...Rc8 12. h4 h5 (...a6 13. h5 b5 14. hxg6 fxg6 15. Nd5 Qe8 16. g4 and whites attack is a step ahead ...Qf7!? FRITZ and high accuracy is required of white) 13. Be2 (...Qc7!?) a6 14. g4 (+/=) Qa5? 15. Nd5 +/- Arakhamia-Matveeva, 1993
- ...a6 12. h4 b5 (...h5 13. Nd5) 13. h5 b4 14. Nd5 Bxd5 15. exd5 Qa5 16. hxg6 hxg6 17. Bc4 Rfc8. 18. b3 +/- Geller-Horowitz, 1954.
- ...Kh8 removing the need for Qc7. 12. h4 Qa5 13. h5 Rfc8 14. hxg6 fxg6 15. a3 +/= e.g. Rab8 16. Bd3 (Bxf6!? +- FRITZ) Bf7 17. Bxf6 Bxf6 18. Qh6 Kg8 19. Qxh7+ Kf8 20. Nd5 +/= Petrovic-Jevtic 1993.
- ...Qc7 the mainline 12. h4 Rfc8
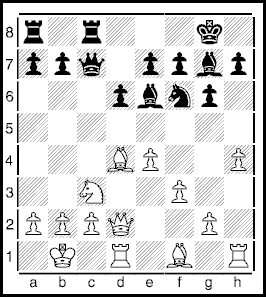
12... Rfc8 Another important position in the dragon.
Another critical position in the dragon, black will continue Qa5, intending Rxc3 and Qxa2. White has several options here, entering into a tactical fight aiming to mate first plays to blacks plan, instead white has the pleasant choice between two endgames which are more pleasant for white and in which preparation will be
well rewarded.
13. g4! (Also interesting is 13. h5 Qa5 14. h6!? Bh8 15. a3, when black must either play ...Nd7 or face BxN and Nd5.) Qa5 14. Qg5! (Ivanchuk) black must now either swap queens or make a concession.
- ...Qc7 and white can try either 15. a3 (Gufeld) or 15. Bd3 (Nunn) both of which should be more pleasant for white.
- ...b5 15. Qxb5 Qc7 16. Qa4! (a prophaylactic retreat since 16. g5 Rab8 and black gains the initiative) Rab8 17. Ka1! a5 18. Bb5 Qb7 19. Rb1! and white holds his extra pawn. Z. Almasi - Ki.Georgiev, 1995.
- ...d5 15. exd5 Nxd5 16. Bxg7 Nxc3+ 17. Bxc3 Qxa2+ 18. Kc1 And white secures the advantage of the two bishops in a better endgame (?? Once again I find the notes rather confusing, white has the advantage as he is a piece up surely? Its not an endgame either!)
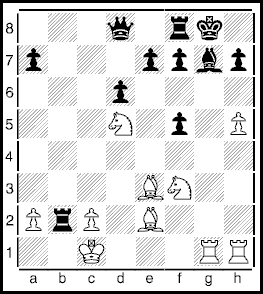
- ...QxQ 15. hxg5 Nd7 16. BxB KxB 17. Rh4! This move of Guverich protects g4 allowing white to press with f4, white can also quickly double rooks on the h-file.
 The position after 17. Rh4. White has a space advantage and the better placed pieces. However the position is still very sharp. If black manages to swap of pieces and activate his king then whites advanced kingside pawns will rapidly fall and black will win. For this reason, the two breaks of ...f6 and ...h6 (after ...Rh8) are critical to the position. For white the tactical possiblities of f4-f5 and the activity of his pieces must be used accurately.
- ...f6 18. gxf6+ Nxf6 19. g5 Nd7 20. f4 Rc5 21. Nb5! Nf8 22. Nd4 Bd7 23. Bd3 and white has a pleasant position I. Gurevich - Ward, 1994.
- ...Rh8 18. f4 Nb6 (...Rc8!?) 19. a4! a5 20. Bb5 and Nunn claims white to have an advantage e.g. ...Rac8 21. f5! Bc4 22. Rh3 BxB 23. axb5 Rc5 24. f6+ Kf8 25. Rhd3 Nc4 26. Na4! (planning Rc3) and white is better.
LINE 2C: 9... Bd7?!
This move is less effective without Bc4 being played. Black cannot reasonably play Ne5-c4 as the bishop captures from c1, saving two tempos compared to the sharp 9. Bc4 lines. However this move is extremely popular at club level and higher with strong tactical players. Black often plans to sacrifice a piece against whites kingside pawns and exploit and slight innaccuracies by white with deeply analysed home preparation. Ward who was very dismissive of this move in his first dragon
book changed his mind in his recent updated version, saying that he had underestimated the move.
10. g4 Rc8 11. h4 Ne5 12. Kb1 b5 13. h5 Nxf3!? 14. NxN Bxg4 15. Be2! b4 16. Nd5 Nxe4 17. Qxb4 Rb8 18. Qxe4 Rxb2+ Kc1 Bf5 20. Qxf5! gxf5 21. Rhg1! I think this position exemplifies the dragon slaying activities to the utmost. Black is lost!
 This position also exemplifies my (AR) worries about this line. The position is Rdg1? After which FRITZ shows that black can comfortably win with Rxa2. After the correct Rhg1! It still takes over 5 precise moves (which I doubt I would find over the board) before fritz decides white is winning.