P76 4.4 V8 in a TC Cortina
Updated: April 3, 2002
All images are thumbnails - click on them to get the
full size version
In an attempt to improve the power to weight ratio and the front to
rear weight balance (and thus the front suspension issues), I've opted
for fitting a Leyland 4.4 aluminium alloy V8 engine into my TC Cortina
6. This page gives an idea of some of the issues involved in this
conversion and how we've attempted to solve them.
First some pics, text on how (not why :-)) follows
:

|
Here we are back in the early days - basic fitment complete ie. engine
mounts plus a few hoses, cruddy old rocker covers, no exhaust system, fan,
radiator or electrics |

|
Same time, same stage but viewed from the passengers side. Note SD1
timing cover + accessories |
|
Weird angle shot here to satisfy artistic nature of photographer. |

|
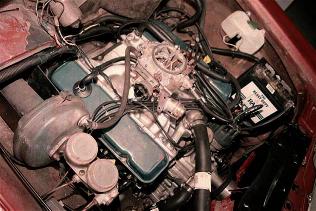
Here is a nice view from the front - accelerator cable has been lengthened
but is not connected, we were just getting ready to start the beast: exhaust
is on, radiator in, fan on, electrics ready, electric fuel pump fitted
and all kinds of fiddly things done. Radiator hoses are top: HZ top hose,
bottom: EB Falcon bottom hose. Both hoses fit without cutting. |

|
Seems like we are hanging off a crane for this overhead view. It all
fits in but only just. |

|
Side view - again, everything fits but only just. |
| Final picture - with powder coated orange rockers has yet to be taken
because the car is always on the road and I cannot stop driving it long
enough to take a picture :-). |
On the road with transport department approval and insurance since
February 25, 2002. So far no teething troubles. April 3, 2002 @ approx
3000 miles - secondaries will be tuned shortly so we should be able to
get a better idea of performance. |

|
This is it! Errr, well not really :-) - but wrecking yards are fun
places to go.... |
|
Thats not it either - unlikely that this VW will ever see the balck
stuff again though..... |
Description of surgery required
to effect this transplant
-
Width of the P76 4.4 Block - the P76 4.4 block is wide - 515mm across
the block from the exhaust manifold gasket surface on one side to the exhaust
manifold gasket surface on the other side. This is much wider than the
Ford Windsor 302 V8 and significantly wider than the Rover 3.5 block (which
measures 465mm across the same dimension) and causes a number of problems.
-
Fitting an exhaust manifold. I tried almost all the cast iron exhaust
manifolds plus two different sets of extractors available for the P76 and
Rover. This includes those from the Rover 3500 SD1, Range Rover, P6B, Range
Rover 3.9 and the standard P76. Whilst some of these would have fitted
on the passenger side head, they all clashed with either the crossmember
or the intermediate steering shaft from the column to the rack or BOTH.
Even the SD1 exhaust manifolds which have twin pipes at the rear and a
fairly tight profile didn't clear the steering shaft! Only solution was
a custom made extractor for the drivers side (I'm using a tri-Y setup).
Definitely a challenge - the front two ports had to be routed through the
wheel arch and over the front spring tower before joining the rear ports
after the bellhousing. The new tri-Y extractor I had for the passenger
side of the P76 needed to be shortened in order to clear the crossmember
and avoid poking out below it.
-
Wiring and clutch cable. The width of the block brings the exhaust
manifolds close to the side rails of the chassis on which the wiring loom
runs. This was a big deal after all - as mentioned above front two exhaust
ports had to be routed through the front wheel arch to make room for the
clutch cable etc.
-
Booster Bracket - Standard Cortina brake booster unit would interfere
with the rocker cover and head on the drivers side when the engine was
revved up. Mine has been angled slightly away from the normal position
by the use of some spacers at the firewall between the booster bracket
and the pedal box.
-
Clutch - Cortina 6 uses a clutch operated by a cable. So does the
P76. Both pull the clutch throwout lever to the front of the car but the
P76 system is quite different because the pedal cable operates a shaft
which then operates another cable attached to the throwout lever. Keep
P76 throwout lever, fabricate bracket to guide the Cortina clutch cable
and its adjustment nut connect to the P76 throwout fork and its adjuster.
Fiddle with throwout lever pivot point which (thankfully!) is adjustable
without removing the gearbox.
-
Gearbox - I'm using the P76 4 speed single rail which has
slightly different ratios to the Cortina 6 single rail, a slightly longer
extension housing and a much longer input shaft. Given the constraints
of the firewall, the P76 block mounts further forward than the 250, so
you need the extra length of the extension housing. Shifter hole in the
floor pan needed to be enlarged approx 20mm to the rear so that shifter
will clear the floor pan but no structural mods required and centre console
still fits. Speedo cable is the original Cortina job with a P76 4 speed
speedo drive swapped onto the end (cost $32).
-
Fan to Radiator Clearance - this depends on the front cover
you use with the P76 block. You have a choice of using the original front
cover and putting up with a worn out mechanical distributor and an oil
pump which reportedly loses pressure occasionally [see here for some experiences
on this], or moving to a more modern front cover like that used on the
Rover SD1/SE/Van den Plas. I've opted for the latter because I can then
also use the electronic distributor from these cars which still has a vacuum
operated mechanical advance. The only problem is that Rover moved to a
viscous fan drive for this cover and a longer front water pump shaft. Without
a fan the clearance between the radiator and the end of the SD1 water pump
shaft is 25mm which is too close to mount the big viscous fan. The solution
here was to find a steel fan with a large centre and then spin the fan
on a lathe to enlarge the centre hole until the fan can be moved along
the shaft to bolt up to the water pump pulley.
-
Gearbox Crossmember - Slight modification - move mounting section
in crossmember back by cutting and welding, redrill to fit the two bolts
from the P76 single rail gearbox mount.
-
Sump - standard P76 sump has its oil reservoir at the rear.
Clears the front crossmember and thus does not require any cutting or modifications
to the oil pickup. Yay! However a bit of heat and some hammering has been
applied to the sump to increase the clearance to the front crossmember.
-
Starter Motor - mounts on the drivers side of the block. Standard
P76 starter motor and almost all Rover starter motors have the solenoid
poking out the side - too tight to fit an exhaust system on the drivers
side due to the width of the block. Solution is to use a Rover SD1/SE/Van
Den Plas (1978 on) starter motor, as the solenoid on these has been moved
to the bottom of the starter. Its unfortunate that the Rover starter motor
has a smaller locator diameter than the P76 starter - dealt with by having
a 3mm piece of galvanised steel cut to fit tightly around the Rover starter
locator and bolt pattern. The starter is a bit noisy due to the fact that
the Rover and P76 ring gear is slightly different.
-
Tailshaft - Cortina tailshaft is approx the right length given
the position of the engine as fixed by the new engine mounts. Transferred
yoke from the P76 4 speed tailshaft to the Cortina tailshaft because the
gearboxes have different numbers of splines on their output shafts. Balancing
operation after cutting the Cortina yoke and welding on the P76 yoke is
essential. Tailshaft yoke on the P76 4 speed single rail is the same as
CM/CL Valiant with 4 speed single rail so if you can't get a P76 part these
will also work.
-
Engine Mounts - Remove Cortina 6 cylinder capri style rubber,
cup and bolt from existing mount plate. Existing mount plate bolts to the
crossmember and has a "leg" extending down to the rear bolt of the U-clamp
holding the steering rack to the front crossmember. P76 V8 engine mounts
are forward of the crossmember so fabricate new mounts which use the P76
mount rubbers and which bolt up to the crossmember and which have a "leg"
extending down to the front bolt of the U-clamp holding the steering rack
to the front crossmember. This also keeps the mount out of the way of the
exhaust. Pictures will follow shortly.
-
Radiator - if I'd stayed with the P76 timing cover I could've
tried my 2 core standard Cortina cross flow radiator to see whether it
had sufficient cooling capacity(ha!). However, since I switched to the
SD1 timing cover, both hoses want to go to the drivers side of the radiator.
This isn't a problem really as a 3 layer core (at least) radiator
should probably be used anyway. I had the tanks swapped over on my Cortina
radiator housing, a 3 layer core and a baffle plate fitted in the drivers
side tank between the top and bottom hose outlets. Water will circulate
from the top hose across the radiator and back again before leaving via
the bottom hose. Radiator hoses - after a lot of searching through a Repco
hose warehouse I've found that I can use the bottom hose from an EB Falcon
and the top hose from an HQ-HZ Holden with a 1.6l Escort thermostat housing
(needs slight rounding out of the bolt holes to fit the inlet). Both hoses
fit without cutting and both are easy to find because the models are popular
in AU.
My P76 4.4 Engine
-
Standard P76 block with 20 thou oversize bore - I'm not trying to
increase displacement here as that requires removal of the old cylinder
liners, boring the block, then pressing in new liners. Due to the fact
that there is not much metal around the liners on this block (in common
with the Buick 215 and early Rover 3.5 up to 1983) you could drop a cylinder
liner with potentially catastrophic results if you subject such an engine
to higher than normal revs - not for me but seems to be ok for others -
see here for example.
I reckon that if you want to increase bore safely then start with a different
block - 1983 and on Rover 3.5/3.9 or the newer Rover 4.0/4.6 have more
webbing and more metal around the liners. Standard block and bore is fine
for me because its cheap and it is going into a car that will weigh approx
1040kg with this engine so I don't need to rev it to get it going.
Mick Meaney (and others) also think that the P76 block is a really cheap
way of getting extra grunt (and it is if you price a new Rover big capacity
short block!). However, according to Mick, you should carefully check the
'cross webs' toward the rear of the lifter gallery: if the block is going
to crack then you will see it in this area first.
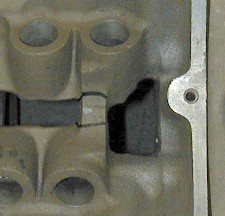 |
Mick Meaney's pic of a cracked web. The bolt hole and machined surface
on the right of the image is for the rear valley cover. Eeek! |
-
1964 Buick 300 heads? - I was going to use the 1964 Buick 300 heads
but these have a 54cc combustion chamber versus a 37cc standard head combustion
chamber. Whilst this isn't usually a problem (just buy higher compression
pistons), I already had a set of nice forged pistons with a 16cc dish (previous
owner of this block had these as part of his uncompleted project). Using
these pistons with the Buick 300 heads would have brought the static compression
ratio down to approx 8.25:1. I've since heard others say that the combustion
chambers can be welded up to reduce their volume but since the standard
heads were already reconditioned by the previous owner and the Buick 300
heads should really be fitted with larger valves to make them worthwhile,
I've decided not to use the Buick 300 heads for the moment and they are
awaiting some future project. The advantages of the Buick 300 heads over
the standard P76 heads are:
-
supposedly superior port design (especially the inlet)
-
size of the exhaust port outlets is larger by default
-
has larger inlet valve (41.2mm versus 38mm standard) by default and can
be easily modified for larger exhaust valves if required
-
uses Buick/Rover shaft mounted rocker gear (which will accept oiling via
hollow push rods so no need for oil passage drilling in P76 block) versus
cheaper stud mounted rocker.
-
Standard P76 heads with a few modifications?
-
Wilpower single plane 4 barrel inlet and Rochester 4GC carburettor from
a Buick 215 - Was going to use a Buick 300 dual plane inlet with some
spacer plates from John Harcourt in New Zealand. However Bill Laney's Wilpower
4 barrel inlet is made for the P76 - no spacers required. The Rochester
4GC carb from the Buick 215 has fairly small primaries (which I like because
overfuelling the engine is a big no no in my mind) but jets are fairly
easy to obtain and the carb is simple and was as cheap as when purchased
from the US: $40USD + postage with a reco kit included.

Left to right: standard P76 2 barrel inlet, Bill Laney's Wilpower inlet
manifold and the Buick 300 4 barrel inlet with spacer plates for P76 -
Thanks to Greg Williams for this photo!
NOTE: Other P76/Leyland people have commented on the strength
of Bill Laney's Wilpower inlet manifold: it is a good quality casting which
stands up well to port matching. I can also say that the lack of water
heating on the hotbox in the Wilpower makes absolutely no difference to
suburban driveability here in Tasmania! The car warms up quickly and I
have no problems with cold idle etc. Its a great manifold!
-
ARP main bearing cap studs and ARP rod bolts - overcomes another
weakness of the P76 block (in common with the Buick 215 and Rover 3.5 up
to 1983): crankshaft walk. The bolts on the bearing caps have a tendency
to come lose over time with the result that the crank 'walks around' and
the main bearing caps fret against the block - lots of expensive damage
to the block and anything else in the way when something lets go. Not nice.
ARP main bearing cap studs deal with this problem just fine. The new ARP
rod bolts are supposedly much stronger than any of the stock stuff so might
as well replace the old ones and do it properly.
-
Balanced crank, pistons+rods, flywheel and front pulley - seems
to make sense in any rebuild to me.
-
Rover SD1/SE/Van den Plas front cover and electronic distributor
- overcomes the problems associated with oil pump and worn out mechanical
distributor on standard P76 front cover. Introduces a few extra though
because of longer water pump shaft, water pump inlet on opposite side to
P76 waterpump and enormous viscous fan (too large for my engine bay anyway)
but these can be overcome.
More info has since arrived on the cause of the oil pump pressure losses
in the original P76 front cover and oil pump. From the experiences of Mick
Meaney: "The fluctuating oil pressure problem is, in my experience, down
to two likely causes - the standard cylindrical relief valve has a tendency
to cock or prop in the body and will momentarily stick. The pommies use
a teardrop come tadpole shaped valve which eliminates this problem [you
can see a picture of this in Hardcastle's book on pg. 125]. Other cause
is, because the standard oil pump is of a decent high volume capacity there
is a lot of oil passing thru it at higher revs and the gears can 'cavitate'
so that oil within the pump body gets thrashed and delivery from the pump
stalls. The fix is to mill or carefully die-grind two larger balance slots
into the pump end plate - about 5mm wide x 3mm deep seems to be adequate.
Any wear or grooving in the pump gear outer periphery or the pump body
obviously makes it worse and correct gear end float is a must."
-
Standard P76 4 Speed Borg-Warner single-rail - lots of people have
recommended using a Toyota Supra 5 speed instead but I've always like the
Borg-Warner single rail - seems tough and reliable. My only concern is
the strength of the P76 clutch - previous owners I have known seem to think
that it is a little too small for the job - shouldn;t be too bad for my
application. For a 10.5" Chev clutch and a 5 speed box, Mick Meaney suggests
using a Holden Commodore Borg-Warner T5. He has made up an adaptor for
this T5 to fit the P76 bellhousing pictured below. Flywheel obviously needs
to be redrilled as well.
 |
Mick Meaney's pic of a P76 bellhousing and T5 transmission with adaptor
plate mounted on the front. |
-
Other stuff:
-
Crane anti pump up lifters for Buick 300 (have hole for oiling the top
via hollow pushrods)
-
Mild (very nearly standard grind) new billet cam shaft - I like hi-torque,
low revs and low stress - specs can be seen
here
-
Crow double row roller timing chain set
-
Buick 300 side rear main oil seals
-
Standard rear main oil seal (which is still available from Repco Australia)
-
Ford clutch spigot bearing (not just a bush)
-
Standard valve springs
-
was going to use SD1/SE/Van den Plas alloy rocker covers to replace standard
P76 tin rocker covers, but these turned out to be too tall (interfered
with firewall, heater unit and brake booster) so I used powder coated standard
P76 tin rocker covers.
-
Rough performance comparison - Standard P76 with 2 barrel Stromberg
WW carb made 143kw (192 HP) @ 4250 RPM with 393Nm (285lb/ft) of torque
at 2500 RPM. The Ford 250-2V six, also with 2 barrel Stromberg WW carb,
made 127kw (170 HP) @ 4400 RPM with 338Nm (245 lb/ft) of torque at 2400
RPM. Given that the car has lost approx 40-50kg from the front end, it
is a lively little performer with understeer much reduced.
Brief History of the Leyland P76 4.4 V8 and how
it relates to the Buick/Rover 215/3.5 V8 and the Buick 300 V8
-
Buick 215 sold to Rover in 1963 apparently because of high production costs
(lots of blocks thrown away due to poor casting technology/metallurgy of
the time).
-
Buick 300 replaces Buick 215 in 1964 but has cast iron block and
for 1964 only the heads are aluminium and will fit Rover 3.5/Buick 215/P76
4.4 without modification. 1964 Buick 300 heads are considered superior
to Buick 215 and early Rover 3.5 heads because of larger exhaust port outlets
and ability to easily fit larger valves.
-
Buick 300 gets cast iron heads in 1965 which can still be made to fit the
Buick 215/Rover 3.5/P76 4.4 - but much more work required. See for example
here
.
-
Leyland Australia P76 gets raised (approx 17mm higher) and stroked Rover
3.5 block+crank with same pistons but longer rods and bigger main bearing
shells in 1973 - new capacity is 4.4 litres. Everything from Rover 3.5
except crank and rods can be used on the P76 4.4. P76 4.4 crank can be
used on the 3.5 as a stroker crank. See for example here.
By comparison, the stroked Rover engines (4.2 and 4.6) kept the same rods,
block height and bore as the 3.9 but reduced the piston crown height to
accomodate the extra stroke on the crankshaft. The Rover approach is superior
because you get the capacity increase without having to change the block
height, rod length, inlet manifold width and external dimensions as well
as the crankshaft.
-
Rover 3.5 gets more webbing and more metal around cylinder liners
in 1983 - result is known as the "stiff block".
-
Rover 3.5 "stiff block" gets bored out - 3.9 litre, and then stroked
- 4.2 litre. These blocks can be retrofitted with stuff from the 3.5 such
as the front cover, heads, inlet manifold etc. 4.2 would have different
crank and pistons to the 3.9 to provide increase in stroke & capacity.
-
More stroking and addition of cross bolts into the main caps results
in the 4.6. 4.0 is crossbolted 3.9 - apart from crossbolted main caps new
blocks are much the same as the "stiff block" and can still be be retrofitted
with old parts from the 3.5/3.9 such as heads, inlet manifold, front cover
etc. 4.6 would use different crank and pistons to the 4.0 to provide increase
in stroke and capacity.
-
Table showing comparisons between engines:
| Engine |
Bore x Stroke |
Capacity |
| Buick 215/Rover 3.5 |
88.9mm x 71mm (3.5" x 2.8") |
3528cc |
| Rover 3.9/Rover Crossbolted 4.0 |
94mm x 71mm (3.7" x 2.8") |
3950cc |
| Rover 4.2 |
94mm x 77mm (3.7" x 3.0") |
4278cc |
| Leyland Australia P76 4.4 |
88.9mm x 88.9mm (3.5" x 3.5") |
4416cc |
| Rover Crossbolted 4.6 |
94mm x 82mm (3.7" x 3.2") |
4554cc |
Check out: "Tuning Rover V8 Engines" by David Hardcastle, 1993 (J.H.Haynes
and Co. London)
-
Thanks to Mick Meaney for passing on his experiences + pictures! Also to
Simon Collins for taking the photos of the Cortina.
Any comments? Email them to me at p76cortina@yahoo.com.au


