Start with a new image 425/550 (pixels), transparent
background, 16 million colors
First we make the Bottom on the Basket.
note .. do not move anything unless the tutorial calls for it ..
let the selections set themselves into place.
Go to Selections, load from disk .. choose sher_basket_bottom.sel,
double click on it.
Choose your Flood fill tool (paint can) .. in your Tool Options
box, Blend mode Normal, Match mode Opacity, Tolerance 18, Opacity 100
Set your 2nd style palette to the Bronze gradient that you
downloaded. 1st, 3rd and 4th are off.
How to set your style palette .. Left
click and hold on the second palette under the color palette .. when a
small window pops up then you can let go and pick the second icon from
the left. That is the gradient icon. The first one Is paint, second
gradient, third image, and fourth is off or null. After clicking
on the gradient icon the little window will close. Now regular left
click on the palette and another window will open. You will see a
small push button, use it and find the gradient that says Sherrie Bronze
(a little hint, it's a bronze color:) .. click on it. Set the
Gradient to Linear Gradient (top right), Angle at 270, Repeats at 0
Click OK Now you need to turn off the other style palettes, do this the
same way you choose this gradient, left click and hold until you have a
small window pop up with 2 or 4 icons in it, the last one on the right
is off/null)
Set the Gradient to Linear Gradient
(top right), Angle at 270, Repeats at 0 Click OK
Right click into your selection in the
new image window.
You have this, much larger:)

Go to Effects, Noise, Add .. 7% uniform,
click OK
Go to Effects, Texture Effects, Straw-wall,
use these settings
Color 555555
Angle 100
Blur 40
Density 15
Length 14
Width 2
Transparency 0
Click OK
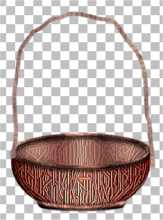
Now you have this

Go to Layers, add New Raster Layer with these settings
Name (doesn't matter
we are gong to merge)
Blend mode BURN
Opacity 43
The rest is default so click OK
Set you 1st style palette to the image that you downloaded, Sherries
Basket Weave. Scale 100%, Angel 0 .. click OK
Left click into your selection on the image.

Go to Layers, Merge, Merge Visible
SAVE!
CTRL D to deselect
Go to Layers, add New Raster Layer (default) Click OK
Go to Selections, Load from Disk, sher_basket_top.sel, double click
it
Left Click on the second style palette (bronze gradient) and set
the Repeats to 2, click OK and fill the the new selection with the gradient.

Go to Effects, Texture Effects, Straw-wall, Change the color to 2E2424,
Click OK
Go to Layer, add New Raster Layer, use these settings
Name (doesn't matter
we are gong to merge)
Blend mode Exclusion
Opacity 21
The rest is default so click OK
Your first style palette should be set to the Basket weave, so left
click in the selection now to place it.

Go to Layers, Merge, Merge visible
CRTL D to Deselect
SAVE !!
Go to Layers, add New Raster Layer (defaults)
Go to Selections, Load from Disk, and Double click on sher_basket_rim.sel
Click on the Second style palette (bronze gradient) and change the
Angle to 313, repeats 3, click OK
Right click inside the rim selection
Go to Effects, Texture Effects, Straw-wall, use the same settings,
click OK
Go to Effects, 3D, Inner Bevel, use the ROUND preset with these settings.
Width 7
Smoothness 56
Depth 20
Ambiance 0
Shininess 31
Color WHITE
Angle 310
Intensity 50
Elevation 30
Click OK
Go to Effects 3D, Drop Shadow .. Vert 4, Hori 0, Opacity 61, Blur
7, color Black, Click OK.

CTRL D to deselect
Go to Layers, add New Raster Layer (defaults) Click OK
Go to Selections, Load from Disk, Double click on sher_basket_seat.sel
Click on the second style palette and change the Angle to 228, Repeats
to 6, click OK and right click in the seat selection.
Go to Effects, Texture Effects and apply the Straw-wall that you
have been using.
Go to Effects, 3D, Inner bevel and change only the Angle to 34, click
OK
Go to Effects, 3D, Drop Shadow, and change the Vertical to -2 (minus
2) and Click OK

CRTL D to Deselect
GO to Layers, Merge, Merge visible
SAVE !!

HANDLE
Turn your second style palette off .. you will only be working
with the 1st palette.
Set your first style palette to the image that downloaded earlier
name Sherries Handle Weave .. Scale at 100%, Angle at 39, click OK
Add New Raster layer (default , and just so you know you will use
a new layer for EACH handle section)
Use your Draw tool (looks like a pencil drawing a curvy line) with
these settings, Freehand line, Width 7, solid line, Antialias Checked.
Draw a looped line from the left of the basket up to the top and
back down to the right side of the basket. It DOES NOT need to be
straight, it
should look natural.
Note .. Make sure that you keep both the starting
points and the ending points next to the basket. We are going to
"wrap" the edges and you don't want them extended way out to the side.
Like this
Go to Effects, Texture effects, Straw-wall and CHANGE the blur to
5, click OK
Go to Effects, 3D, Inner Bevel .. use these settings Soft Edge Preset,
Change the Width to 15 and the Depth to 28, click OK
Add new Raster layer , Use your draw tool and draw another handle
piece, when finished add the STRAW-WALL effect and the inner bevel ..
You need at least 5 pieces of the handle so add new layers, and effects
until you have what you like you can make more if you like.
SAVE !!!
This is mine with 5 pieces and a line width of 7

This is 10 pieces with a line of 5

Lets clean up the edges of the handle so we can save it here also.
Open your layer palette and click on the glasses to the right of the
bottom layer, this will put a big red X on it and the basket bottom will
not be seen in your image, Now right click on the top layer and choose
MERGE, MERGE VISIBLE .. click on the red again turn the bottom of the basket
back on.
Right click on the bottom layer and RENAME it Basket bottom
RIght click on the top layer and RENAME it Basket Handle
OK, Zoom in on the left hand side of the basket where the handle connects
to the top of the basket.
Use your Selection tool set to Rectangle, Feather at 0, Antialias checked.
Draw a small rectangle around the handle like I did.

Add new Raster Layer (default)
Fill with the same image that you used for the handle (use your Flood
fill tool, paint can) left click with the flood fill tool inside the selected
area.

Add the Straw_wall effect

Add the same inner bevel that you have been using.
Go to Effects, Texture effects, BLINDS, use these settings.
Width 4
Opacity 100
Color BLACK
Both Boxes CHECKED
Click OK

Go to Image, Rotate, Right, Free at 25, Click OK
Now use your mover tool and move this piece up just a little .. you
will see that you actually have two of them. It looks more wrapped
this way.

CTRL D to deselect.
Go to Edit, copy,
Edit, Paste as new layer
Image Mirror and use the mover tool to move it to the right side of
the basket.
Now, I needed to use my deform tool to make the right side just a little
smaller, so if you need to then choose your deform tool, and using the
side nodes and top nodes make it smaller so it looks wrapped. When
you have what you want them double click anywhere outside of the deformation
to set it.

GO to Layers, Merge, Merge visible
Now you can save your basket as a Tube to use again. Go to File,
Export, As tube. Put the name that you would like in the lower right
hand side, you do not need to put the extension on it, the program will
do that.
Now you have a tube of the original and you can still keep playing with
this one.
Go to Colors, Colorize, and set your Saturation to around 60, then keep
moving the Hue until you he a color that you like. If you click on
the small icon net to the eye then you can watch your basket change colors
as you change hues. I used a hue at 225 .. when you find a color
that you like then click OK
Side Ribbon
Layers, New Raster Layer (defaults)
Choose your Draw tool set to Freehand line, Width at 2, Line style Solid,
Antialias checked.
Click on the first style palette and find the Sherrie Satin Gold that
you downloaded earlier.
Set your second style button to Gradient, with the Sherries Easter Pastel,
set it at Linear Gradient (first icon on the top right side), Angle at
228, Repeats at 0, Click OK
Zoom in once to the right side of your basket where the handle meets
the bottom.
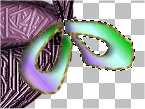
You are going to draw one side of the bow, starting where the Red X
is on this graphic. Draw around the outside down and around, do not
let up off the mouse, when you get back to the top then go around the inside
also, going down and around and back to the Red X .. now let up off the
Mouse.

GO to Selections, select all, selections/float, selections.defloat.
Layers, add new Raster layer
Effects, 3D, Cutout, use these settings
Vertical 2
Horizontal 6
Opacity 61
Blur 7
Color 202020
Click OK

Open your layer palette and click on the glasses on the bottom layer
to turn off the visibilty of the basket. Right click on the top layer
and choose merge, merge visible. Click on the Red X so you can see your
basket for the next step.
CTRL D to deselect
Add a new raster layer, use your draw tool again and draw another loop
for the bow.
Go to selections/select all, selections/float, selections/defloat.
Add new layer (defaults)
Go to Effects, 3D, cutout and use the same settings as before.
CTRL D to deselect
Open your layer palete and click on the glasses on the bottom layer
to turn off the visibilty of the basket. Also click on the glasses for
next layer up (the first loop of your bow) Now Right click on the top layer
and choose merge, merge visible. Click on the red X'x agian to turn them
back on.
Add a New Raster Layer (defaults)
Draw what will be your tie for the bow. Just down and over a little
and then back up.

Go to selections/select all, selections/float, selections/defloat.
Add new layer (defaults)
Go to Effects, 3D, cutout and use the same settings as before.
CTRL D to deselect
Open your layer palete and click on the glasses on the bottom 3 layers
to turn off the visibilty on them.Now Right click on the top layer and
choose merge, merge visible. Click on the red X'x agian to turn them back
on.
Add a New Raster Layer (defaults)
Draw what will be the second tie for the bow.

Go to selections/select all, selections/float, selections/defloat.
Add new layer (defaults)
Go to Effects, 3D, cutout and use the same settings as before.
Open your layer palete and click on the glasses on the bottom 4 layers
to turn off the visibilty on them.Now Right click on the top layer and
choose merge, merge visible. Click on the red X'x agian to turn them back
on.
CTRL D to deselect

Add a New Raster Layer (defaults)
Draw a small circle in the middle of the bow.
Go to selections/select all, selections/float, selections/defloat.
Add new layer (defaults)
Go to Effects, 3D, cutout and use the same settings as before.
Open your layer palete and click on the glasses for just the bottom
layer (basket) Now Right click on the top layer and choose merge, merge
visible. Click on the red X to turn on the basket Now you have two
layers, the basket and the bow..
CTRL D to deselect

Now right click on the top layer again (in the layer palette) and choose
duplicate. You may not see it but don't worry you will:)
Go to Image Mirror .. it SHOULD put the bow on the other side of the
basket.

There you have your basket, go to Layers, Merge, Merge visible and save
how you want to save it.