Kitchen Canister
Tutorial for Paint Shop Pro 7
This is what we will be making.

Scroll to near the bottom to see what else can be done.
You will need something to decorate your jar with.
I used these strawberries
but can not remember where I got them from:(
If they are yours and you would like credit then please
email
me and I will
give you credit or pull them off this site, which
ever you want.
#1 .. Open new image 200x400, 16 million, transparent
*As usual you may set your colors to what ever you like or you may
go by the tutorial the first time and then if you want, go wild and make
one that suits you.
#2 .. Set your foreground color to Light Blue (E2E4E8), Set your
background color to Blue (383FD0 .. 0 = ZERO not O) // Set your first styles
button to Paintbrush, the second one to Gradient foreground/background,
NO check mark the invert gradient box, turn the 3rd one & 4th one off,
put a CHECK MARK in the box that says Lock **** IF
you do not know how to use the styles buttons then please Scroll all the
way to the bottom of this page ****
#3 .. Use your selection tool  set to Rectangle, 0 feather, antialias UNchecked.
#4 .. Start at 50, 50 and holding
down your mouse button go to 150, 250 then lift up off your mouse button
(look for the numbers in bottom left hand corner of the PSP window you
will see them change as you move your mouse over the window that you are
working in)
4A
.. Change your selection tool to Ellipse, 0 feather, antialias UNchecked.
Hold down your Control key (Ctrl) and start at 100, 50 and go to 150, 65
.. let up off your mouse and then the keyboard key.
4b .. Now hold the
SHIFT key down and start at 100, 250 and go to 150, 265
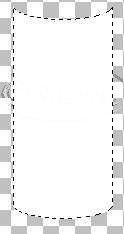
** You should have what looks like this ..
I filled it with white so you can see the shape .. yours will be nothing
but selection lines. **
#5 .. Click on your Flood Fill  (normal blend mode, RGB Value match mode, Tolerance is 100, Opacity is
100) Right click to fill the rectangle with your gradient.
(normal blend mode, RGB Value match mode, Tolerance is 100, Opacity is
100) Right click to fill the rectangle with your gradient.
#6 .. Go to Effects, Noise, Add .. use 5% and
Uniform, click OK

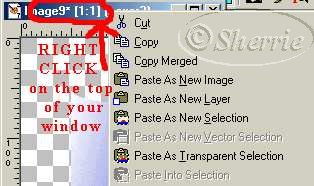
#7 .. Deselect (ctrl D) .. Right click on the top of your working
window, it will bring up another window and you will have several choices.
Choose copy, then right click again in the same area and choose Paste as
new layer. This is the only time that I will put these steps, from
here on out they will only be said as COPY and PASTE AS ... this is just
so much easier than going through all the other steps.
#8 .. After you have pasted as new layer, go to Image, flip, then
move that layer to the bottom .. this can be done two ways, either open
your layer palette and drag it below your first layer or go to Layers,
Arrange, Send to bottom.
#9 .. Use your mover tool  and move the BACK (layer 2) until it looks like you have a jar, with the
sides lined up.
and move the BACK (layer 2) until it looks like you have a jar, with the
sides lined up.
#10 .. open your layer palette  and take the color down on your jar. This is how mine is set ..

Bottom of jar
#1 .. Add new layer .. Switch your foreground and background colors
by clicking on the double arrow between them. 
#2 .. Use your selection tool set to Ellipse, 0 feather, antialias
CHECKED
#3 .. Start at 100, 250 go to 150, 265
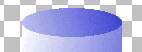
#4 .. Use your Flood fill can and left click in the Ellipse that
is the bottom of the jar.
#5 .. Go to Effects, 3D, inner bevel.
 Style is
pillow, color is white, Width at 7, Smoothness at 100, Depth at 100, Ambiance
at 4, Shininess at 6, Angle at 295, Intensity at 69, Elevation at 23 ..
Click OK.
Style is
pillow, color is white, Width at 7, Smoothness at 100, Depth at 100, Ambiance
at 4, Shininess at 6, Angle at 295, Intensity at 69, Elevation at 23 ..
Click OK.

#6 .. Deselect
#7 .. open your layers palette and turn off layer 1 (the front of
the jar)
#8 .. Highlight layer 2 .. right click on that highlighted area,
you will see a window that has merge, click it and then on merge visible.

Jar Top 
**Top and lid are easier to do if you zoom
in once to work**
#1 .. Add new Layer put it on Top in the layers palette
#2 .. Use your Pre shapes tool  set to Ellipse, Antialias CHECKED, retain style UNchecked, Create as vector
UNchecked, Line width at 4, Line style is #1 solid.
set to Ellipse, Antialias CHECKED, retain style UNchecked, Create as vector
UNchecked, Line width at 4, Line style is #1 solid.
#3 .. Turn off the 2nd styles button 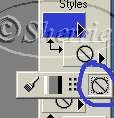
#3 .. Start at 47,32 got to 153, 68 .. DO NOT move it after you lay
it it down.
#4 .. Use your selection tool set to Rectangle, 0 feather, antialias
Unchecked.
#5 .. Start at 40,50 go to 158, 25 .. what you are doing is selecting
the top half of the dark blue ring, but you MIDDLE messuments MUST be right.
It will look like this.

#6 .. Now hit COPY, Then hit delete. Then deselect.
#7 .. Do paste as new layer, Leave it on top right now. (if you are
working zoomed in you may not be able to see it, bu if you scroll down
you should see it)
#8 .. Use your mover tool to select the part of the Blue ring that
is left on top. Move it down just a little

#9 .. Use the mover tool and move the part that you cut off and copy
and pasted as a new layer up to the top again .. match it up completely
with the front of it. Like this.

#10 .. Open your layer palette and move layer 3 (back of blue ring)
to the bottom.

** the top of the jar now looks like this it will look like your
ring goes all the way around the jar.**
#11 .. In your layers palette turn off the back/bottom and the back
ring (merged & L3) layers. Highlight the front of the jar (L1)
and right click on that highlight and merge, merge visible.
#12 .. Turn that layer off and turn back on the ones you had off,
then merge them together.
#13 .. Turn your front merged layer back on highlight it, right click
on the highlight, rename it Jar front. DO the same with the other
merged layer, right click it and rename it Jar Back.
Lid 
#1 .. Switch your foreground and background colors by clicking
the double arrow between the colors above the color palette.
this will put the Light blue back on the left and Bark Blue on the right.
#2 .. Turn off your the #1 style tool under the color palette. 
#3 .. Turn your 2nd styles button back on to Gradient 
#4 .. Add new layer, put it on Top.
#5 .. Use your pre shape tool
set to Ellipse, antialias CHECKED, Line width doesn't matter. Line
style 1 solid.
#6 .. Start at 48, 34 and go to 152, 67 .
#7 .. Go to Effects, Noise, Add, 7% and uniform, click OK
 #8 .. Go
to Effects, 3D, Inner bevel. Use these settings. Preset Pillow, Width
22, Smoothness 52, Depth 18, Ambiance -42 (MINUS 42), Shininess 10, Color
WHITE, Angle 323, Intensity 50, Elevation 59. Click OK
#8 .. Go
to Effects, 3D, Inner bevel. Use these settings. Preset Pillow, Width
22, Smoothness 52, Depth 18, Ambiance -42 (MINUS 42), Shininess 10, Color
WHITE, Angle 323, Intensity 50, Elevation 59. Click OK
#9 .. Add new layer (it should be on top, it not then move it there)
#10 .. With you pre shape tool set to Ellipse, antialias CHECKED,
line width doesn't matter. Hold down your shift key and start at
80, 5 go to 120, 45 .. let up off the mouse key and the keyboard.
#11 .. Go to Effects, Noise, Add .. 7%/Uniform, Click OK
#12 .. Go to Effects, 3D, Inner Bevel, same settings as above (they
should still be there) ONLY change the angle to 309, click OK

#13 .. If you are not working zoomed in then zoom in now. You
want to be able to see this area.

#14 .. Use your Retouch tool  In your tools options box 1st page, choose Shape round, Size 6, Hardness
0, Opacity 100, Step 25, Density 100. On the second page
In your tools options box 1st page, choose Shape round, Size 6, Hardness
0, Opacity 100, Step 25, Density 100. On the second page  Use the pull down window and choose Smudge.
#14A .. You are going to smudge
from the ball to the lid, making a shadow that comes from the left and
ends on the right. Do it in small steps so that you can use ctrl Z (undo)
if you need to.

#15 .. Turn off the visibility on the jar (front and back) and Merge
the lid top and ball together, then rename it Lid. Turn your jar
(front and back) back on.

#16 .. Highlight the Jar front in your layer palette.
#17 .. Use the Magic wand  Tolerance set to 40, feather at 0 sample merged UNchecked. Touch
the Blue band the is around the top of your jar.
Tolerance set to 40, feather at 0 sample merged UNchecked. Touch
the Blue band the is around the top of your jar.
#18 .. Go to selections, modify, contract 1, click OK
#19 .. Go to Effects, 3D, Drop Shadow, V/H at 1, Opacity at 78, Blur
at 4.9, Color is HTML color 404040 (4 zero)
Decorating the Jar
#1 .. Highlight the Jar front in your Layers palette.
#2 .. Copy what you are going to use to decorate the jar and paste
it as new selection on to your jar. You may use tubes or what ever
you like to decorate it.
**Here I have taken a tube (ashamed to say that I can not remember
where I got it from) to decorate the front and then I took one and filled
the jar with candy strawberries.
** If you fill the jar make sure you put the "filling" between the
Jar front and Jar back layers.

After you have finished decorating your jar then go to layers, merge,
merge visible. Save how ever you like, or make a counter top to sit
it on:)
More that I made


Graphic made by Dee
This area is only for those that do not know how to use the
Styles Buttons and how to set them for this tutorial.
 ) ) |
** to set your colors and styles .. with your
mouse left click on the left colored button on top (circled in RED) ..
in this box  put the HTML color code (E3E4E8). Click OK. Now left click
on the right button (circled in green) and do the same thing .. put the
HTML color code 383FD0 in the HTML color box.
put the HTML color code (E3E4E8). Click OK. Now left click
on the right button (circled in green) and do the same thing .. put the
HTML color code 383FD0 in the HTML color box.
Now click on the arrow on the 1st Styles box under the color pallete
(circled in blue). You will see this  click on the paintbrush.
Now click on the arrow (circled in orange)on the 2nd Styles button
and choose the Gradient button 
Now click on each arrow on the 3rd and 4th styles button and click
on the button on the right to turn them off .. the button looks like the
one the black arrow is pointing to in the picture on the left. It's
called "null"
 Now
left click where you see the ORANGE X in the picture on the left, this
will open a new window and you will see this (larger) Click on the
top button on the right. Put the number 105 in the box for ANGLE
and 0 (zero) in the box that says REPEATS, put a check mark in the Invert
gradient box. Now left click where you see the red on the long push
bar (where the arrow is in this picture. Now
left click where you see the ORANGE X in the picture on the left, this
will open a new window and you will see this (larger) Click on the
top button on the right. Put the number 105 in the box for ANGLE
and 0 (zero) in the box that says REPEATS, put a check mark in the Invert
gradient box. Now left click where you see the red on the long push
bar (where the arrow is in this picture.
 Now you
see this (larger) .. each picture is named something, the one that we will
be using should be your first one (circled in red here) FOREGROUND/BACKGROUND
(if you roll your cursor over each picture you can see what they are named)
Click on the one that says foreground/background, make sure there is no
check mark in the "invert gradient" box, then click OK on the first window. Now you
see this (larger) .. each picture is named something, the one that we will
be using should be your first one (circled in red here) FOREGROUND/BACKGROUND
(if you roll your cursor over each picture you can see what they are named)
Click on the one that says foreground/background, make sure there is no
check mark in the "invert gradient" box, then click OK on the first window.
Now put a CHECK MARK in the box that says Lock .. that way when you
change tools your settings will be still be there.
That's it:) your styles are set for at least the first part
of the tutorial and you know at least what each one does:) Now you
can go back and start at #3. |
This tutorial is Copyright © 2000, 2001 by Sherrie all
rights reserved
it may not be copied or reposted in any way without express
written permission of Sherrie.


