There are several large graphics here so you can see the area zoomed in, so please let the page load.

 |
This tutorial came to light after being ask
by Cynthia how I color the line art that is set to one of the groups that
I belong to .. So Cynthia this one is for you:) In order for me to
write it I had to have a graphic that was nothing but line art. I
don't have any kids here so I had no coloring books, and most line art
on the web is copyrighted, so I need to make my own. The idea came
from Betty
also known as BestBetWins
.. So thank you Betty for giving me a way to show how to color inside the
lines:) Betty also is a pretty good spell checker:) ROFL:)
The basics of this tutorial can be used for any outlined image. !!! TIP FOR BEGINNERS !!!
|
|
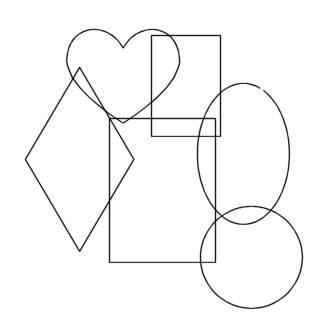
This tutorial will show one method to take those line art images that we seem to get as WET's as turn them into something that we can color or fill with an image for a great effect. I have made a break in the line of this graphic so you can see one way of fixing it. The breaks seem to be the largest complaint when working with a line graphic and trying to select an area. You may use your own line art, or a line art
that your group
After saving to your computer then bring it up in Paint Shop Pro. Also bring up the graphics that you will be using to fill with, you can minimize then until you are ready to use them. |
Right click and save to your computer |
The first thing you want to do is make a duplicate so you don't lose the original graphic* So use SHIFT D on your keyboard to make a duplicate
(you may close or minimize the first Original one now)You need to make sure that it is also 16 million colors .. most effects will not work if it's not.
* So go to COLORS (at the top of your PSP window)
Scroll down to INCREASE COLOR and when you click on it they should all be grayed
out, if not then click on 16 million colors.Now we need to make it so we can get rid of all the white areas
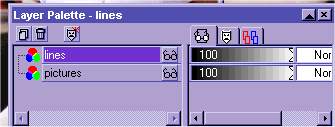
* Open your Layer Palette
When you look in your Layer Palette window it will say "background" for the graphic you are looking at .. now look on the right side of that. If it is grayed out, then you need to still do one more step before you can work on your line image.
* Right click on the "Background" layer (right where it says background) choose DUPLICATE. Now you see two layers, One say Background, one says Copy of Background. Right click on the one that says Background (it's the grayed out one and should be on the bottom) Choose Delete. Now your line image is ready to use.
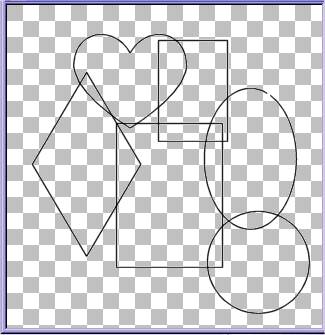
Lets get rid of all the white so we can see only the outlines on a transparent background.
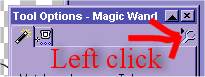
* Choose your Magic Wand and open your Tool Options window
Set the tolerance to 10 (this may be a little high or low if you are working on your own graphic so adjust if necessary but try at 10 first) Feather is at 0* Click on a large area of white in the graphic then go to Selections (top of the PSP window) choose MODIFY, then SELECT SIMILAR. This will grab all of that color.
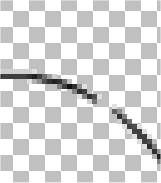
NOTE .. if you are working on a different graphic than this one and it does not pick up all of the color you are trying to delete, then go back to your Tool Options window and go up A LITTLE with the tolerance. I usually go up 5 at a time and then adjust from there)* Hit Delete on your keyboard .. now you should have nothing but the outline and the transparent background.
Now we need to check for breaks in the line .. there IS one in this graphic so I could show how to fix it:)
Using your magic wand touch the inside (transparent areas) and see if it grabs more than it should. You only want to grab the area inside each of these shapes nothing on the outside.
NOTE .. if you are using your own graphic then just touch a few of the open areas and watch what happens to the graphic. If it doesn't grab more than the areas you are wanting to fill then don't worry about it right now and you can come back to "Filling the Lines" step if you need to later.
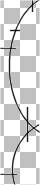
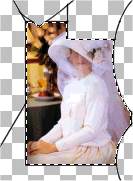
Did you find the broken line in this graphic? It's on the Ellipse on the top right side. FILLING THE BROKEN LINES
So lets fix it. Zoom into the area that needs to be repaired. Go to View and choose zoom in by 5 .. this will make it very large, but you will be able to see the area better. Use the sliders on the side and bottom of the window to find the area that needs to be fixed.
* Open your Tools Option window. Choose your PAINT BRUSH toolIn your Tools Option box set the Shape to round, size is 1, Hardness is 9, Opacity 47, step 25, and Density at 80 .. Build up brush is UN checked. Your Foreground color is BLACK for this line art (you may need to use a different color if yours is not black)
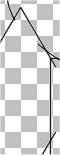
* Start at the broken point on one end of the line .. and paint to the other end .. DO NOT keep your mouse held down the whole time, because if you need to undo then you will undo all of it. It should only take a couple strokes to fix the line. Remember .. if it doesn't look the way you want it to then CTRL Z to undo it. The race on a WET or Challenge is not to see who can get it done the fastest. So take your time and fix things that need to be fixed, the more the practice, the faster you will get.When you are done go to View again and choose Normal View.
SAVE !!!
Taking out portions of the graphic
Now you could use your magic wand and start filling the inside areas with color but lets go one step farther with this graphic and this will help in other graphics too. Lets take out some of the lines so we can make this graphic into a frame collage. You can take out any of the EXCESS parts that you want but in the graphic below you will see which ones I will be taking out so I make the shapes into solid frames. This same method can be used for any line art graphic so you can fill with color or images when finished. I have circled in red which line I will be taking out. You may take out which ever lines you want in your image.
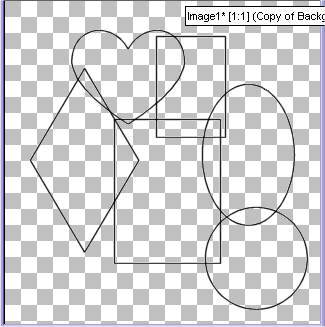
#1 Before 
#2 Erasing large portions of the lines that
we want out of the graphic.To take out the large sections of the lines that you want gone
* Open your Tool Options window and choose your ERASER tool.
Set it to these options (these settings are for this graphic, you may have to adjust the size if a graphic you are working on has smaller areas or skip to the "Freehand cleanup" section of this tutorial)
Shape Round
Size 10
Hardness 100
Opacity 100
Step 14
Density 100
Build up brush UNcheckedNow use your eraser to take out ONLY the large portions of what you want out of the graphic, do it slow and in steps, do not try and take out the whole line in one mouse click because if you make a mistake and have to undo then you will undo all of what you di in that mouse click. Hold down your mouse and take out portions just till it leaves a line at the connecting line.
Examples
Now we clean it up ..
* Open your Tool Options window and choose your FREEHAND TOOL
use these settings
Selection type is POINT TO POINT
Feather 0
Antialias CHECKED
Now, I NEVER use the Precise cursor except for this step .. it just gives me more control as I can see the lines better through the mouse cursor.
* Click on the second icon on the top LEFT side of the Tool Options WIndow and choose USE PRECISE CURSORS (when you are done you can uncheck it or keep it, the choice is yours:)Zoom into the work area, I zoomed in by 5, then used the slider bars on the image window to navigate around the area so I could see what needed to be deleted.
You want to start inside of the area you are working it, click then take the cursor over to the first line you are going to delete. Try and get as close to the connecting line as possible but DO NOT touch it, click to lay that line down (NOTE, because we have the freehand set to antialias it will grow into your lines, that is fine as it will give it a nice even look.) Now move your mouse to go THROUGH the line you are going to delete and out the other side of it, click, then go back toward the first line you laid down .. when you are close and not in danger of crossing any lines .. then double click to have the selection set .. if it looks good hit DELETE on the keyboard. Do this with each line that needs to be taken out .. if you make a mistake then use CTRL Z to undo that step.
I made my example with RED lines so you can see where to start and each click spot:)When you are done and you do not want the Precise cursor any longer then click on the second icon at the top of the Tool Options window and click on the check mark to deselect it.
**All done? Right click anywhere in the graphic to deselect the last area done.
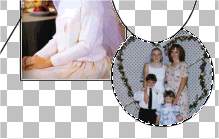
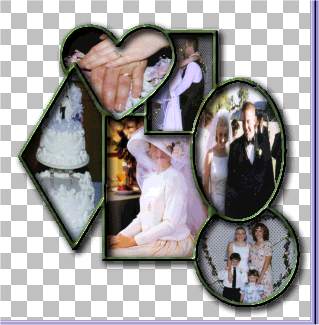
After you have finished taking out all the lines that you want gone you will have something like this.

SAVE !!!
Remember those graphics you picked a lot earlier to fill your image with? Well it's finally time to use one. Alrighty Then:) Were ready to fill this puppy:)
* Go to Layers, ADD NEW RASTER LAYER, name it PICTURES and hit the OK button
* Go to Layers, ARRANGE, SEND LAYER TO BOTTOM (you won't see anything happen but it did.
* Open your Layer palette and lock it open, because you are going to switch between layers. If the palette closes when you move your mouse back to your image then you need to lock it by clicking on that little arrow in the top right hand corner, the arrow not the x:) If it doesn't close when you move back to your image then you already have it locked and you don't need to worry about it.
* Right click on the Layer that says copy of background and choose rename, type in Lines and go back to your image.
* Go back to your graphic that you have chosen to fill with.
* Go to Edit, Copy
* Go back to your Frame image
* Use your Magic Wand, in the Tool Options window set the tolerance to 0, feather to 0. (make sure your LINES layer is highlighted in your layer palette, if not then highlight it)
* Touch your mouse on the inside transparent area of the first "frame" that you want to fill with your graphic.
Note! .. if you are filling another picture then touch the inside of the area you want to fill with your paint or your graphic.* Now highlight the PICTURES layer in your layer palette
* Go to Selections, MODIFY, EXPAND 1, click OK
* Go to Edit, Paste, Paste INTO selection .. now you have your picture in the frame that your want (or your color if you are coloring an area of an image)
You can close the image that you used for this frame if you like now and open the graphic you will use for the next frame.
* Go to your next graphic that you have chosen to fill with.
* Go to Edit, Copy
* Go back to your Frame image
* HIGHLIGHT LINES in your layer palette (just remember, you want to have lines highlighted when choosing the inside of an area)
* Use your Magic Wand, in the Tool Options window set the tolerance to 0, feather to 0.
* Touch your mouse on the inside transparent area of the first "frame" that you want to fill with your graphic.
* Now highlight the PICTURES layer in your layer palette (Before you lay in any picture you want to make sure you are on the picture layer or when it is time to make the frame you will not like what you have done)
* Go to Selections, MODIFY, EXPAND 1, click OK
* Go to Edit, Paste, Paste INTO selection .. now you have your 2nd picture in the frame that your want
Follow these steps until you have all the frames filled
You can close the image that you used for this frame if you like now and open the graphic you will use for the next frame.
* Go to your next graphic that you have chosen to fill with.
* Go to Edit, Copy
* Go back to your Frame image
* HIGHLIGHT LINES in your layer palette (just remember, you want to have lines highlighted when choosing the inside of an area)
* Use your Magic Wand, in the Tool Options window set the tolerance to 0, feather to 0.
* Touch your mouse on the inside transparent area of the first "frame" that you want to fill with your graphic.
* Now highlight the PICTURES layer in your layer palette (Before you lay in any picture you want to make sure you are on the picture layer or when it is time to make the frame you will not like what you have done)
* Go to Selections, MODIFY, EXPAND 1, click OK
* Go to Edit, Paste, Paste INTO selection ..
begin again:) until you have all frames filled.* CTRL D to deselect when finished
* Highlight your LINES layer in the layer palette
* Go to Selections, SELECT ALL
* Go to Selections, FLOAT
* Go to Selections, DEFLOAT
Now you have a marquee around all of your lines,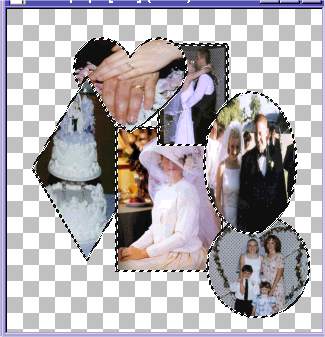
* Go to Selections, EXPAND 1 click OK
* Layers, ADD new Raster layer, just click Ok because we will merge in just a couple of steps)
SET YOUR FOREGROUND COLOR TO WHITE and use your FLOOD fill tool to fill your selection
PSP7 ... left click and hold on the second button under your color palette, these are called style palettes. When the little window with 4 icons pops up, choose the first one on the left, that is the PAINT button. Now click on it again and when the large window opens choose WHITE (bottom right hand corner) click OK Left click and hold on the 3rd and 4th buttons and choose the right side icon, that is the OFF/NULL icon.
PSP6 ... Click on the bottom color button that you see under your color palette, when the large window opens choose WHITE (bottom right hand corner) click OK PSP 6 and 7
Now open your TOOL Options windowand set it to
fill style SOLID, (psp6)
blend NORMAL,
paper NONE, (psp6)
match RGB,
Tolerance 100,
Opacity 100.
SAMPLE MERGED UNchecked (Thank you Patti:)(if you use Blade Pro or a special filter you can use it here:)
* Go to
PSP6 Image, Effects, Sculpture use any of the preset you like by using the top middle menu.
PSP7 Effects, Texture Effects, Sculpture use any of the preset you like by using the top middle menu.
I used the JADE preset.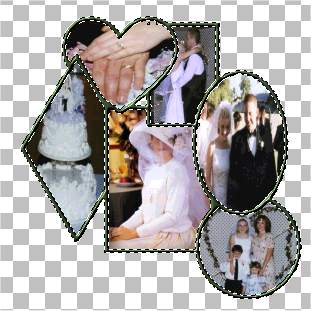
* Go to
PSP6 Image, Effects, Drop Shadow
PSP7 Effects, 3D, Drop Shadow
Vertical 3
Horizontal 3
Opacity 85
Blur 10
Click OK* apply the same drop shadow again if you like to give it a little more definition.
CTRL D to deselect
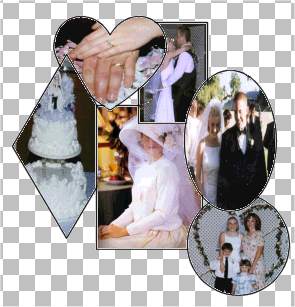
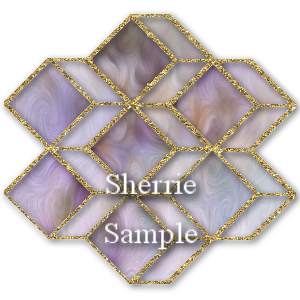
Using the Jade Preset in PSP
Using a Blade Pro preset

Go to Layers, Merge, Merge visible and save how you want to save your graphic.

Using graphics to PASTE INTO Selection |

|

Using paint and image to fill with |
Using a graphic to PASTE INTO Selection |
Graphic made by Dee
 |
 |
 |
 |
 |
 |
 |
 |
 |
This tutorial is Copyright © 2001 by Sherrie all rights
reserved
it may not be copied or reposted in any way without express
written permission of Sherrie.