In this tutorial you will use the Deformation tool and Layers ..
don't cringe .. they are not that scary:)
!! SAVE OFTEN !!

We will be using two main tools for this. The Flood fill tool which will lay the color for our shadow, and the Deformation tool which like the name says, will deform the shadow.
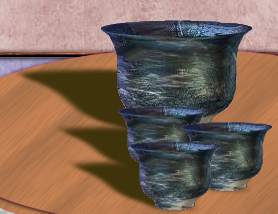
This is the bowl that we will practice with. Download the PSP format here. ZIP FILE. Open winzip and double click it to bring it up in Paint Shop Pro.
When you open the zipped file you will see that I have already made a wall, a table, and the bowl.* Using your Keyboard, hold down the SHIFT key while pressing the 'D' key .. this will make an exact duplicate of the psp image (layers included) that you downloaded. Now close the original window so you don't lose it and can practice more with it if you need too.

* Open your Layers palette by clicking on the Layers Tool ...

Now you see should see this
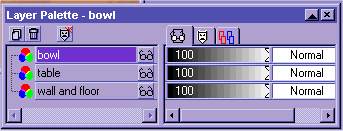
As you can see I have already named the layers. I keep my layer palette open at all times, if you would like to do the same then press on the little arrow in the top right hand corner. You want the arrow pointing up. If the palette gets in your way then you can click the X in the right hand top corner and it will close. When you want it open again then choose the Layers Tool like you did earlier.
* Set your Background color to BLACK
PSP7 ... left click and hold on the second button under your color palette, these are called style palettes. When the little window with 4 icons pops up, choose the first one on the left, that is the PAINT button. Now click on it again and when the large window opens choose BLACK (top right hand corner) click OK Left click and hold on the 3rd and 4th buttons and choose the right side icon, that is the OFF/NULL icon.
Place a check mark in the LOCK box under the 4th style palette. This will keep your styles set the way you set them right now.
PSP6 ... Click on the bottom color button that you see under your color palette, when the large window opens choose BLACK (top right hand corner) click OK PSP 6 and 7
Now open your TOOL Options windowand set it to
fill style SOLID, (psp6)
blend NORMAL,
paper NONE, (psp6)
match RGB,
Tolerance 100,
Opacity 100.
SAMPLE MERGED UNchecked (Thank you Patti:)
* In your layers palette make sure the layer that is named bowl is highlighted, if it's not then click on it to highlight that layer and make it the ACTIVE layer.* Go to SELECTIONS (on the top of the PSP window) click it and choose SELECT ALL (you will see a marquee around your image now)
* Go to SELECTIONS again and choose FLOAT (it is near the bottom, and now you will see the marquee around your bowl)
* Go to SELECTIONS again and choose DEFLOAT (near the bottom, you didn't see much happen but it did;)
NOTE .. the keyboard short cut this is .. CTRL A, CTRL F, then SHIFT/CTRL F .. I keep my thumb on the CTRL key then hit A, then F, then I put my little finger on the shift key and hit F .. a very fast and effective way to do the selection. Also note that using this method will not leave jogged edges like using the wand does. So when you can then you should use the selections methods rather than the magic wand.* Now highlight the TABLE layer in the layer palette to make it the ACTIVE layer
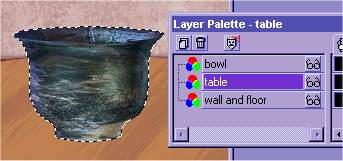
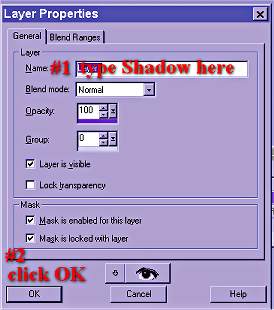
* Go to LAYERS (on top of the PSP window) click on it, then choose ADD NEW RASTER LAYER, when your new window comes up name it shadow. Leave every else the same for now.
now your layer palette looks like this .. you will notice that your shadow is between the table and the bowl. When you add a layer for the shadow just remember that you want to place the "new shadow layer" ON TOP of the item you are placing the shadow on. If we were placing it on the WALL then we would have placed the new layer on top of the wall layer.

* Go to SELECTIONS, choose MODIFY, EXPAND by 3
* Go to SELECTIONS again and choose MODIFY, FEATHER by 8
now you notice that you marquee has expanded around your bowl

* Click on your FLOOD FILL tool
and fill the selection with black.
You should have this now

* CTRL D to deselect your shadow.
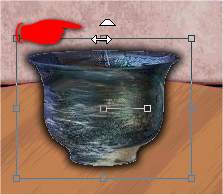
* Choose your Deformation tool
.. when you choose it you will see a box around your shadow.
Like this

* Hold down the CTRL key on the keyboard .. with it held down pass your mouse over the little node that is on the top line in the middle of the deform box
* Keeping the CTRL key held down slid your mouse to the left .. slide it far enough that the shadow goes over the edge of the table (you can do it how ever you want later, but for this practice take it past the table edge)
it will look like this

* When you let go of the mouse you will have this (EXCEPT the deform window will still be around your shadow)

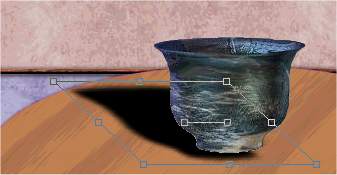
* Now Let up off the CTRL key and using the same node that you slid the shadow over with, pull down towards the middle of your image. Watch the top left side of the shadow, as it lays on the table only then let up off the mouse button.
You have this
* Move your mouse (unclicked) to around the center of the shadow, left click and move the shadow to just under the bowls bottom .. you should not see any shadow in front of the bowl.
*** You may need to move the right side middle node to the left a little just to take away some of the shadow that may show on the right side of the bowl
You should have this now

* When you have the shadow where you think it looks right then double click outside of the deforming box.
You have this

Look at your layer palette .. see the slider bars on the right hand side?

* Use your mouse and slider the "TRANSPARENCY" bar to the left, watch your image shadow and stop when you have a nice transparent shadow .. I stopped at 38.
That's it ..

Save it how you want to save if you want to, or close it, bring up the orginal graphic, SHIFT D to make a duplicate and do it again, this time make the shadow different and play with it.
Now you know how to make a perspective shadow .. practice, you would be surprised at what you can do to a graphic by using this method.
I made this with lots of pictures and detailed discriptions of what need to be done .. but the main things to remember are:
New layer
expand
feather
fill with your shadow color
deform
Graphic made by Dee
This tutorial is Copyright © 2001 by Sherrie all rights reserved
it may not be copied or reposted in any way without express written permission of Sherrie.