Make Mosaic Text here


Make Mosaic Text here
This tutorial will show you how to do just one special effect in Paint
Shop pro, and will only show you one way to use it .. but as you can see
from the welcome graphic and the separator bars .. there are MANY ways
to use it:)
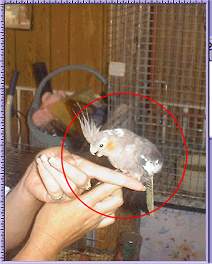
 You may right click and save this graphic to your hard drive if you would like to use it. After saving it then open it in Paint Shop Pro. |

(Just for information, this is Olivia. She was 13 years old when
she passed away. I know she passed away at a young age.
She had
had a respiratory problem all of her life and it finally became to
much)
* After opening the graphic you are going to use then Use the shift key on your keyboard and while holding it down also use the D key .. this will make an exact duplicate of your graphic or picture in a new window. Now close your original graphic.Vertical 9* Now go to COLORS and near the bottom choose INCREASE colors .. make sure that it is set for 16 million colors .. if they are ALL grayed out then you are fine, just click out of it. If 16 million colors is a choice, then choose it.
* Choose your SELECTION TOOL
.. Now Open your TOOL OPTIONS
window and use the drop down window .. find CIRCLE and highlight it then click it. Set your Feather option to 0 and Antialias is checked.
* Look at your graphic, choose a focal point. Place your mouse pointer in the middle of your "focus point and chile clicking and holding, drag your circle down until you have the area selected that you want.
I have used red paint to show the area that I am selecting. The picture also has been made smaller for faster loading

* Go to Selections, Choose INVERT .. Now you will see a marquee around the outside of your graphic and around the circle that you just added.
* GO TO
PSP6 .. Image, Effects, Mosaic Glass and use the settings that follow
PSP7 .. Effects, Texture Effects, Mosaic Glass and use the settings that followUse these settings :THE FIRST thing that I do when using an effect that I have not used is to set it so that I can see the effect on the graphic as I change settings. SO if you want to do the same then follow me.
If you want it left on all the time (which is what I do) then click the button that the red arrow points to. If you only want it on "this" time to see what the effect does to to the picture then click on the button that the green arrow points to.
PSP6 Users all you need to do is check mark the AUTO PROOF box on the effects window:)
Number of Columns 33
Number or Rows 33
Symmetric is checked
Glass Curvature 50
Edge 3
Grout width 1
Grout opacity 70
CLICK OK* GO TO
PSP6 .. Image, Effects, Mosaic Antique and use the settings that follow
PSP7 .. Effects, Texture Effects, Mosaic Antique and use the settings that follow
Number of Columns 40
Number or Rows 40
Symmetric is checked
Tile Opacity 100
Grout Width 3
Grout opacity 60
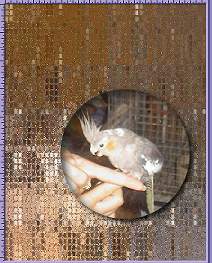
CLICK OKNow you have this but bigger than mine:)

* Go to SELECTIONS .. INVERT .. now your Marquee is around only your "focal point" again
* Go to SELECTIONS .. FLOAT .. if you do not do this then you will cut out your focal point in the next step.
* GO TO
PSP6 .. Image, Effects, Cutout .. and use the settings that follow
PSP7 .. Effects, 3D, Cutout.. and use the settings that follow
Shadow color is Black for this picture, if you have a VERY light picture then you might want to change the shadow color to a dark gray or light gray. Fill Interior with color is UNchecked.
CLICK OK* GO TO
PSP6 .. Image, Effects, Drop Shadow .. and use the settings that follow
PSP7 .. Effects, 3D, Drop Shadow.. and use the settings that follow
Vertical 5
Horizontal 5
Opacity 85
Blur 15
Click OKCTRL D to deselect the area.
Now you have this

Now we add a little boarder just so when you send your graphic into your group it doesn't look funny:)
* Go to SELECTIONS, SELECT ALL
* Go to SELECTIONS, MODIFY, CONTRACT .. in the little window that pops up put in 10, click OK (now you see how the marquee has moved in on your graphic)
* Go to Selection, INVERT .. Now you see the marquee around what will be the border around the out side of the graphic.
* Go to Image, Mirror
* Go to Image, Flip
This will give the border a little definition from the graphic.
* GO TO
PSP6 .. Image, Effects, Inner Bevel .. and use the settings that follow
PSP7 .. Effects, 3D, Inner Bevel.. and use the settings that follow
Use the TOP drop down menu and find Soft Edge click on it
Change the Depth to 10
Click OK* GO TO
PSP6 .. Image, Effects, Drop Shadow ..
PSP7 .. Effects, 3D, Drop Shadow ..
Both PSP 6 & 7 use the same settings as you last used.Go to Drop Shadow again and Change the Vertical and Horizontal to -2 (minus2) Click OK
CTRL D to deselect and save ..
Graphic made by Dee
 |
 |
 |
 |
 |
 |
 |
 |
 |
This tutorial is Copyright © 2001 by Sherrie all rights
reserved
it may not be copied or reposted in any way without express
written permission of Sherrie.