
I finally finished drawing the design on the dome.
Here is yet another dome design I'm trying. Styrofoam was difficult to work with, it melted, it was hard to cut, hard to keep even. I wanted a perfect or near perfect dome. I looked into the Odyssey system, but couldn't find the size I needed. I wanted it to be about 13"-14" in diameter, round shape. Odyssey didn't have what I needed, they're expensive anyway, and I didn't want to spend that kind of money.
I used a rubber ball I got from Toys-R-Us. It only cost a couple of bucks. The important thing was, it had to be even, and round. A lot of the balls there were funny shapes. A lot of them had a funny bounce. To test the ball, first I spun it in the air, that showed me if there was any wobble in the ball; those went back in the in. Then I found a few I liked, I did the bounce test. Basically I bounced it, if it bounced straight up, it was in. I wanted to find a ball of a solid color, but since it was more important to be round I chose whatever color that fit my requirements.
I chose a ball because I wanted to be able to easily remove it. If you read about the fish lamp (Aphrodite's Treasure), I had to destroy the mold, to remove it. That was a real pain, and I could have damaged the project. With this system I can simply pop the ball out. And if it still doesn't budge, I can slash the ball open.
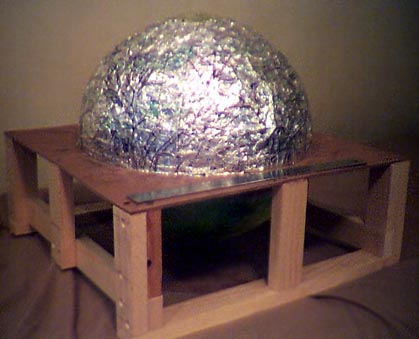
The ball is covered in plastic wrap. I don't want to hurt the ball, I want to simply remove the tape, and pop off the plastic. The ball itself is suspended in Masonite. I cut a hole slightly smaller then the ball, and shoved the ball in. It was very important that the ball was at the right height, and I had the proper centering. I taped and glued the ball in place. The sides are there to keep the mold standing, though it also serves as a very rough model as to what the lamp will look like when done.
I then covered the ball in packing tape. This will allow me to draw on the mold, (plastic wrap can be hard to write on.) I found the center points and drew lines. I also marked where the arches are going to go. I then decided that if there was a drip through, it would pop the ball. So I covered the surface with aluminium foil. I used spray glue to keep it down. I covered that with more tape.
The scene is basically a sunset with trees in the foreground. The trees will connect with the windows below the dome. The windows were designed first for the placement of the tree's on the dome. The tree's I wanted were Serengetti like trees, hard to explain. They look like sticks with some fluffy greenery at the top. I couldn't find any good pictures to work from. Off and on I looked for that tree (while designing other parts of the lamp). Never did find it, I drew it freehand. The sunset itself will be orange at the bottom, and fading to white at the top.
I spread tacky wax over the whole thing. Hopefully this will allow the glass to stick long enough, for me to work with. The tape makes it a little lumpy to work on. But the ball allows me to squish the pieces in place. As I cut I'm tacking the pieces in place, using a soldering gun.
At the end I will have to destroy the design to get the glass out. I couldn't make a hard copy of the project, it was too hard to transfer to the paper. So instead I'm tracing small segments on to a plastic sheet. And working them from there. It will be slow, but it will get done. At the end I'm hoping that I'll have a ball to play with.
11-28-98 - I was hoping that I would have this page uploaded before I got started. At this date I have roughly half of the glass cut out for the main dome.
So far the only problems I've had is the glass I chose. I chose Kokomo orange/white opalescent. I thought I had enough orange to go all the way around the base of the dome. As Murphy's law states, I didn't. Instead of putting the dark orange all the way around the base, I had to fade it on one side.
But it's for the best, now it looks like a sunrise coming up from one side to the other.
11-28-98 - Using the ball isn't working as well as I thought it would. I can push the piece in more, but it bounces back up. The result is a slightly bumpier shape then I wanted. I figure by the time it's soldered it will look ok. To help give it a better illusion, the arch (struts?), on the surface of the dome will help break up any possible unevenness.
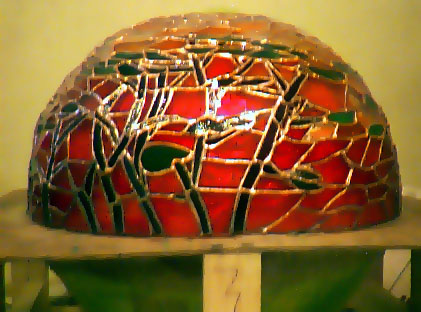
1-26-99 - The main dome is done. I encountered only a few problems, not enough glass, etc.
Somehow I managed to be about 45 pieces ahead. I gained a few lost a few. I actually cut the pieces out very well (better then any other projects). But some of the pieces still fell short of the pattern line. After thinking about it I think I know what happened. I used clear plastic to transfer my design. The plastic must have moved slightly. Parts of the sunset came out a little shorter then the pattern called for. It's ok, since I can make up for it with the next piece. If I re-cut the mis-cut piece, the colors may not have blended as well.
The other reason why I think the pieces shifted was due to the tape overlay on the mold. I covered the entire ball with layers of tape, plastic wrap, and tin foil. The tape stiffened it up, but at the same time it bunched up a little, and moved around a little. This was the most apparent at the top. I was supposed to have a 4" diameter opening at the top of the lamp (for heat and light to escape). But somehow I ended up with a 3-1/2" x 4" oval. If anything, at least it's smaller, it should be fairly easy to hide, and there isn't any way for anyone to easily see it. I'll figure out something.
I didn't want to have any gaps (if I could help it). Towards the end I was cutting out some of the trees and found that I had a huge gap. It was right next to a sunset piece and I couldn't fill it with a another sunset piece, which would look strange. So this is what I did: I made extra branches, I chose a part of the glass where the highlight different, lighter or darker. You see if I simply "tucked" in the tree over to fill the gap, the trunk wouldn't match to the piece below it. But an extra branch will blend in ok. Thinking of continuity, I couldn't have a single branch coming out from no where. So I had to continue that branch outward, making more pieces. But the end result is very nice. Gaps, are ugly and waste of solder, and the solder would have dripped though making it very difficult to put a bead over it.
I tacked as I cut pieces out. I did about 20-50 pieces in each sitting (avg. 2-3 hours). Covering an area about that's about the size of my palm. I used a soldering gun to tack the pieces in. To hold the glass temporarily I used tacky wax. The stuff is messy, and a bit disgusting, and doesn't hold the glass very well. But it holds the glass long enough to tack the glass on. I used a soldering gun this time around (learning my lesson, I burned out my last iron by constantly turning it on and off, in 5 minute rounds). But even using a gun, I still managed to burn out 2 tips and 1 homemade tip. I finally broke down and got a Weller soldering gun. It's a little shaky, and a bit clumsy, and not very comfortable, but it does it's job.
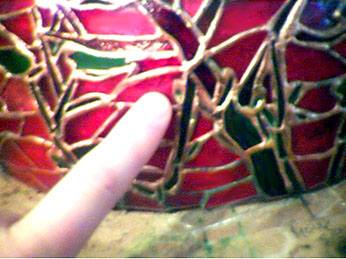
Soldering this thing was a real pain. It was big, heavy and hard to handle. Each joint needed a bead, and each joint or area to work in, was only a few inches wide. And because the unit was a square I couldn't balance it on it's corners. So I had to sit down and put this thing on my lap. I've done this before (Heart of Atlantis), but this was very large. And I had to be careful not to bump into the bottom of the ball, or the whole shade could have popped off. It took a while, nearly 10 hours to solder it. Also it was very difficult to solder a few of the joints, mainly the joints that were next to tiny pieces of glass, like the leaves that attach to the vines. By the way those leave are no larger then a grain of rice, smaller in fact.
One of the large problems I encountered was that my iron died in the middle of the project. No way to see that one! I beaded about 75% of it, and then it simply died. I didn't want to wash the thing off. Why? The mold is partly Masonite, and I feared that it would fall apart when the water soaked in. So for 2 weeks I waited for Ungar to send me my replacement (luckily it was still in it's 1 year warrantee). Of course after two weeks the lamp was quite corroded. I had to really scrub it down before finishing it off. After washing it off, I found out that the wood didn't really mind getting wet after all. Oh well, something to remember.
The beads of solder went on ok, but I was worried that the patina wouldn't stick. I planned to use Jax, because of it's amazing ability to stay coppery for so long. I scrubbed the lamp with everything, soap, baking soda, steel wool, etc. I got it pretty clean. I applied the patina, and of course, it didn't take. Though I did know if it could somehow let it soak on the solder it would turn copper. So this is what I did: I took a paper towel (ripped in half), and soaked it in patina. I sucked the patina up in an eye dropper, then carefully squirted it out on the paper towel. I then let the towel sit on the surface while the patina did it's magic. I let it sit in each area for about 2 minutes, poking it with a stipple brush every here and there. It worked! everything now has a fairly even coat of copper on it.
The dome came out better then I thought, originally I didn't think it would be a perfect dome. But it did come better then I thought, there are a few spots here and there where the glass is a little lower then the rest, but it still blends.
I hate polishing things, and this was large and my hands were tired. it took over an hour to polish it up, hopefully it will stay shinny for a very long time, at least as long as it takes to put the whole thing together.


Home | About Me | Aliens | Foil | Miscellaneous | Shop | Projects | Tips | Shopping List | Links | Awards

Started on 11-28-98