This is actually pretty neat. For the record I am in no way an expert in fusing. I have a Quickfire 6 kiln. The quickfire 6 looks like a big marshmellow. They also have the Quickfire 4 which looks like a slighlty smaller marshmellow. Either way, it's not a very advanced looking piece of equipment. I have a small guage (pyrometer), to give me my reading (though I can't be sure that the temperatures I give you, are going to be accurate). I heard that the pyrometer, can be off by quite a bit. So when I give you a temperature, I'll also try to give you a physical description. Sorry I can't give you a picture of what it looks like inside the kiln while it's on. My camera would melt if I tried, and my friend Tony the midget says he wouldn't step inside in one of those things, even if he was paid a million dollars; which is too bad because he does own that heat proof camera. Which really makes you think why he bought it in the first place, doesn't it?
I think it all started when I made the blue antique car. I needed to slump the rear windshield. After finding a suitable material for the project, I thought about other uses I can use with this new idea. I played around with kiln wash, seeing if it would take an impression. I found it did take an impression, but it was hard to keep defined. Kiln wash as you know is a very fine and loose powder. With one breeze, it falls apart (after all it's still a pile of powder. In any case, the experiment was a success. I used a piece of double strength window glass, and a dragon fly for the shape. The dragonfly was there, in the glass; as you can see in the picture below:
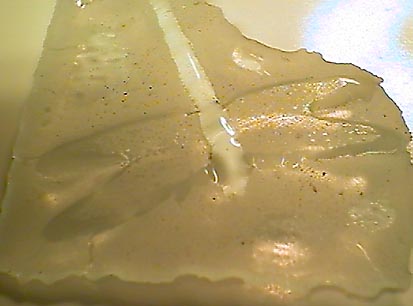
As you can see, the first try wasn't the greatest in the world. But you can definitely see a dragonfly shape in the surface. The kiln wash has one side effect though, it's grainy. The surface is gritty, after all the kiln wash is grit. The glass picks them all up - it find it like a baby finding small rocks to put in his mouth....mmmmmm rocks. As a result of that, the background glass has a frosty look to it. Almost a sandblasted effect. The overall detail didn't work as well either. As the glass got hotter, it drooped inside the mold; but because the mold was a powder, a lot of it shifted. As a result the detail wasn't as fine as I would have liked it to be.
Possible applications could include box tops. The look of the glass has a fossilized look. However if you want it smoother, then you need Hydrocal. Hydrocal sets up pretty quickly, and the surface can become very smooth if you wanted it. The material is baby powder fine. I found that Hydrocal can withstand heat of up to 2000 degrees. But it can only be used once, after a firing it falls apart. Which is just as well, because it can be difficult to remove the glass sometimes.
If you know of another material I can try let me know. I'm on a hunt to find the perfect material. The perfect material, would need to take a fingerprint fine impression, and still survive 1800 plus degrees. But more importantly, I would like it to be able to survive more then one firing.
Glass filigree is exactly how it sounds. I take ordinary brass filigree, make a mold, and make glass filigree. To make these you need the following:
Just so you know, to make these takes at least 2 days. 1 day for the Hydrocal to dry, another day to let the kiln cool.
To start off find a suitable tray to hold the Hydrocal in. Because of the size of my kiln I have to set up a dam on a piece of marble. I use clay to setup a square about 5" x 5" square, maybe a little bigger. I've also used small trays, that were the right size. But since you most likely won't have what I have, the alternative works. Just be sure to keep the clay as smooth as possible, otherwise some may get trapped, and later on burn.
Find the filigree you want to use. I found that filigree with not much depth, with fine detail works the best. Things with a lot of lumps, don't work as well. I have some pictures of things that works pretty well. If your going to try this, make a test piece first, and try all the filigree you have.

Above we see a piece of glass about 5" square. It's black Bullseye, matt rainbow iridescent. I found that Bullseye works the best. Iridescent shows the detail the best. I tried an assortment of goodies here. The butterflies, dragonflies, swan, and bow tie worked the best in this experiment. Unfortunately, there wasn't enough glass for the whole thing. As the glass gets hot, it seeps into piles (like Odo in Deep Space 9, or that metal cop in terminator 2). That's one theory anyway, the other, is that the deeper impressions caused trapped steam, and the glass simply popped. I may never know. In the future, I will put extra glass on top.
This was mainly an experiment, you'll also notice the drips on the sides. But in either case, this was my first experiment with Hydrocal. I think the result speak for themselves. It was fairly successful, and it allowed me to open up a new area for glass decorations.
Anyway, getting back on track. Find the release you want to use. If you don't use any, God help you... Actually I don't know what will happen exactly. Never tried it, my guess is that it everything stick on like glue - you don't want that, by the way.
Spray some on the filigree - make sure the filigree is clean, and that the lines are clearly visible. Spray some on the mold your going to use.
Mix the Hydrocal with some water. It's not scientific, just mix a little water and mix it up. I use a rubber bowl, a large paper cup will also work. You'll want to mix up enough so that it is about a 1/2" deep when it fills the mold. It doesn't need to be any deeper. A 1/2" deep is enough that it shouldn't crack in the middle of a heating cycle. Sometimes I find that if the mold is too thin, it cracks as the glass seeps in. What you get is a crack like extension in the middle of the glass filigree.
Pour the Hydrocal in the mold, the consistency should be like melted ice cream. Ice cream, not ice milk, which turns back into water when heated. Spread out the goo in the mold. Use the vibrator against the mold, or marble, or whatever you used. Little bubbles will come out. There is a time limit, Hydrocal set's up pretty quickly. I think it's about 5 minutes, before you can't shove anything into the material. Though this varies, depending how much water you use. Vibrate it long enough so there aren't too many bubbles surfacing.
The vibrating step is important. It allows the Hydrocal to seep where it needs to be. But more importantly, it prevents bubbles in the middle of your work.
It's important that the white glop isn't too loose. Otherwise the elements will sink to the bottom. The material should peak a bit if you were to dip something in it. I havn't done this for a while, so you'll have to play around with it.
Place the filigree face down, and slowly, gently, and carefully shove the filigree in the material. The depth of detail is up to you. I usually sink it until the highest part is level with the surface of the Hydrocal. BE CAREFUL not to shove it in any further, or you may never get it out again. Don't vibrate the mold when the filigree is in it, or they will sink. Do this for all the pieces. Don't touch it for at least a day. Hydrocal has a catalyst in it, and it does get warm to the touch as it dries. It's very important to let it dry completely. There can't be any water left inside, it could explode inside the kiln, and I'm pretty sure you don't want that!
After it's dried, your ready to remove the thingies. Be very careful, if you rush it, you'll screw it up big time. The filigree has to be removed carefully. If a little bit of material needs to be removed, then remove it. Butterflies are the worst to remove, because the wings are far beneath the surface.
Just keep picking at it until you can remove the filigree. Then remove the mold, carefully flex it (like an ice cube tray, or a balloon animal). Or do anything you can to remove it, without breaking it.

This is an example of what one section looks like after it's done. There are a few chips, but it's on the outside, and wouldn't effect the final result, as much.


This is an extreme close up of the items shown above. Note how well the Hydrocal picks up on the fine detail.
Now that the molds are ready, your ready for the next step. The glass: I found that iridescent works the best. I've only used a few types of glass in my tests. Currently I found that Bullseye glass works best, I think it's just better suited for the higher temps. Each filigree indentation should have it's own piece of glass. Try not to let the glass touch another piece of glass. If it does, the glass may transfer to the other piece, and you may gain or lose glass from the melting process.
Place the molded Hydrocal (removed from it's form), on the kilns shelf. Oh yeah, make sure that the mold has no extra powder in it, and that the glass is clean. Turn the kiln on, and let it bake. I have no ability for soak or ramp times, just a basic temp check. Usually I start looking at the temperature when it's at around 1000 degrees. I usually remove it at around 1400 to 1600 or so degrees. Just to make sure the glass settles down I leave the cover on, not flashing it. I bet if I let it soak at a lower temerature, for a while, it would look even better. Inside the kiln the glass will have a slightly sunken in look in the middle. The edges usually moves in, and looks a bit jagged.
Let the kiln cool and remove the pieces from the mold. With any luck you'll have an acceptable design indented in the glass.
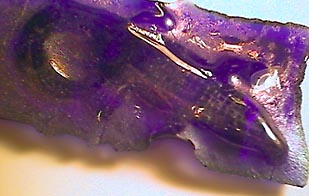
The alligator, pictured above, didn't have a thin design, it was on the bulky side. The glass used was Armstrong cathedral, blue iridescent. Most of the iridescent burned away. Apparently Armstrong's iridescent won't burn away if there's pressure on that side. Anyway, that filigree failed, and probably won't be used again.
Now that you have your shape, it needs to be cut out. (Note - the edges are very sharp, use a grinder first to knock those edges off). This is where the band saw comes in. It's needed, you can't cut this with a glass cutter. The ringsaw works the best. It's not just because it can cut in any direction. It's because you can spin the glass in any direction that you need it to go in. A normal blade would twist if you tried that.
So far most of my tries make the glass pretty thick. The only way to thin it is to use a beveler, or the Twin Spin's wheel and grind it flat. However, I'd like the current legnth of fingers. The light may not pass through these, and they are difficult to foil due to the thickness. But it's worth it, now you can make your own jewels. It's more suitable for boxes and such. They may even look nice in a mosiac.

To the left you'll see a shell I made. The shell was brass, but a normal shell should work too. The shell is slightly messed up. You can see the obvious one, not enough glass at the bottom. But on the upper left you can see where a crack developed in the mold. It's not terrible, but it's there.
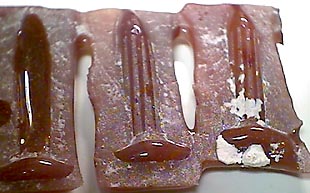
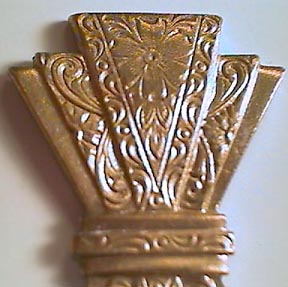
This came out pretty neat. It was for Sky City. I wanted an old column look. I found fluted dowels, and some neat looking nails. Above is the try with the nails. The mold wasn't deep enough, which is another reason for the 1/2" thickness for the mold. The nail's head touched the base of the mold. So the nail sat at an angle, and this was the result. It looks neat doesn't it? Kind of like a lost city emerging from the sand. You can still see some of the Hydrocal that I never bothered to remove. By the way, you can remove the extra Hydrocal by soaking it in water.
What other applications can you use these things on? See below for at least one idea. I'm sure I'll have more later on.
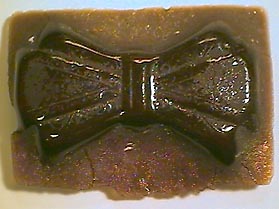
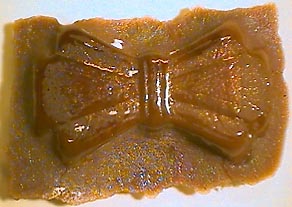
I made wall sconces from the filigree below. The bow tie filigree has a neat design in it, and the glass loves it.
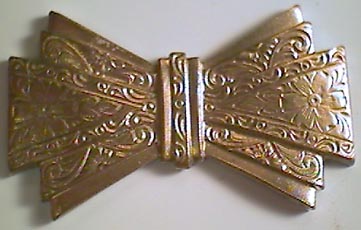
Above shows the part of the bow tie I used, and what the result looks like. What made it difficult for Sky City, was where I cut it. I didn't split it down the middle, I left the band in the center, and cut just slightly below it. I only had a few pieces of filigree. Which meant that I could only make and cut a few at a time.
Many of the batches didn't come out right. One thing or another ruined the batch. Here are some examples of bad sconces:

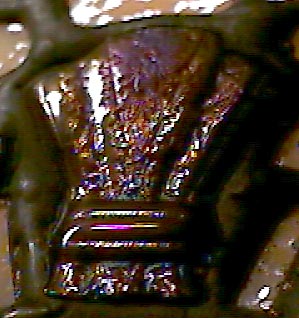
This one was the right color, and it does have it's irridescents, but it lacks the detail I wanted.
This one has gritty detail.
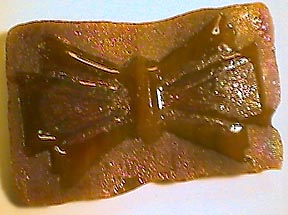
This one is the wrong color. It was from the same glass, Root beer Bullseye, but it must of had some streaks of another color in it, which apparently gives it a color shift. It also lost a lot of detail.
The color is still wrong, but has better detail.

Back to Tips and Observations Index


Home | About Me | Aliens | Foil | Miscellaneous | Shop | Projects | Shopping List | Links | Awards

Started on 9-12-99Also don't vibrate the goo when the filigree is in it, or they will sink.Also don't vibrate the goo when the filigree is in it, or they will sink.