
What is solder reclamation? Normally I use 50/50 to fill in the gaps. 50/50 isn't all that expensive, but if I can save money, that's good right? I collect all the solder scraps that I have, left over ends, blobs, balls, splats, all the stuff you would normally throw away. I also look for solder at garage sales. For example, pictured above, there is bar solder (50/50) meant for casting weights, along with other rolls of solder. Solid core solder should be used, 50/50 is best. These are also a few spools of Stearine core solder, which I found out later that I shouldn't have used for some reason. Solder can be found at these sales, ranging in the price of 50 cents to a dollar. Usually, however, the solder isn't pretty looking, it can actually be pretty scuzzy looking, but that's ok.
You'll need a propane torch, and spark lighter, to light, hold the cup over the torches nozzle for a second or two. Then squeeze the handle to create the spark. The cup fills with the gas, and it will light faster. The cup should be pointed toward the floor, I once saw someone light an Oxy-Acetylene torch with the cup pointed towards his face; one big flash, singed his eye-brows, it was pretty funny. The torch should be set to low when lighting, otherwise the force of the gas will extinguish the flame. Turn up the flame some when melting the solder. Remember, when pointing the torch down, the flame will get bigger as a result. Also keep in mind what's above the torch when you set it down in the table.
Also needed:

These are the ladles I use. The big one on left works best. The one on the right has a small separator on it, it's to keep the slag from getting into the solder. That one broke as soon as I tried it, so long for that theory. The main ladle is made of iron, and is heavy duty, it holds about 8oz of solder.
![]()

I find these at the occasional garage sale, fishing stores should have it. This is a fishing weight maker (if you couldn't figure it out). I have another one, it makes chubby weights, I like this one because the finished result is much thinner, which makes it easier to melt and hold onto afterwards.
![]()
This is what scrap solder looks like. Odd experiments, bit's from here and there, repair projects with it's melted solder, sweepings etc. There is crust on some of the solder, corrosion on others, a little bit of dirt, wood, and glass mixed in as well. The lump in the center of the bowl, is body solder, it was removed after I took the picture. Body solder is mostly lead (5/95), and is meant to be smeared, I haven't found a good reason to use it on anything yet.
Not pictured are the rolls of solder that had too much crust on it to use. Crust on the outside of the solder get's into your bead and makes it, well, yucky. Patina doesn't stick well, nor can you get a smooth bead. Plus it takes longer to heat up then clean solder. I melted probably several pounds of a solder for this session.
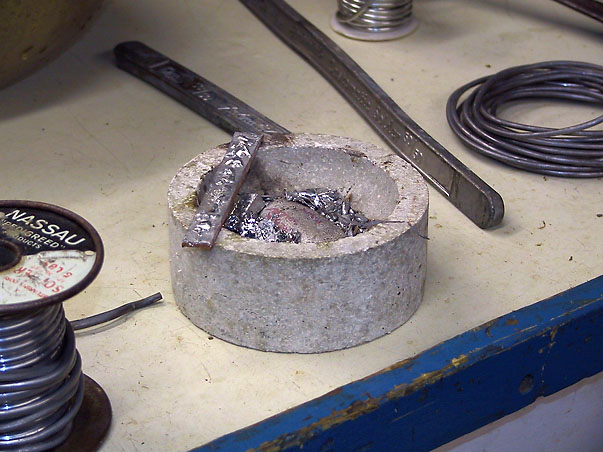
I couldn't take pictures while I worked so I'll have to explain it instead. Start by removing the non solder from the bowl, the big chunks (like wood or glass). Pour the solder scrap into the ladle. The ingot maker should be closed tightly, I use a spring clamp to hold it together (on the handles of the mold). Light up the torch and melt the contents in the ladle. The solder melts best if you simply point the flame (the blue cone within the flame), right at the solder. It takes about 30 seconds to get it liquid hot (looks like mercury). Carefully move the ladle around (when heating, I leave it in the bowl, to save killing my arm). You want to make sure the solder is completely melted. A clean wire can help mix the solder a little.
The first thing you'll notice is that it is shiny, it should look like this. If the solder is really dirty or scummy (a lot of paste flux was used for example), the surface will look gray and scummy. A good portion of the junk should be stay at the bottom.
Next, pour the solder in the mold. The mold has sprue holes at the top, this is where you pour the solder. The mold should be level and upright. When you think the solder is hot enough, pour it slowly into the opening of the mold. I found placing the flame into the pouring stream of solder keeps the solder hot enough that it doesn't freeze up to soon. After you pour the first mold (there are usually 4 - different sizes). If there's any solder left, re-heat the solder and pour the next one. After the solder has run out, you'll see a black crummy substance, this is the junk. Dump the junk into the water. It's not necessary to dunk the ladle, it will only take longer to heat up for the next batch and you might have spattering.
It takes a few moments for the ingots to cool. I wait about 30 seconds, sometimes squirting a little bit of water in to rush it. Open the cast maker, and let the still hot weights fall into the water. Use the pliers to remove them. Now they are cool to the touch. Get your cutting plier and remove the sprue (the part that looks like an ice cream cone - the sprue is a funnel and you filled in the funnel with solder).
These scraps can be re-melted, along with the next batch. My next batch used rolls of solder, I pulled off about 8", and wrapped it around 2 fingers. About 3 of these rolls will fit easily into my ladle. I try to add enough solder to make several weights at once. I also try to make the small weights first, then the large ones. If I run out of solder mid way through, I re-melt the last weight (if it's only half competed).
Rosin core, Stearine core, should not be used due to it's disgusting factor, and it's apparently fairly flammable. I still have no idea what Stearine is used for, I have about 12 pounds of it, got, of course, at a garage sale. It bubbled, hissed, smoked, then caught fire. I won't ever use this again.
Re-melting solder so many times can reduce it's quality. I think the tin is being burned away, and as a result the solder starts becoming very pasty. I will sometimes add a bit of 60/40 or 95/5 to the batch, to add more tin.

All the work, about 2 hours or so, results in this. A pile of shiny solder ingots ready for use. The ones that look like fish still have their sprue cones on, I didn't bother cutting those off. It's better if they are off though, they tend to get in the way when you melt them. It doesn't look like a lot, but each one is a different size, and largest ones are 4 oz a piece.
![]()

This is the junk left over that was either covering the solder or mixed in with it. This get's thrown away. If the solder doesn't come out shiny like you saw in the picture above, re-melt it, cast it again, because it may still have some of this stuff in it. When pouring, only the shiny solder goes in, these crumbs are left behind. When casting lead, this is called Slag, and when casting gold, it's called Dross.
![]()

Everything is now set and done. I place the finished units back in the box (where I'll keep collecting more solder for the future). When I make a project, I'll pull a few of these out. The hemostats hold them in place, these thinner ingots are easier to hold, then my older thicker ones.
What is really neat about using the fishing weights as an ingots is when I make a project, I can more accurately tell how much solder I used. Or exactly how much I have left.
A few other tips:

Back to Tips and Observations Index


Home | About Me | Aliens | Foil | Miscellaneous | Shop | Projects | Shopping List | Links | Awards

Started on 9-22-98